Snipping Tool for Mac: How to Screenshot Effortlessly [2024]
Even though the Snipping Tool is a Windows item, all Macs come with their own version of the Snipping Tool that allows you to effortlessly capture clean and sharp screenshots. All you need to do is press “Command + Shift + 4” simultaneously. It’s that simple.
In this article, we will delve into everything you should know when using a snipping tool for Mac.
Table of Contents
Snipping Tool For Mac
When it comes to using the snipping tool there is no one-serve-all method. Instead, the built-in snipping tool allows Mac users to pretty much capture their screen however they want. From full-screen screenshots to specific areas, the only thing you need is the right key combination.
Here are a few different methods to capture your screen when using the built-in snipping tool for Mac:
1. Capture Your Entire Screen (⌘ + Shift + 3)
If you want to get a full-screen screenshot of your Mac, simply use the combination “Comand + Shift + 3” and your entire main window will be screenshotted. Once it’s captured, your image will appear as a small thumbnail in the lower right corner of your screen.

You can also edit your screenshot in the Preview tab with options like crop, text interaction, etc.
2. Capture a Specific Portion (⌘ + Shift + 4)
For those of you looking to capture an Instagram post or a meme, this keyboard shortcut will come in handy. Here’s a quick rundown to capture specific areas of your Mac:
- Simply press Command + Shift + 4.
- A crosshair will show up on your screen.
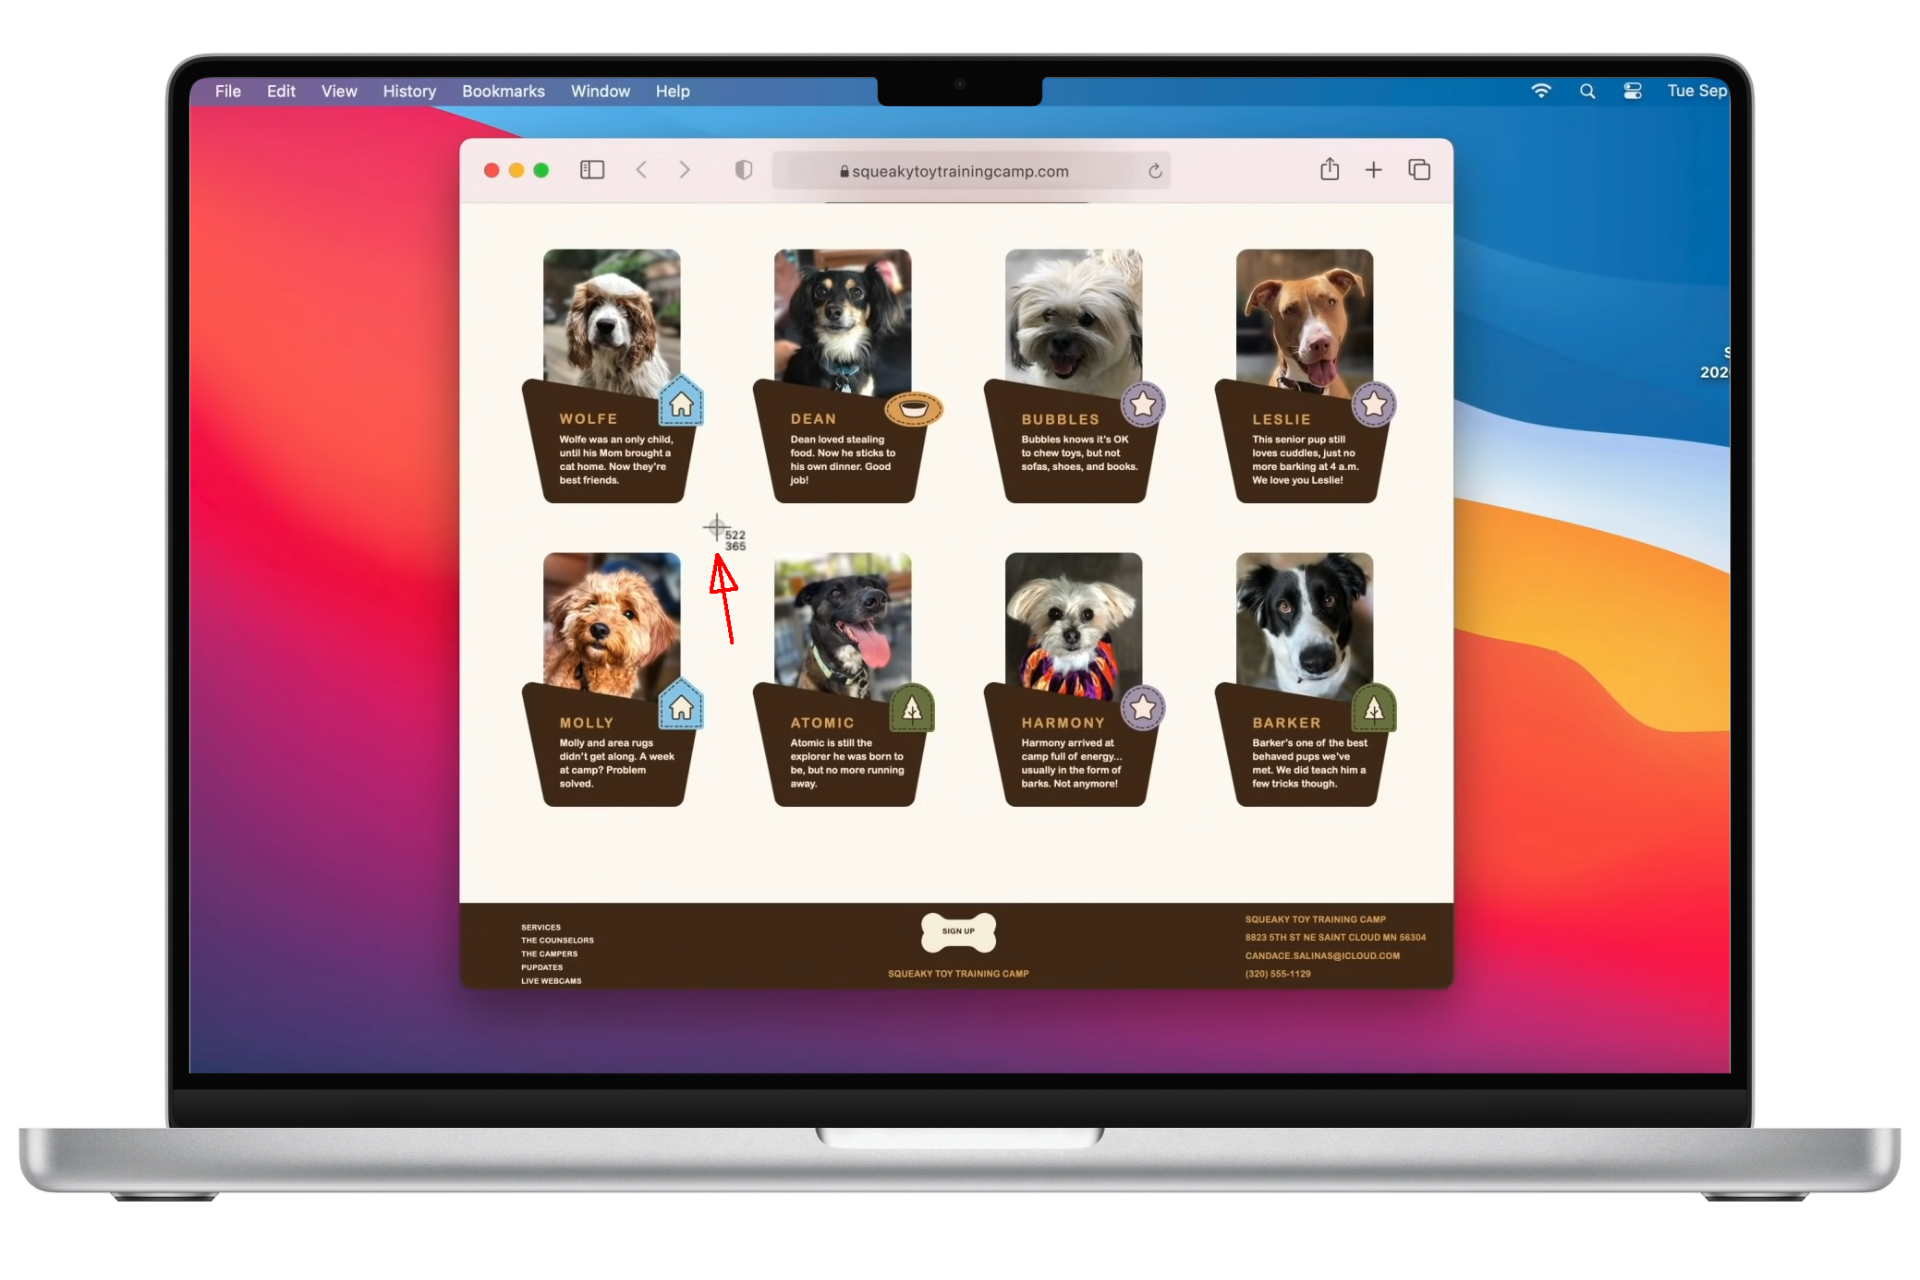
Crosshair should look like this - From here, move the crosshair to cut whatever portion you want in the snip using your mouse.
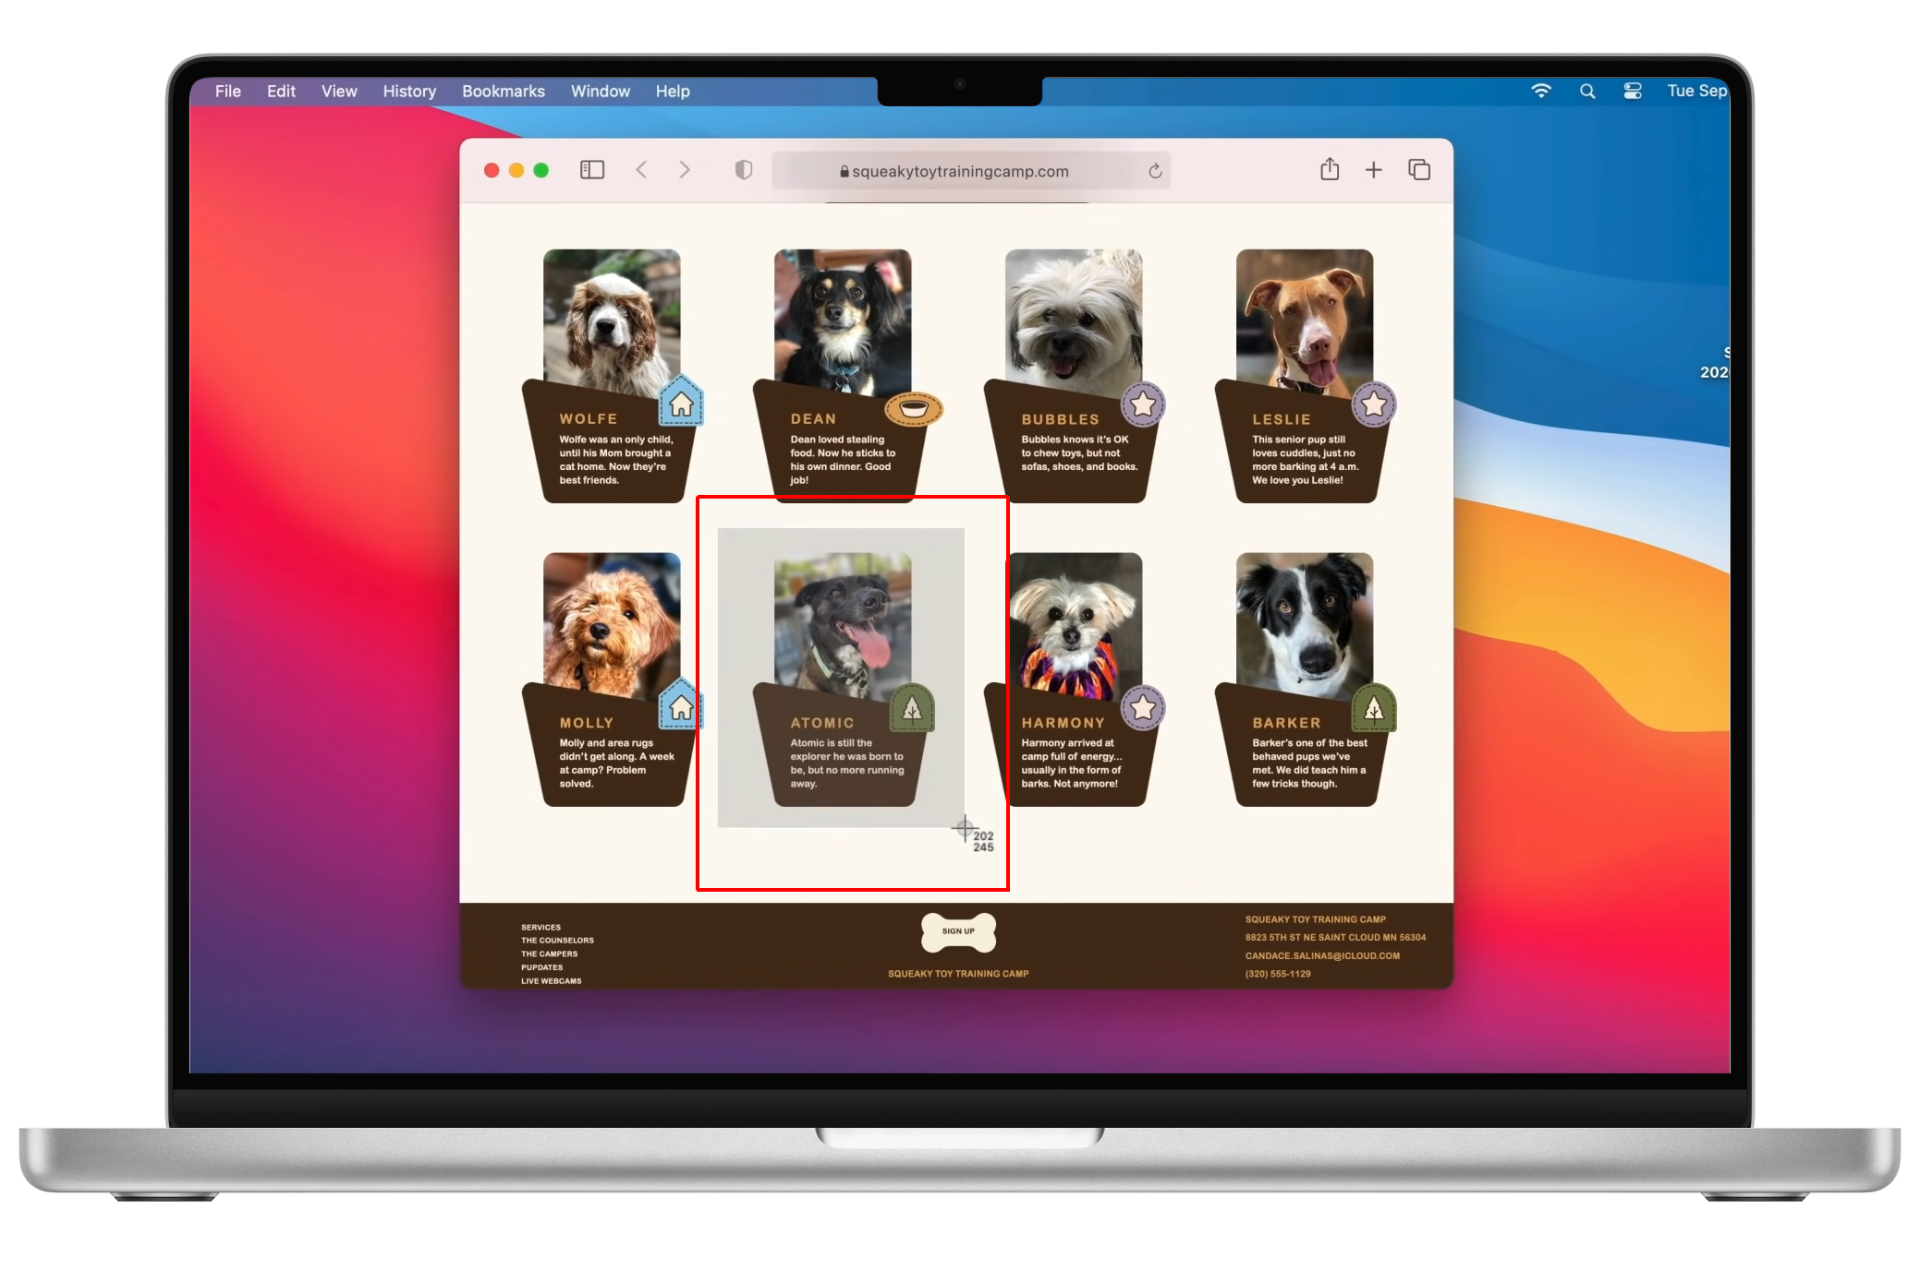
Drag the crosshair according to your picture
As you have your snip in place, you will notice the captured portion of the screen getting darker. In that case, you can even reposition the selected area on the screen by simply pressing and holding the spacebar before releasing the mouse button.
If for some reason the shortcut isn’t working for you, consider checking out our troubleshooting guide on How to Fix Command Shift 4 Shortcut not Working on MacOS.
Bonus: Video Captures Using Snipping Tool
Apart from capturing screenshots, the snipping tool can also be used to record whole videos. But there is no shortcut to recording your screen. You have to open up the snipping tool menu using the ⌘ + Shift + 5 combination and record through here.
One of the first changes you will notice when in the recording mode is that the “Capture” button switches to “Record” which is used to start your recording.
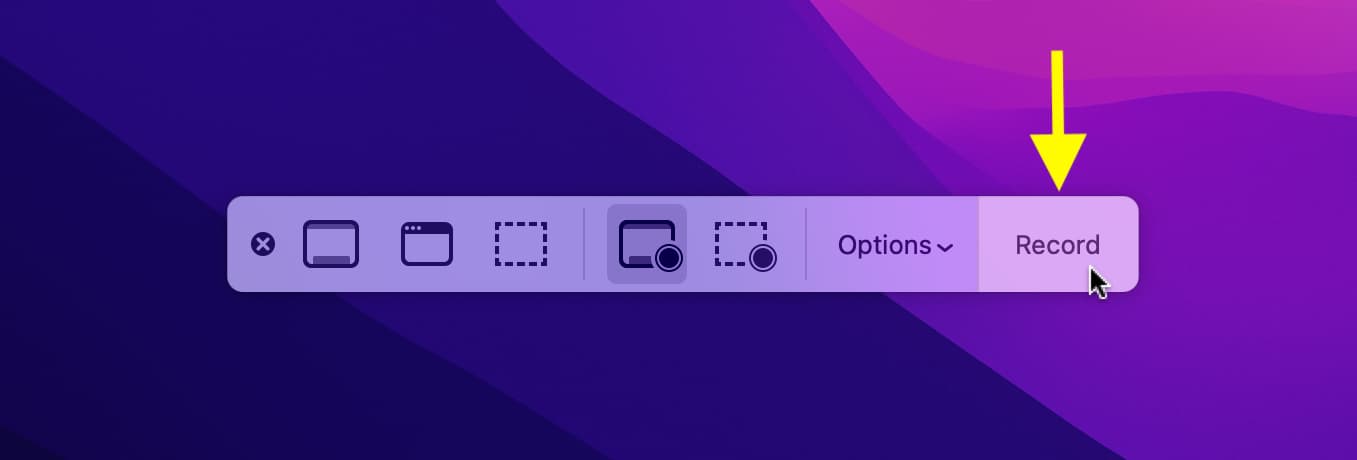
To stop the recording, you simply have to open the menu by pressing ⌘ + Shift + 5 and click on the Stop Screen Recording button.
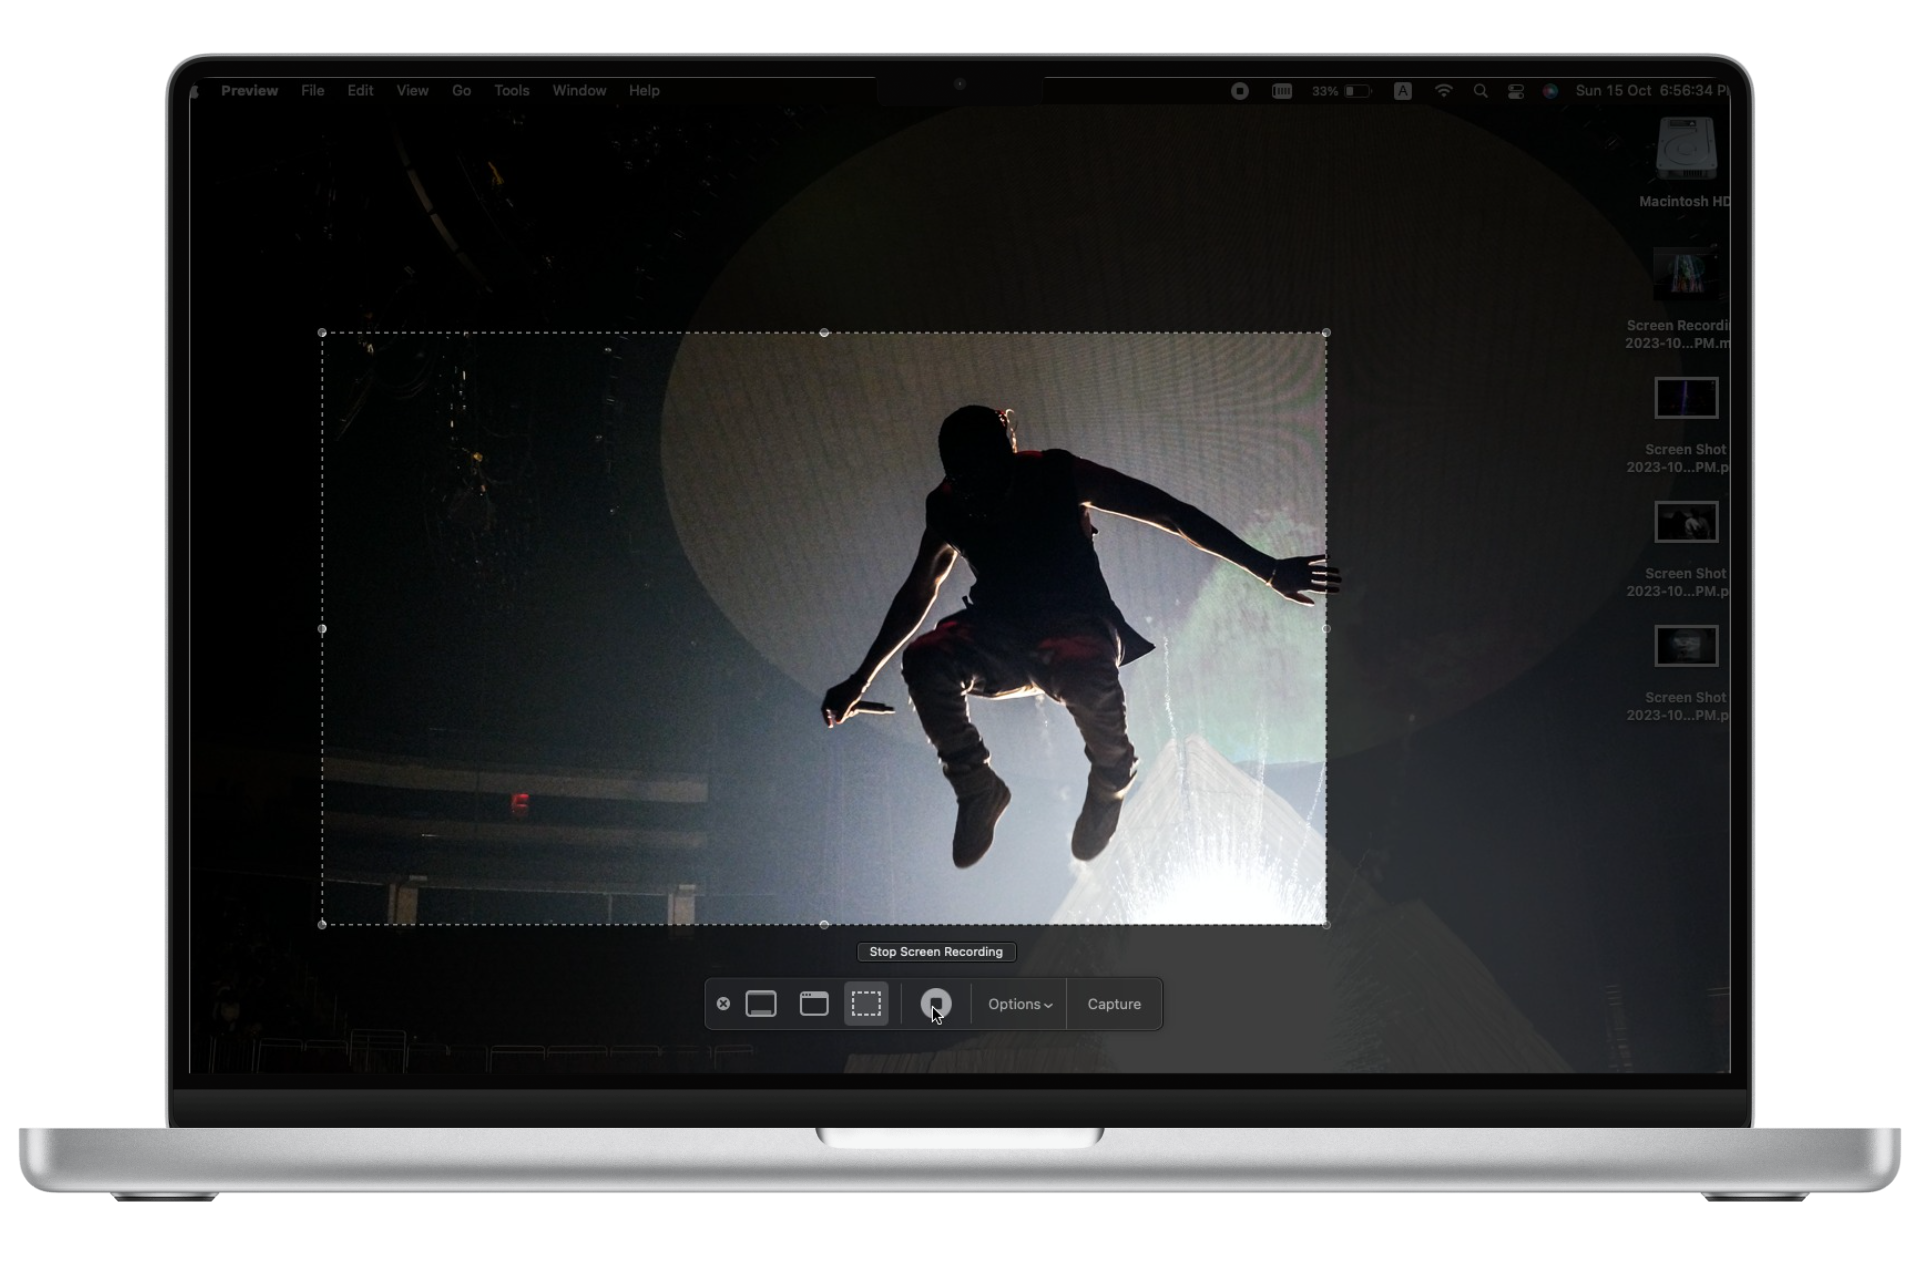
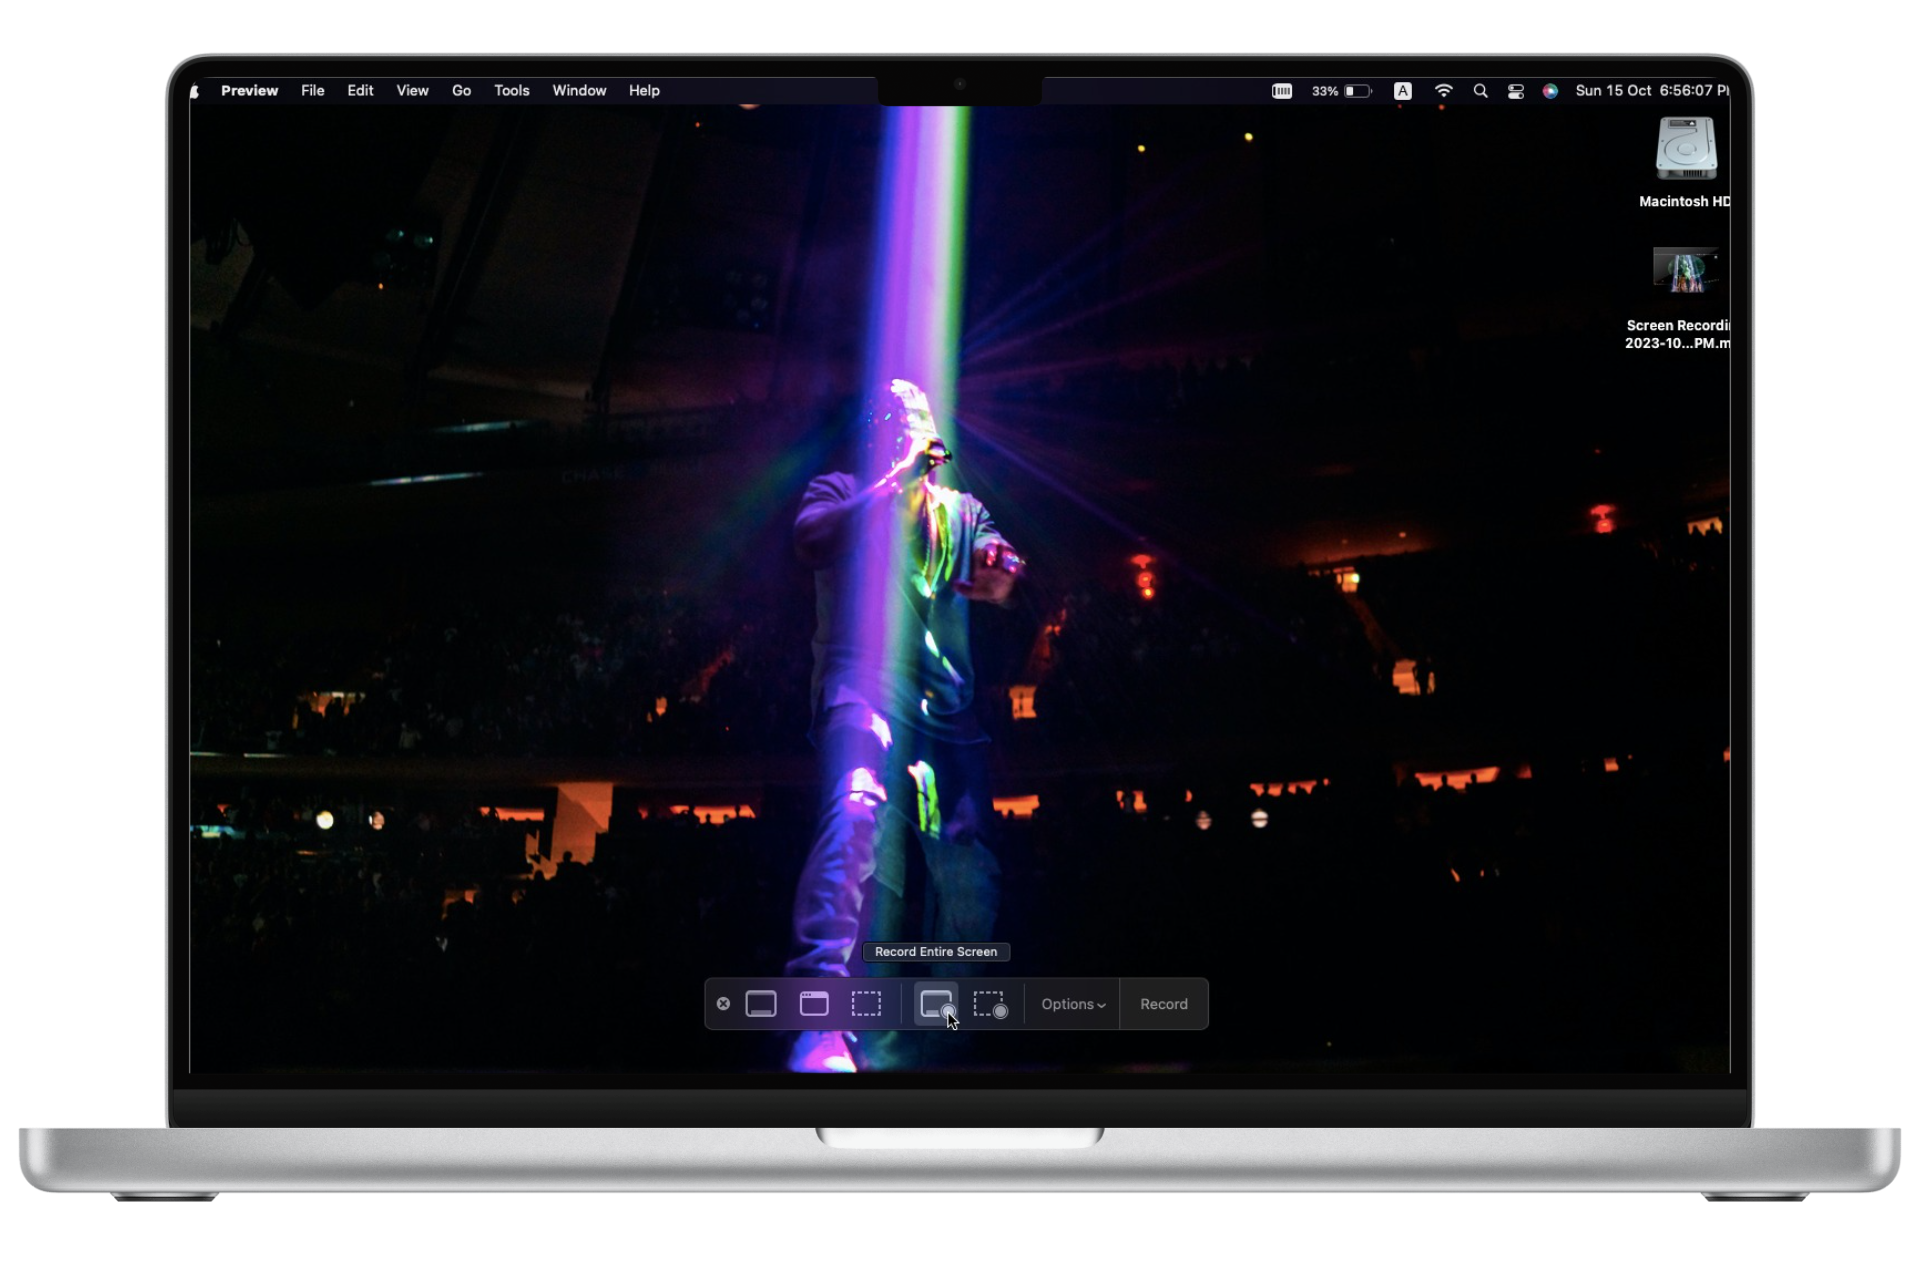
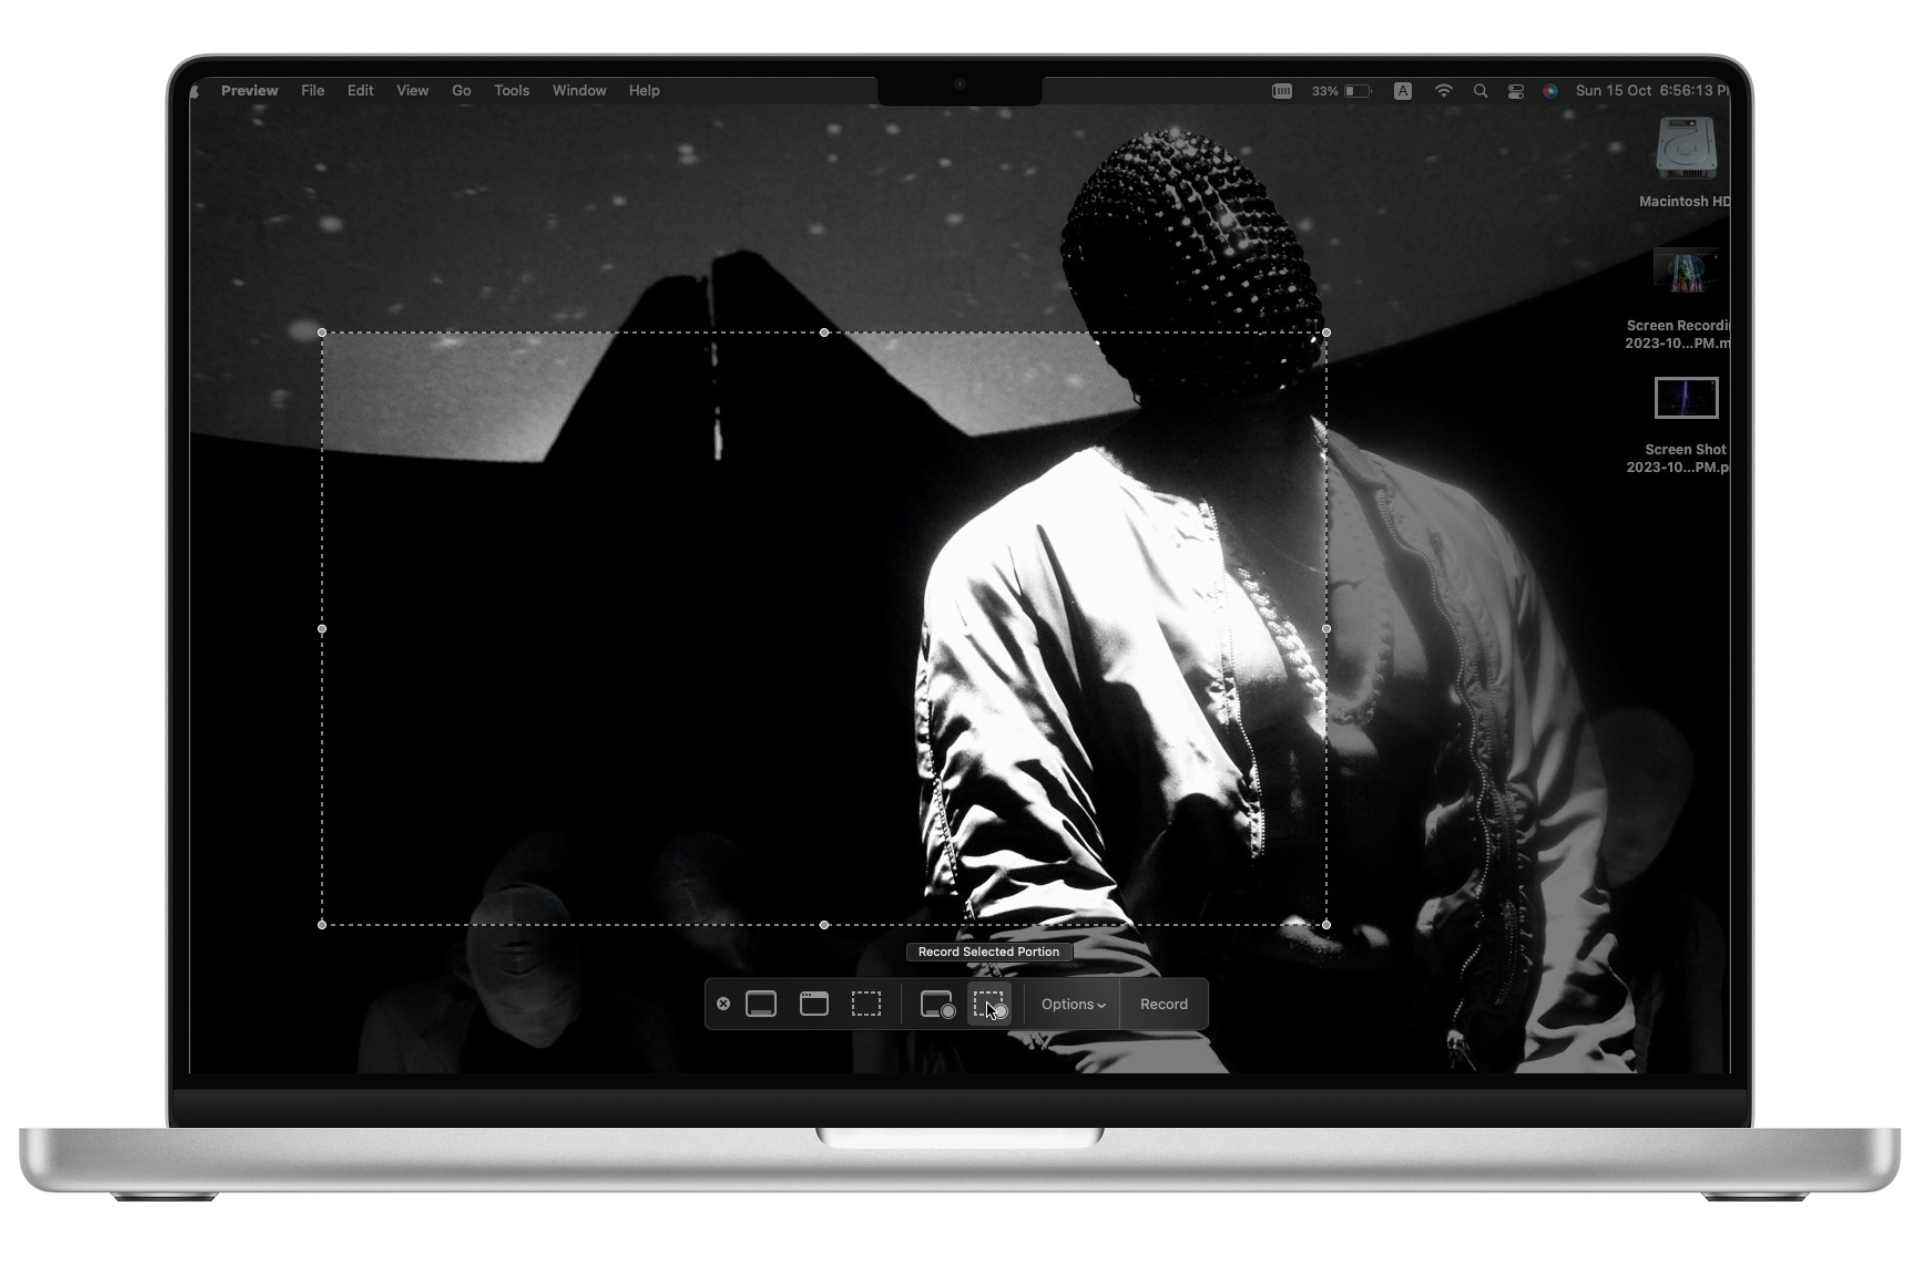
In the main control menu, you have two options to play around with, Record Entire Screen and Record Selected Portion.
- Record Entire Screen: This one is self-explanatory and allows users to record their entire screen.
- Record Selected Portion: With this one, users can choose how much of their screen they want to record. You can also resize the portion and record it accordingly.
3. Add Screenshot Option to Touch Bar
One thing that makes the MacBook stand out in terms of its overall aesthetics is the Touch Bar, an innovative OLED strip placed on top of the keyboard. The touch bar replaces your traditional shortcut keys and introduces a new way of navigating around your device.
Apart from basic functions like Do Not Disturb or Siri, Mac users can pretty much use the touch bar as a media control tab, add favorite sites, use editing tools, and much more.
If you can’t remember this many shortcuts and just want quick access to the Snipping Tool control panel, you can simply add the app’s shortcut to your touch bar by following these steps:
- Open up the View option located at the menu bar.
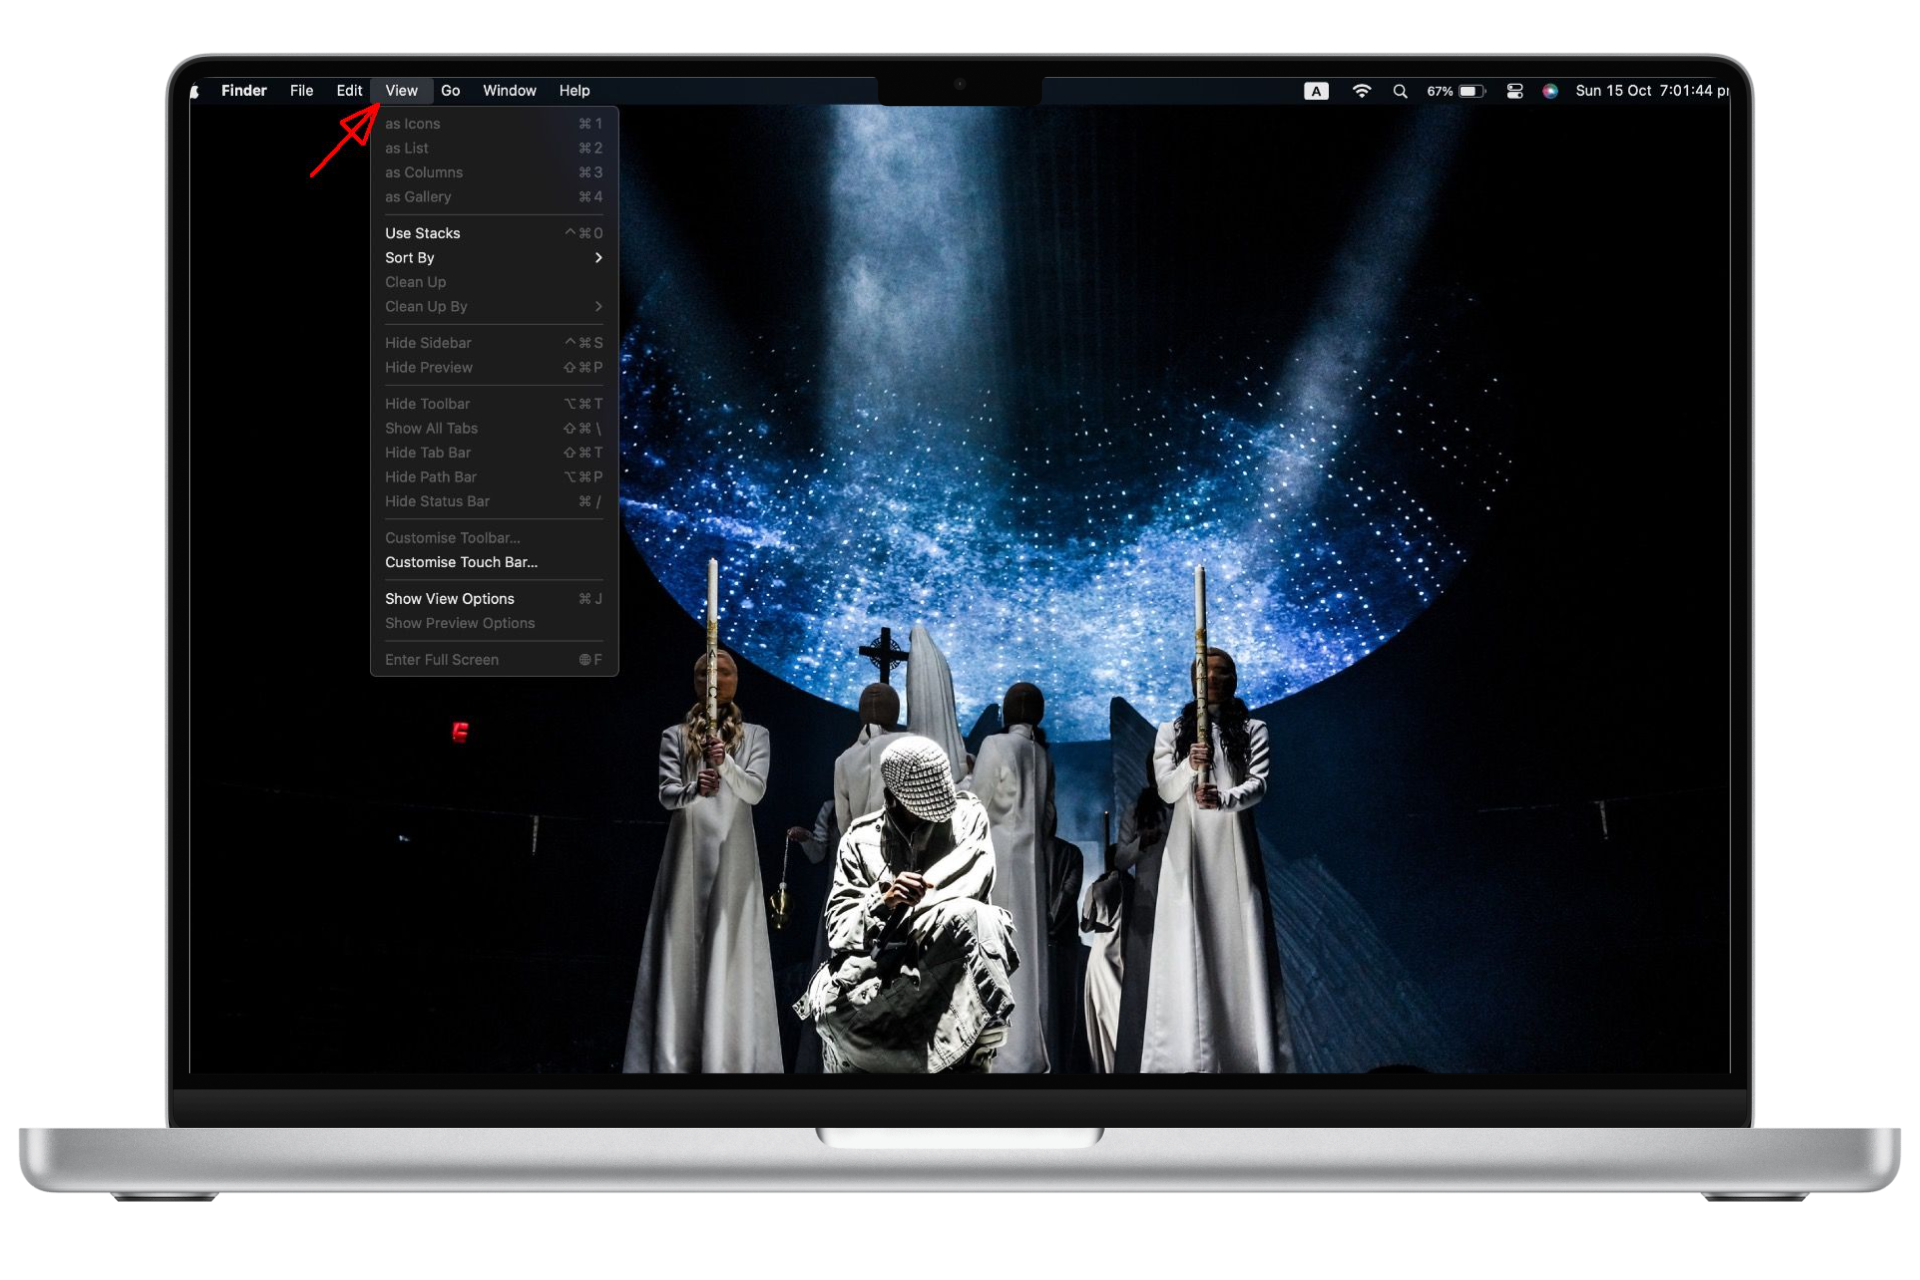
Click on the View tab - Next, click on the “Customize Touch Bar” option.
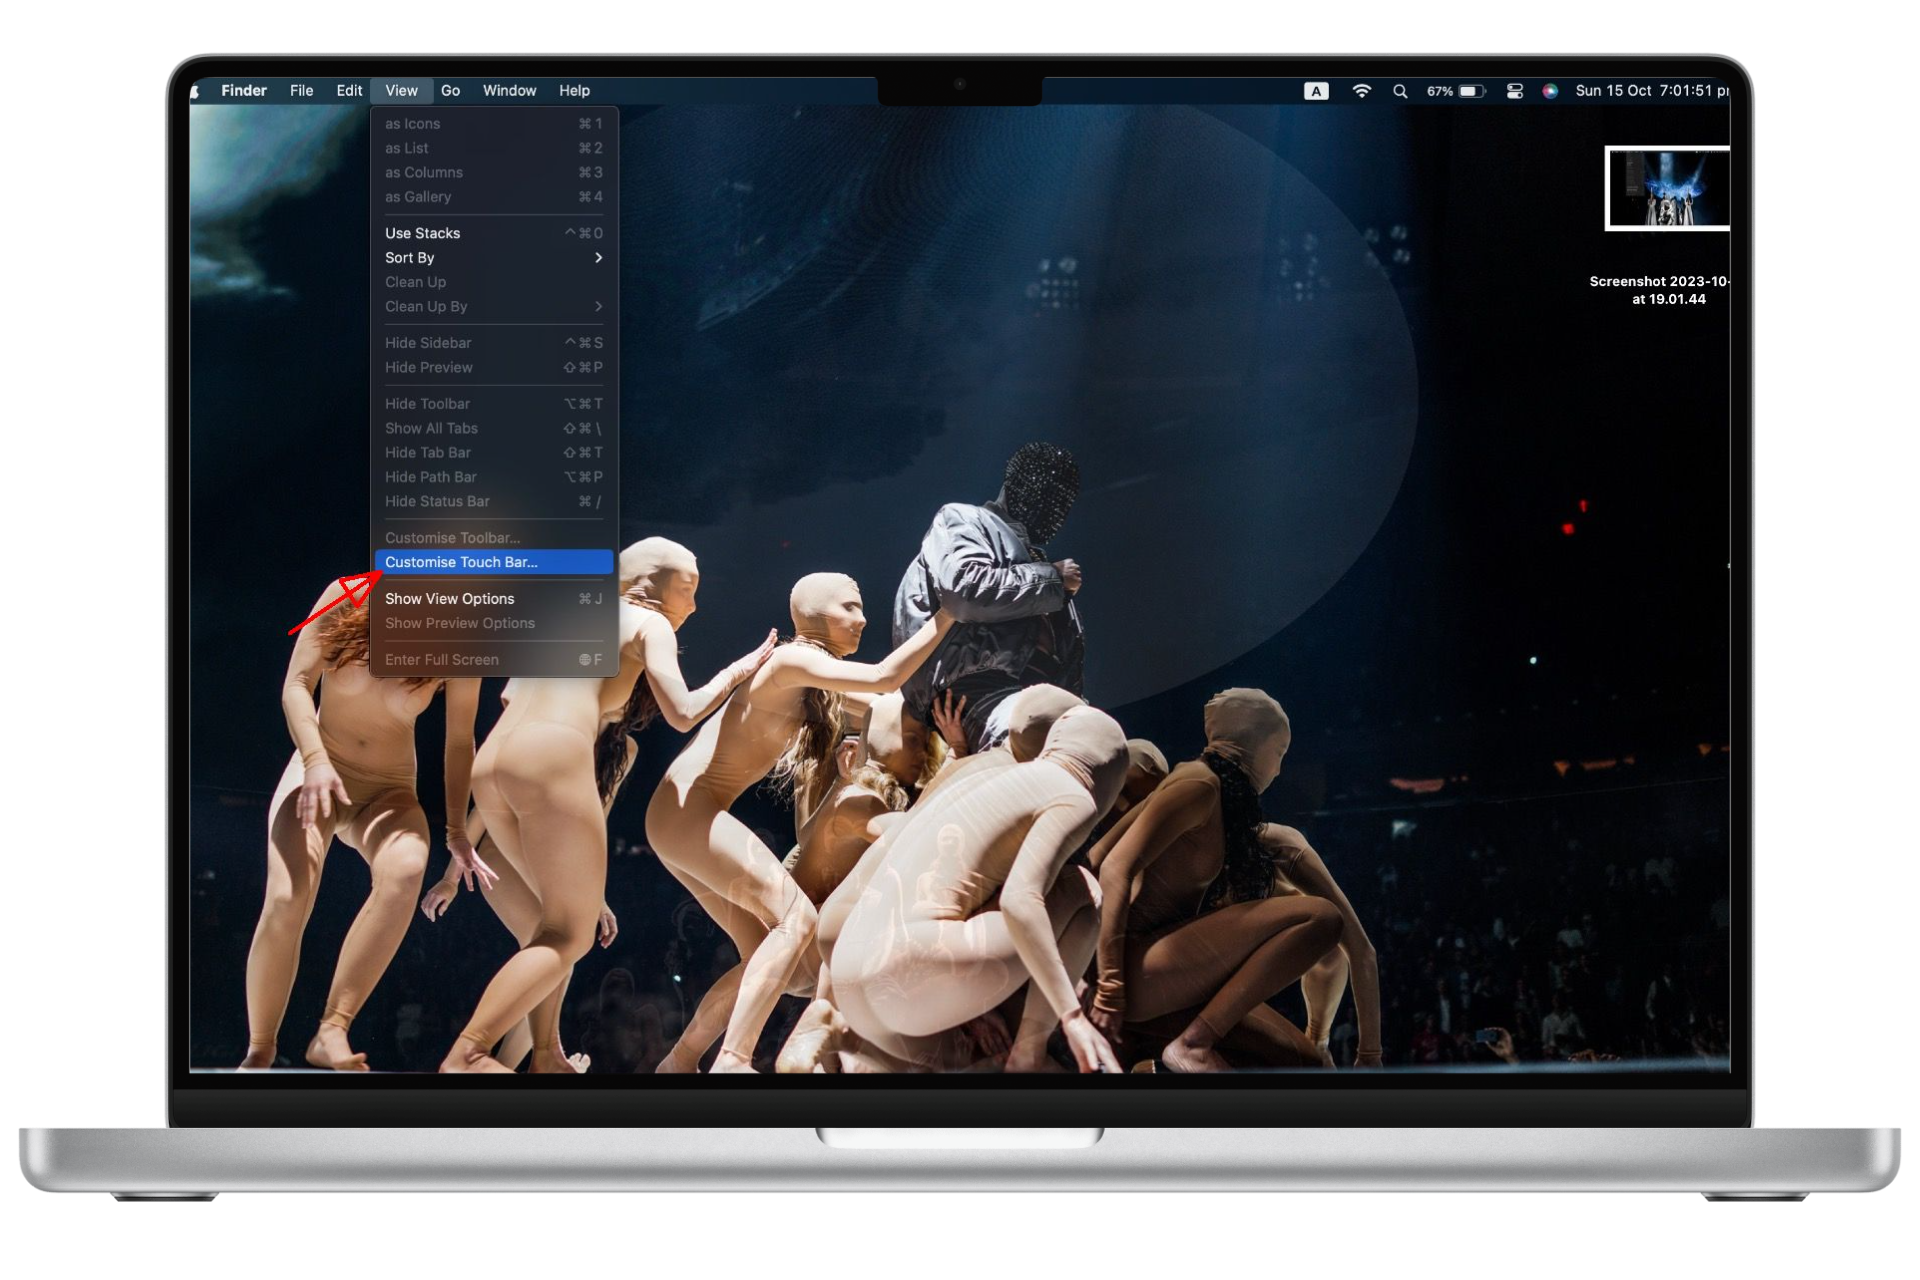
Choose the Customise Touch Bar option - From here, choose which icons and settings you want on your touch bar.
- If you want to add the Screenshot option simply look for a camera icon.
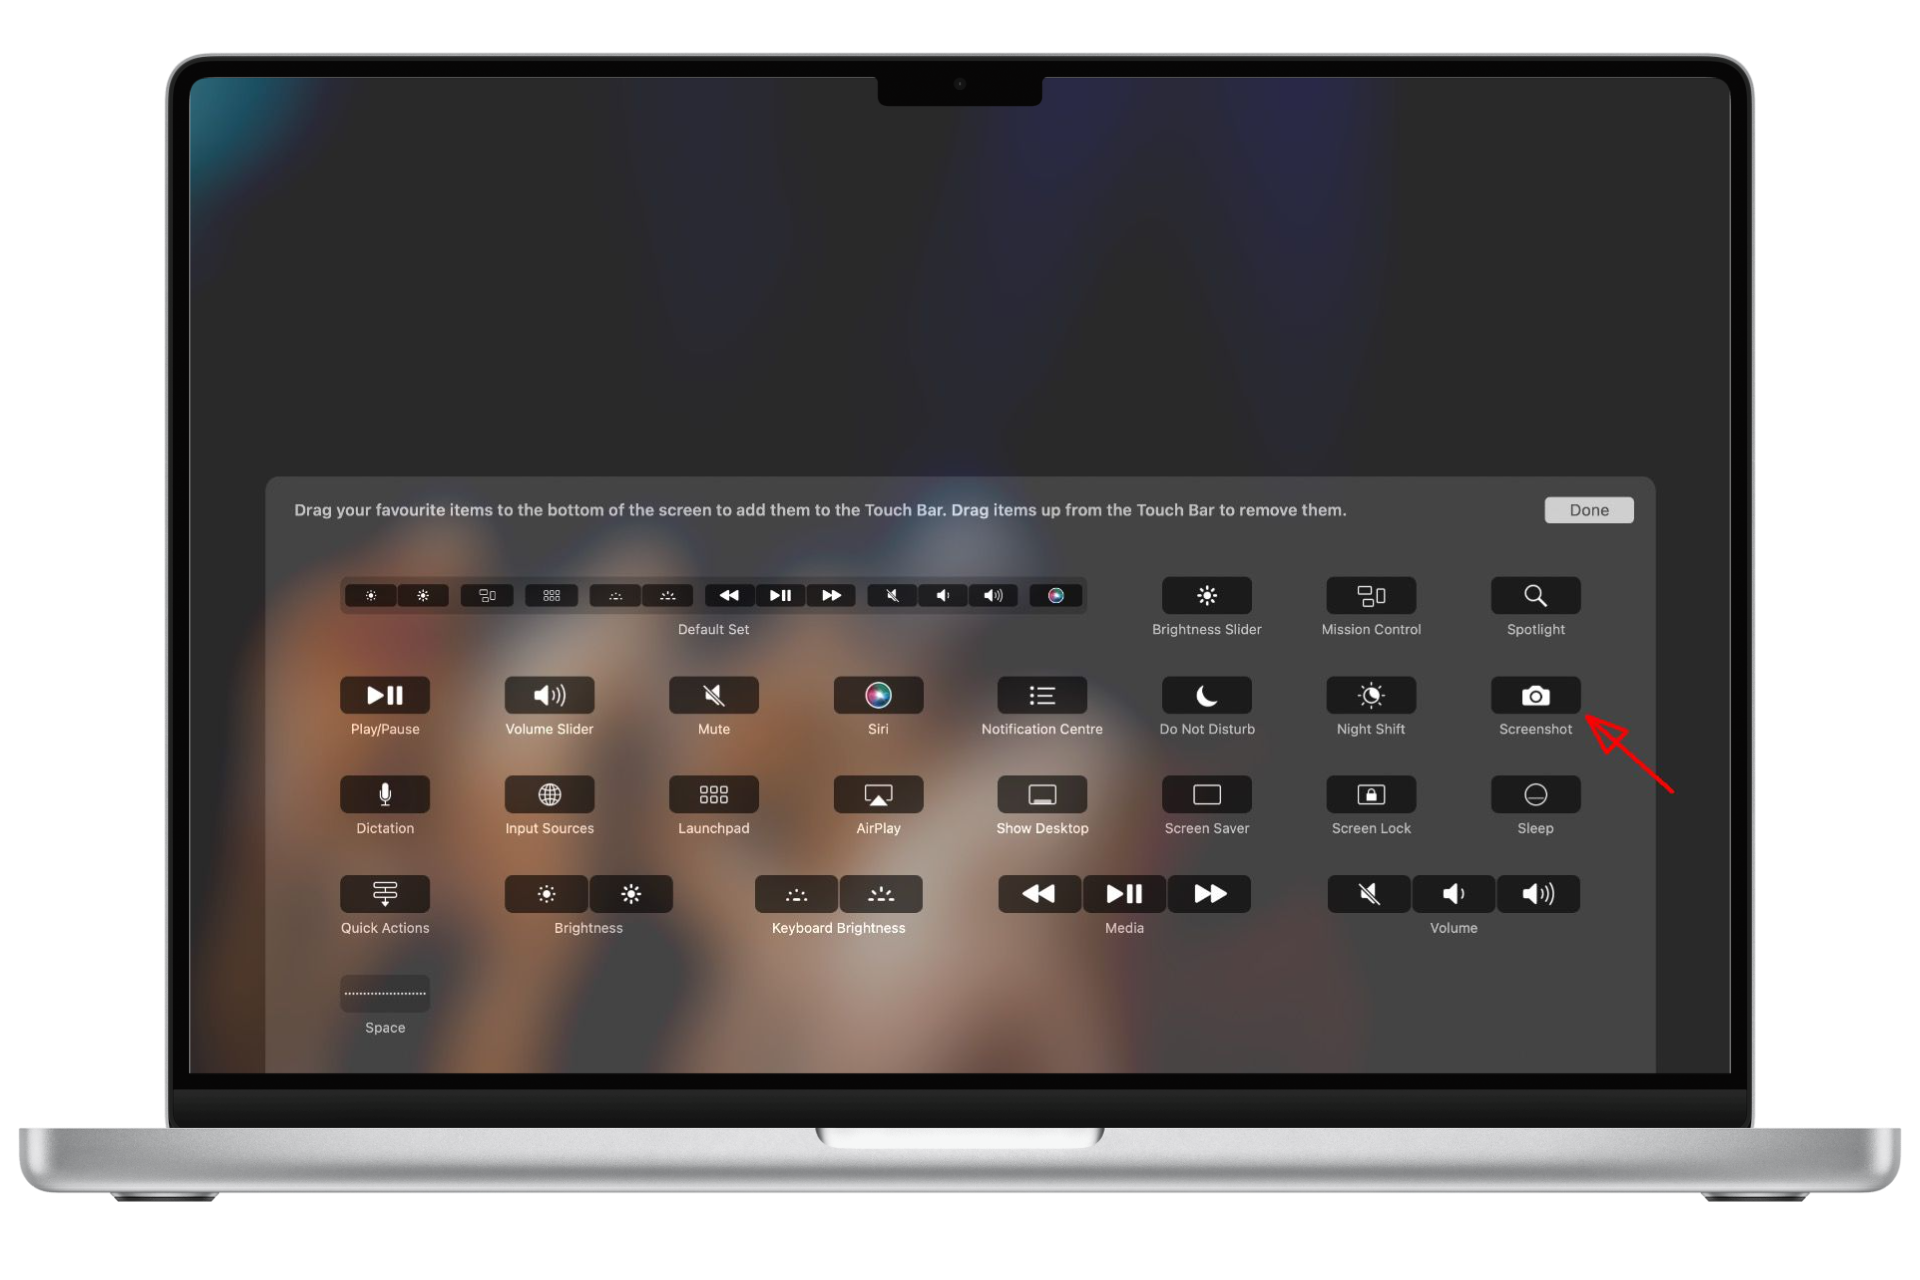
Look for this camera icon - Once you have it, simply drag the shortcut toward your touch bar and it will automatically jump towards it.
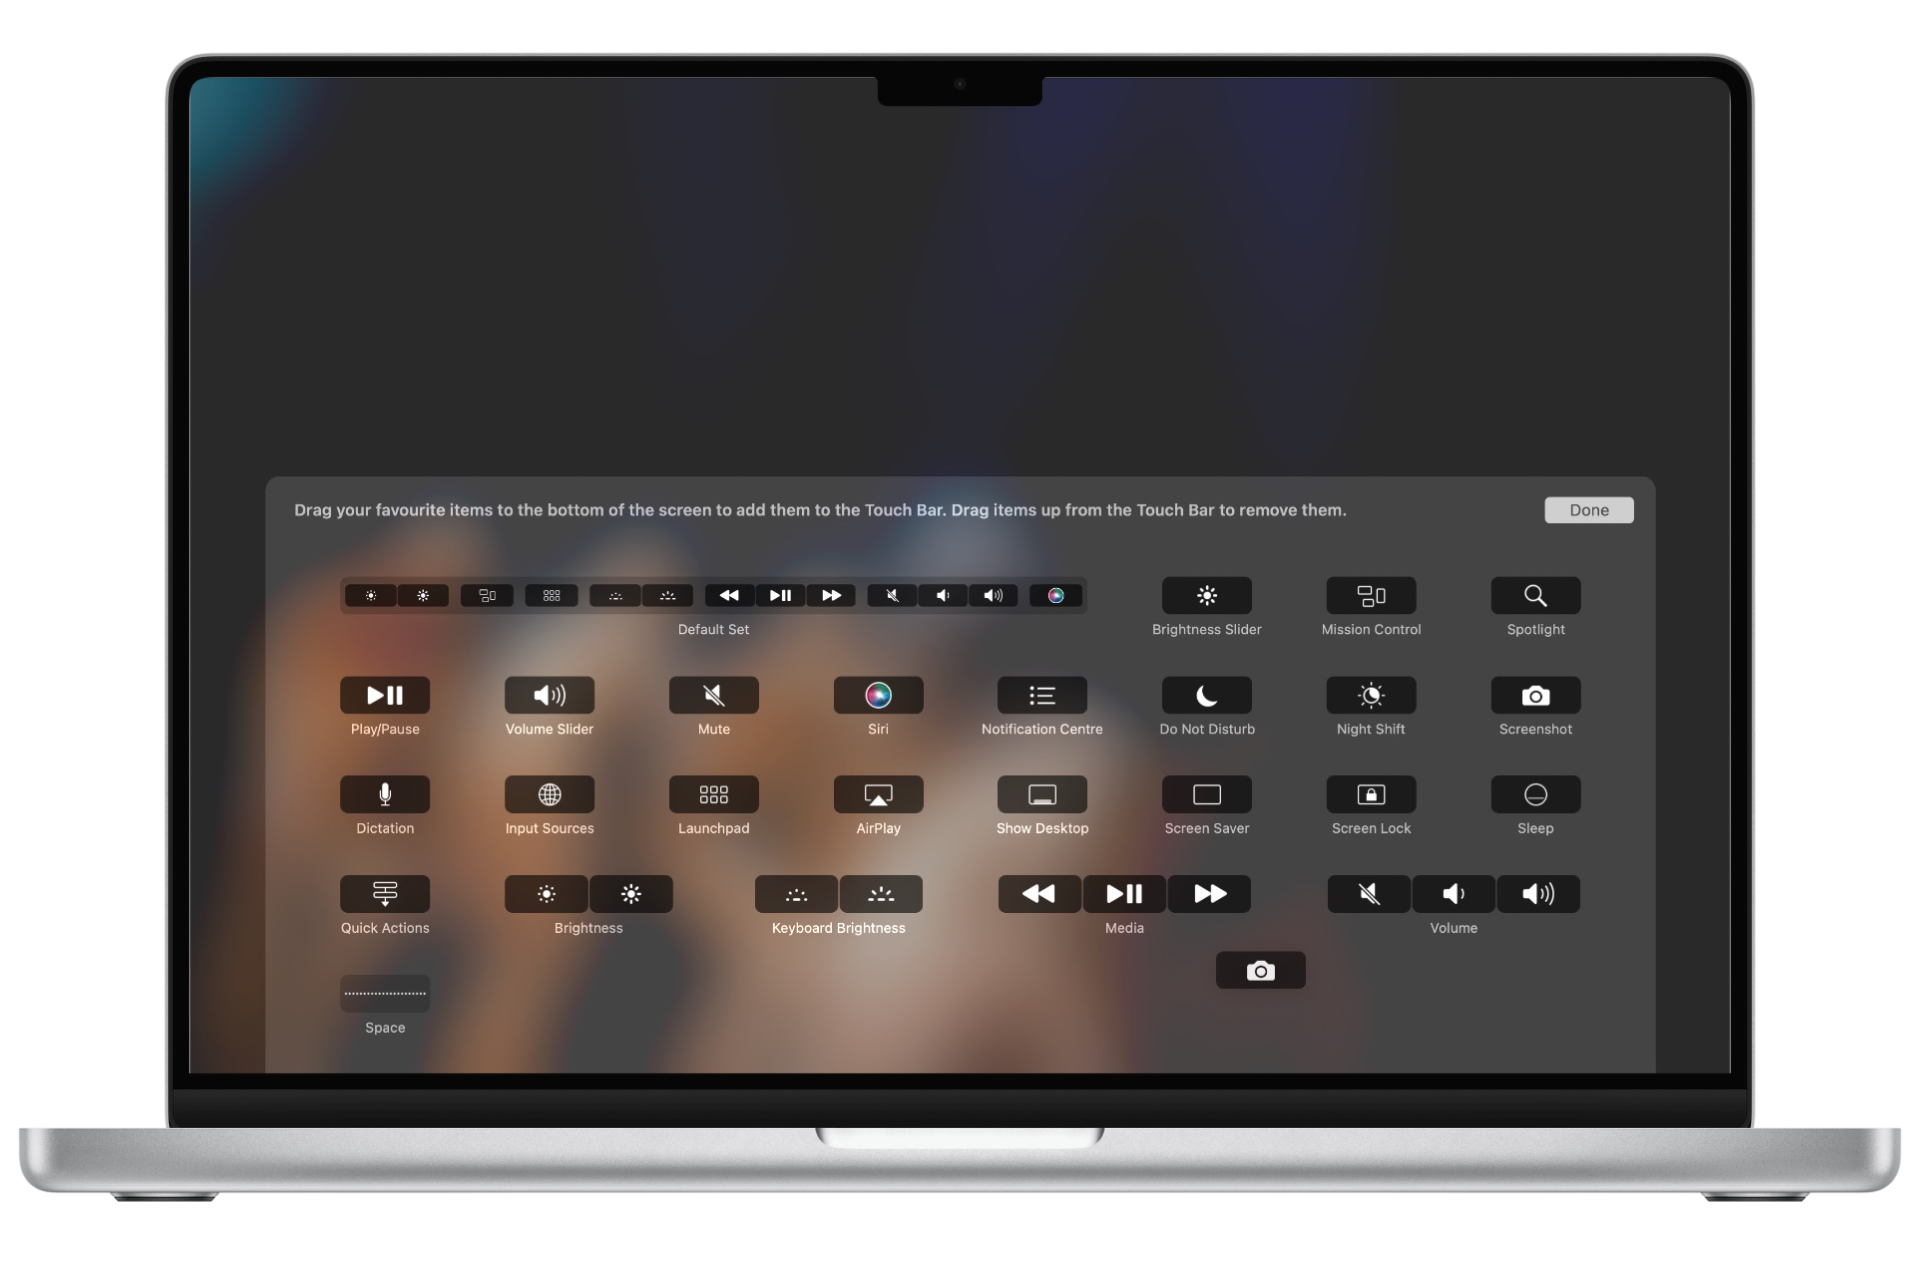
Drag the camera icon to your touch bar
Now that the shortcut is in place, all you have to do is tap on the Camera Icon and it will open up the whole panel. From here, just take the screenshot the way you want.
Third-Party Snipping Tools
Although macOS does have a user-friendly snipping tool that’s pretty straightforward and offers several basic functions it still has some limitations.
So, if you are looking for the ultimate screenshot app, consider installing a third-party app like CleanShot X or Shottr. These apps offer more annotation options, cloud storage, and additional capture modes like the ability to snip drop-down menus.
Although there are a ton of apps that can get the job done, our top picks are CleanShot X and Shottr due to their smooth feel and advanced features that come with these two for a small cost. CleanShotX, however, is an entirely paid app.
Here is a quick rundown to taking your first screenshot with both these intuitive software:
1. CleanShot X
- Firstly, press the standard full-screenshot command (⌘ + Shift + 3).
- As the screenshot is done, you will see a small overlay at the bottom left of your screen similar to the one that the Mac’s screenshot app displays. But with a lot more power.

CleanShot X snip preview - From here, you can choose options like editing, cloud saving, copying images, saving images, and more.

You will have several options to choose from - Lastly, hit the Save button and your screenshot will show up on the desktop.
 The screenshot should appear on the desktop like this
If you want to take a screenshot of a specific area or a window then use the same shortcuts as the Mac snipping tool but this time CleanShot X will take it.
Screenshots sourced from CleanShot X
2. Shottr
- Once you have installed Shottr, it will now be available on the Menu Bar. From here, click on the Shottr icon and a drop-down menu will open.
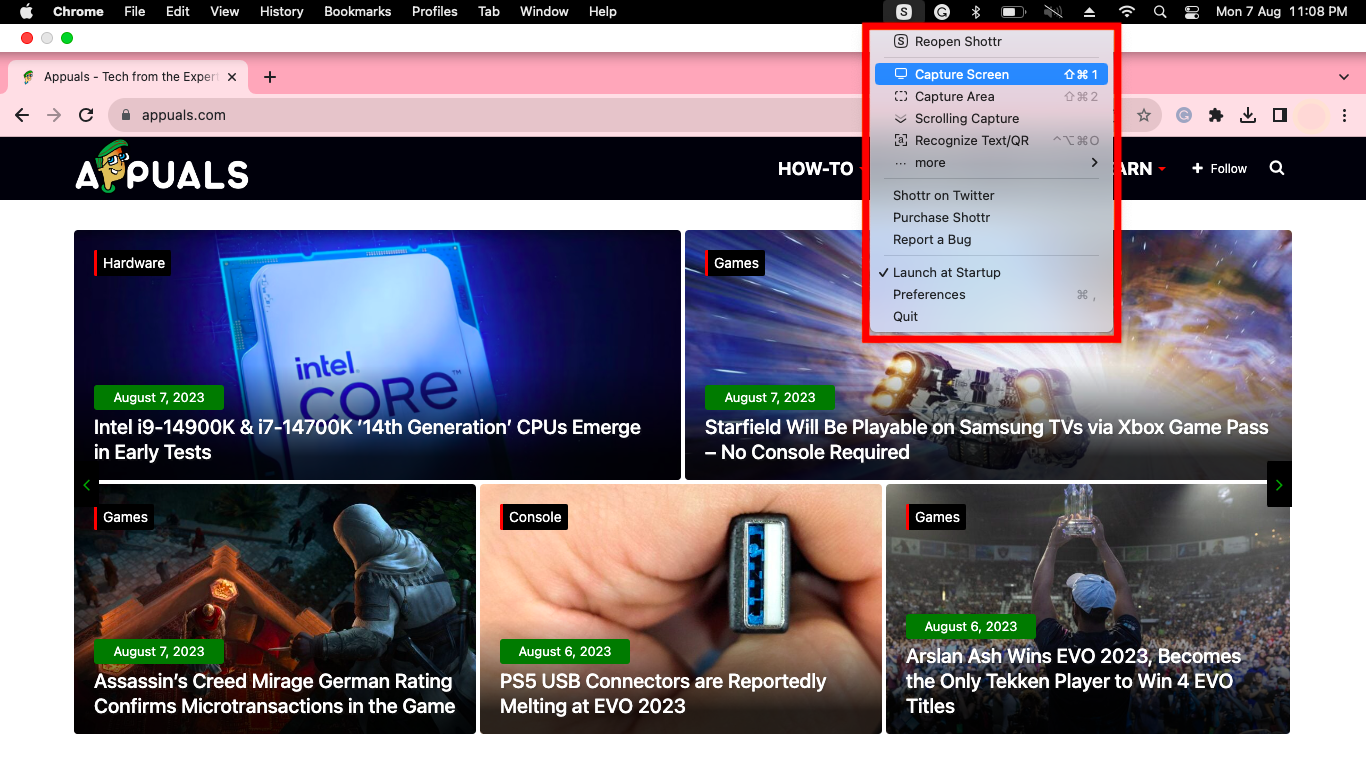
Shottr drop-down menu - Here, you will find several functions like Capture Screen, Capture Area, and some new ones like Scrolling Capture and Recognize Text/QR. For a simple full-screen snip just choose the capture screen option.
- As you take a screenshot, a window will open up just like the Windows snipping tool allowing you to edit your screenshot. If you don’t want to change anything, simply save the picture by clicking on the icon in the upper left corner.

Hit the save icon
Snipping Tool: Windows vs. Mac
Snipping Tool is a legacy app in Windows for taking screenshots, introduced all the way back with Windows 7. Even before Snipping Tool, people just used the Alt + PrtSc (PrintScreen) hotkey to copy the screen to clipboard, and then open up another app such as Paint to paste it there and save it as a screenshot. Yeah, it wasn’t elegant so the Snipping Tool was certainly an upgrade.
Later in Windows 10 (and now 11), these tools were replaced by the “Snip & Sketch” app with new features like custom annotation and even sharing options. The hotkey for Snipping Tool/Snip & Sketch has also changed to Windows + Shift + S, bringing it much more in-line with what the Mac has to offer.
On the contrary, the Snipping Tool on Mac doesn’t exist as a built-in application by that name. In fact, the native screenshotting and screen-recording features in Mac don’t have any name. It’s just something that is part of macOS and has always been that way. The hotkey for even taking the screenshots hasn’t changed in years.
Conclusion
Mac’s built-in snipping tool offers everything you would need when taking screenshots. Just remember the right key combinations or add the screenshot shortcut to your touch bar and you are good to go.
If that isn’t enough for you, you can also choose one of your picks for an alternative to the snipping tool for Mac and get some more advanced features when capturing your screen.
FAQs
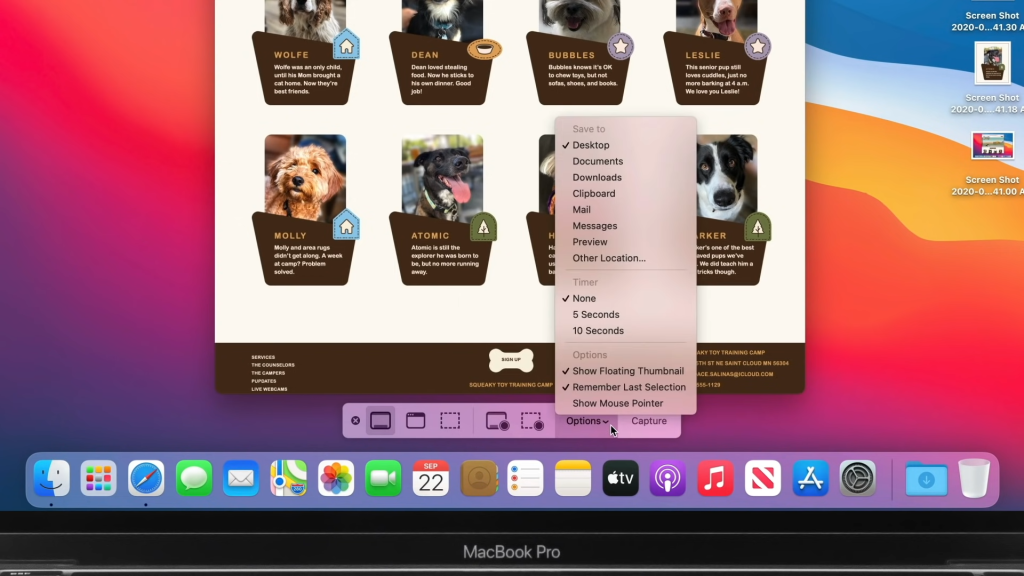
By default, Mac saves your screenshots to the desktop. After capturing a screenshot, it should appear directly on your desktop. If you can’t locate it, review your Screenshot settings by accessing the Screenshot Toolbar and verifying the destination selection under “Save to.”
To snip and paste on Mac, press Command + Control + Shift + 4. This will allow you to select a screen section with a cross-hair cursor and paste it into another program.
There’s minimal difference between Windows and Mac built-in snipping tools as both apps offer almost the same options when taking screenshots. However, in Windows 10 the snipping tool doesn’t have an option to record entire screens as compared to Mac’s snipping tool.
 Reviewed by


