3 Methods to ‘Allow Standard User to RDP/Remote Access’
RDP stands for Remote Desktop Protocol, which allows a user to connect from another computer with a graphical interface connection over a network connection. It has protected rules and guidelines for communicating data developed by Microsoft. Users can connect as an administrator or as a standard user depending on the permissions. Enabling access for the standard user can have many reasons, such as; allowing them to work on the remote computer from anywhere, giving access to family and friends for specific programs as a standard user but with no administrator rights.

However, several Windows users are getting the connection denied error when they try to RDP with a standard account on a computer. The error will appear with a message like this: “The connection was denied because the user account is not authorised for remote login”. This happens because the computer you’re trying to connect has not added the standard account for the remote access.
Allowing Standard User in Windows 7 and 10
Using Remote Desktop Connection application allows you to connect and control your Windows computer from a remote device. But this option is off by default, you need to enable it first.
In Windows 7 and 10 we have few different methods through which we can add the standard users for the RDP. You can try any of the methods to add the standard user and later access it by logging in to that username through Remote Desktop Connection.
Method 1: Adding Standard User in System Properties (Win 7 & 10)
- Hold the Windows Key and Press R to open Run. Now type “SystemPropertiesRemote” in the text box and click OK
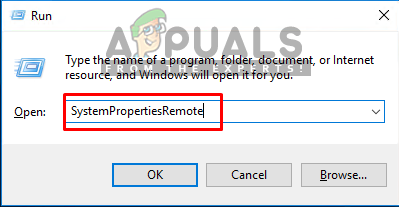
Opening Run and typing SystemPorpertiesRemote - At the bottom of the pop-up window, you will find “Select Users”, open that

Clicking on the Select User - Click on “Add” and add the user name which you want to allow and click “Check Names” to confirm the name

Adding the standard username and checking it - Click “Ok” for all the open windows and close the Remote Desktop
- Now login with the username that you included in the settings and it will be able to login now.
Method 2: Adding Standard User in Local Users and Groups (Win 7 & 10)
- If you are logged in as an administrator to the PC, then open Run by pressing (Windows + R) buttons. Then type “lusrmgr.msc” in it and Enter
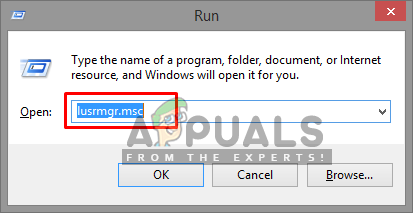
Opening lusrmgr.msc through run command - Now click on “Groups” in left-panel
- In the list, double click the “Remote Desktop Users”

Local users and group window - Click “Add” on the Remote Desktop Users Properties window
- Here you can type the name of any User you want to allow, in a text box and click “Check Names”
Note: Check name will check in the list to see if the user you typed is available or not
Checking the username available or not - After Adding name click “OK” and save the settings
- Now you can log in through that user on RDC
Method 3: Adding Standard User using PowerShell (Win 10)
- Search for “Windows PowerShell” and open it by selecting “Run as administrator”

Opening PowerShell with run as administrator - Now you just need to type the following command and Enter:
Add-LocalGroupMember -Group "Remote Desktop Users" -Member "User"

Typing the command in PowerShell Note: User will be the username of the account that you are adding.
- After pressing the Enter you can close PowerShell and check to log in as the added user.

