How to: Clean Boot Windows?
Clean booting refers to starting up the system with only Windows services loaded and the default programs needed for the system’s functioning. Over time, a number of programs and services can automatically integrate themselves into the startup routine, even though they aren’t necessarily needed. Most users aren’t aware of this, and it consumes CPU, memory, and disk space, leading to unnecessary high resource utilization that slows down the system and increases the CPU temperature.
Clean booting is also handy when troubleshooting high usage issues. I always recommend performing a clean boot once every two months. Your startup programs will accumulate over time. Think of it as ‘scaling your system’ every six months, similar to a dental cleaning recommended by the doctor.
Clean Booting a Windows 10 Computer
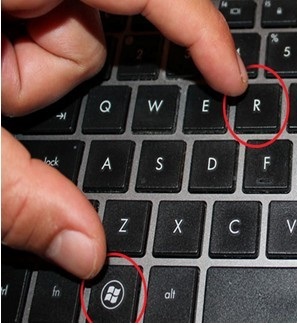
Hold the Windows Key and press R;

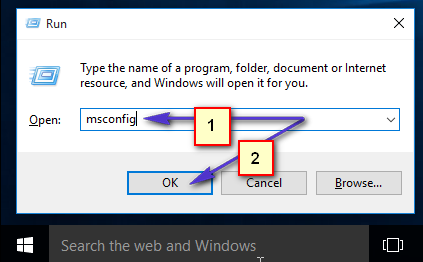
In the run dialog that opens up, type ‘msconfig’ and then click ‘OK’.

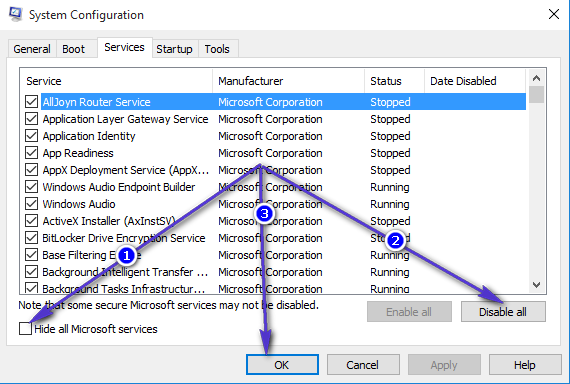
This will load the system configuration window. From here, choose the Services Tab, then put a check on Hide All Microsoft Services and select Disable All.

First, click ‘Apply’, then click ‘OK’. You will be prompted to restart; choose ‘Restart Later’. Hold the Windows Key and press R again; then type ‘msconfig’ and click ‘OK’. This time, when the System Configuration dialog box opens, choose ‘Start Up’ and select ‘Open Task Manager‘. From this pane, look at the last field called ‘Start-Up Impact’ and disable all the ones with ‘High’ impact. You can disable them by right-clicking on them and choosing ‘Disable’. This only disables them from automatically starting up when the computer reboots, so you can still start them up normally and re-enable them later if you want them to be started up automatically. Follow the same steps as above, but instead of choosing ‘Disable’, choose ‘Enable’.
Once this is done, reboot your system and it will start up in clean boot mode.