How to Use the Linux Version Command
You’ll often need to find the exact version of Linux you’re running if you need to update or reinstall anything. There’s a single Linux version command that will tell you most of what you need to know, and it will take an absolute minimum of time to run it. Finding your Linux version couldn’t be any easier.
Naturally you’ll need access to a command prompt to find your Linux version. Open up a command prompt using whichever method is most comfortable for you. You might want to hold down Ctrl, Alt and T or Super and T to open up a graphical one or you could search for Terminal on the Dash. KDE, LXDE and Xfce4 users can also start it from the System Tools menu after clicking on the main Applications menu.
Method 1: The uname Linux Version Command
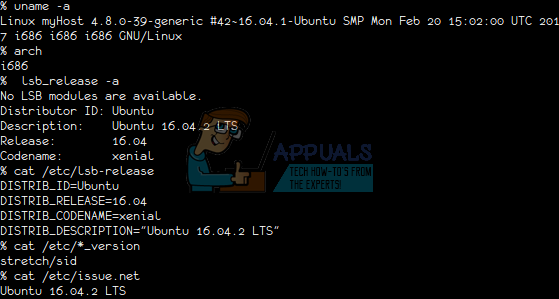
At the command prompt, type uname -a and push the enter key. You’ll be given a line with a complete readout of everything regarding your system. You’ll be told which version of Linux you’re using as well as the processor architecture. Technically, this is a universal Unix command for the most part so you could also use uname -a from the command prompt inside of FreeBSD, NetBSD, macOS or almost any other Unix implementation. It’s not at all unique to Linux, and it’s actually really good to keep in mind if you ever sat down on a buddy’s computer and had no clue what type of operating system that they were running.
Method 2: The arch Command
If you simply want to know what architecture your OS is designed for, then type arch from the command prompt and push return. This is especially useful for cases where you don’t know if you’re using the i386 or x86_64 version of your distribution. If it reads i386, then you have a 32-bit Linux or other Unix distribution installed. If it reads x86_64, then it’s 64-bit. Like uname, you can run arch as the root user or as a regular non-privileged user with no real difference. If you see something like i686 or something similar, then you can treat this as a synonym for i386 and trust that you’re running a 32-bit version of Linux even if you have a full x86_64 processor installed.

Method 3: Using the Linux Standard Base
While uname -a and arch involve the least amount of playing around, you could also check if your distribution supports the Linux Standard Base. You can get some extra information about it if you’re using Debian or one of the distributions descended from Debian like Ubuntu, it’s various derivatives, Linux Mint or Bodhi Linux. A good rule of thumb is that this works on anything with the apt-get package manager.
At the command prompt type ![]() for some additional information. Assuming that this didn’t spit out an error message at you, then you can use
for some additional information. Assuming that this didn’t spit out an error message at you, then you can use ![]() followed by
followed by ![]() and
and
![]() to learn even a bit more about the operating system that you’re working with.
to learn even a bit more about the operating system that you’re working with.
Users of Red Hat Linux and it’s derivatives like Fedora can use ![]() followed by
followed by ![]() to find out some more information. You should find that the
to find out some more information. You should find that the ![]() technique works on anything that uses this base. A good rule of thumb is to use this technique if you’re working with the yum package manager.
technique works on anything that uses this base. A good rule of thumb is to use this technique if you’re working with the yum package manager.

Keep in mind that if you’re copying and pasting commands from an article online like this one, then you’ll need to either click on the Edit menu in your terminal emulator and click on paste or hold down Shift, Ctrl and V to paste the command on your prompt before pushing the enter key.
It’s quite possible that your distribution doesn’t support these additional commands, but if it doesn’t then that’s no real loss at all. Simply running uname -a will get you more than enough information for most purposes.
At some point you might notice a line telling you that you’re running Fedora, Debian, Ubuntu or some other distribution then you’re actually running. This is because your distribution is based on this, and actually isn’t an error. For instance, a Lubuntu or Xubuntu user would be told they’re running Ubuntu even though from their user experience side they’re not.