Fix: Boot Device Not Found (3F0) Error on Ubuntu PC
Boot Device Not Found is a common error encountered and usually shown as Hard Disk – (3F0) on HP computers and when it happens and it prevents the computer from booting to the installed Operating System. This means there’s no way to use the Operating system’s diagnostics feature to investigate the issue.
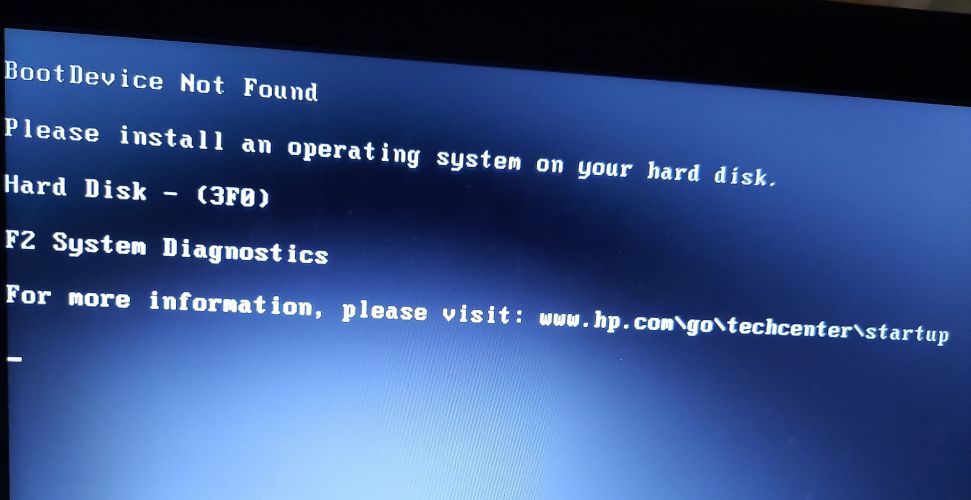
The error means that the computer can not find any partition on the Hard disk which has an Operating System. This however doesn’t mean that the Operating System suddenly disappeared from the Hard drive. There are various reasons that may cause the error other than the sudden disappearance of the OS.
Causes of Hard Disk – (3F0) Error
- Incorrect BIOS Settings – There’re are various BIOS settings that are very crucial for the system to boot into an Operating System. For example when the Hard Disk is missing from the boot devices or it is not set as the primary device.
Another setting is about the partition style the computer expects on the Hard Disk. There’re two partitioning styles i.e MBR and GPT. When a computer expects MBR and it finds GPT, it won’t be able to read the data on the partition which is the same for the other way round. - Damaged Boot Loader – A Boot Loader is a program that’s responsible for identifying any Operating Systems on the Hard Disk as well as allow booting into the available Operating Systems. Any slightest misconfiguration in the program can prevent the computer from booting into an Operating System.
- Corrupt Partition – Any partition on the Hard Disk can be corrupt for a number of reasons for example misconfiguration from the user, or as an effect from another program for example malware.
- Loose Hard Disk connection – If the Hard Disk is not connected well to the motherboard, the computer won’t be able to detect it and find an Operating System. This results in the BootDevice Not Found error.
- Faulty Hard Disk – Sometimes the Hard Disk lifetime is just over. If the Hard Disk is faulty it won’t be able to be detected by the computer thus the error.
Solutions 1: Fix BIOS Settings
The most straightforward way to fix this is to reset the BIOS settings to their default state with the following steps:
- Boot up the computer and press the key that allows you to open the BIOS settings. For most HP models it’s the F10 key but different manufacturers set different keys, for example, Esc, F2, F9, F12. That said, find the BIOS key for your specific computer model.
- Look through the various sections to find the option for Reset to defaults. The label varies between different models. On some computers, it is Restore defaults/Factory reset or something similar. Select the option, confirm to load the defaults then exit after saving the settings.
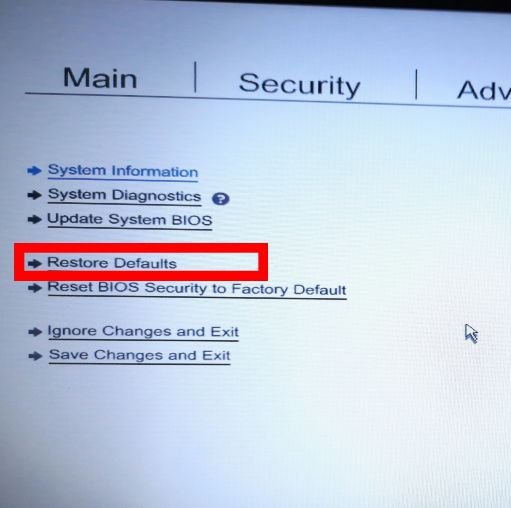
Reset BIOS Settings to default - If this doesn’t fix the error, try the next BIOS fixes.
Another fix for the BIOS Settings is to set the Hard Disk to the primary boot device.
- Open the BIOS Settings as we did earlier in the first BIOS fix
- Navigate to the section with Boot Options
- Navigate to the section with the order of the boot devices and set the Hard Disk as the first device in the sequence.
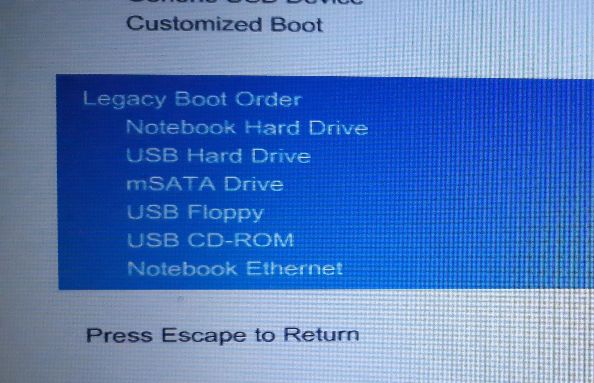
Change Boot Order to make Hard Disk first - Exit while saving the settings and check if the error is fixed.
One more fix for the BIOS Settings is to make the System be able to access data on the Hard Disk despite its partitioning style (MBR/GPT). BIOS Settings configure the computer to boot in either UEFI mode or Legacy mode. MBR partition style can be accessed if the computer boots from the Legacy mode whereas the GPT partition style can be accessed if the computer boots from UEFI mode. Some computers provide options for booting with both UEFI mode and Legacy mode while others provide only one option.
- Open the BIOS Settings as we did earlier in the first BIOS fix
- Move to the boot settings tab and navigate the section with the Boot mode which has options like Legacy or UEFI.
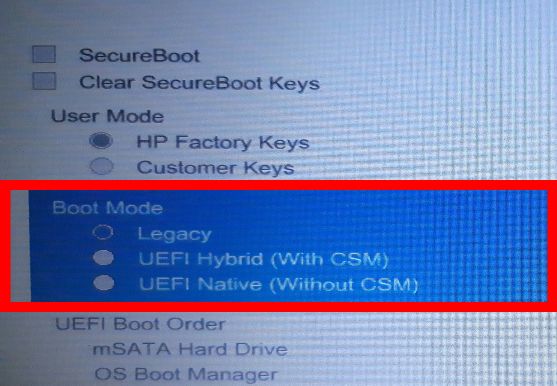
Change Boot Mode - Change this boot mode through the various options available while saving the settings and booting up again to check if the error is fixed.
If these BIOS Settings tweaks don’t solve the error, try the next solutions
Solution 2: Fix the Boot Loader
This solution requires you to have a USB drive which is bootable with Ubuntu. You can follow this guide to create a bootable USB drive with Ubuntu. After creating a bootable USB drive, follow these steps to fix the boot loader.
- Put the USB drive in the computer and boot while pressing the key associated with the boot menu for your specific computer model. The common keys are F9 or F12, but if they don’t work on your computer, do a quick google search for the key associated with your specific computer model.
- From the boot menu, select the USB Disk as the boot device. This will load Ubuntu on the computer.
- Click Try Ubuntu and wait for it to open an operational environment of the Operating System. In the next steps, we shall be installing the Ubuntu Boot-Repair program
- Open the terminal by clicking Ctrl + alt + T
- Enter the following command in the terminal to add the Boot-Repair repository to your computer
sudo add-apt-repository ppa:yannubuntu/boot-repair
- Update the local repositories with the following command
sudo apt-get update
- Install Boot-Repair with the following command. The command opens the program after the installation
sudo apt-get install -y boot-repair && boot-repair
- If the program doesn’t open after installation, you can open it from the apps menu or with the following command
boot-repair
- Click on Recommended Repair and wait for it to complete the repair process.
After the repair, the program will open a log file with the issues about the Hard Disk. You should read through the file to ensure that there’s no additional problem with the Hard Disk.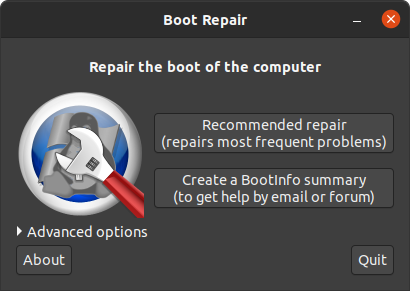
Ubuntu Boot-Repair - Restart your computer without the USB Drive and see if the error is fixed. If the error is not fixed, try the next solution.
Solution 3: Install Windows 10 alongside the existing Ubuntu
This can be a solution where the computer is unable to find the Ubuntu boot loader or if the partition with the boot loader is corrupt. Installing Windows 10 will set the computer to use the Windows 10 boot loader as the default instead of the Ubuntu boot loader.
- If you already have Windows 10 installed, you will need to replace it with this fresh installation. You can follow this guide about the installation of Windows 10
- After a successful install of Windows, your computer is most likely to work normally however you won’t have the option to boot to Ubuntu.
- To add the Operating System selection menu when booting, go through the steps in Solution 2 described above.
- If you boot into Windows 10 normally but unable to boot into Ubuntu even after following the steps in Solution 2, you will need to do a fresh installation of Ubuntu.
Solution 4: Replace the Hard Disk
This should be the last option since it has the most negative effect in terms of the cost as well as the data loss. Before buying a new Hard Disk, you can try using this Hard Disk as an external drive and see if you can access it and if you can then you probably won’t have to throw it away.

