How to Install Mi Dialer in HyperOS in 6 Easy Steps [2024]
- Xiaomi replaced MIUI with HyperOS, starting with the Xiaomi 14 series. Despite expectations, initial HyperOS releases did not bring back popular features like the Mi Dialer, which had been removed in some regions due to privacy concerns.
- HyperOS is region-specific, with different features available in different areas. Users in regions without the Mi Dialer have sought ways to reinstall it, leading to methods involving changing software regions or flashing custom ROMs.
- To get Mi Dialer on HyperOS, users can switch their device's region (e.g., Global to India) without unlocking the bootloader, or flash the Xiaomi.eu ROM, which needs an unlocked bootloader but offers less bloatware.
In 2023, Xiaomi announced that MIUI 14 would be the last of its name for the company’s new mobile devices. Instead, a new, redesigned operating system named “HyperOS” would take its place. Starting with the Xiaomi 14 series, HyperOS would become the standard operating system for all future Xiaomi phones.
With this announcement, many users expected that some familiar features, including the popular Mi Dialer, would make a comeback. These features had been pulled back from recent MIUI versions for certain regions. However, the initial release of HyperOS didn’t include any of these updates. This article will provide a detailed guide on installing the stock Mi Dialer on devices running HyperOS.
Table of Contents
Why Doesn’t My Phone Have the Stock Mi Dialer?
While Xiaomi’s mobile operating system, HyperOS, boasts the same functionality on the surface, it’s actually quite diverse and differs for certain regions and phones. It doesn’t necessarily provide the same feature set for the same phone in every region.
HyperOS is divided into specific software versions catering to particular regions in different ways. For example, there’s a HyperOS Global ROM, one for China, Indonesia, Russia, India, and even Europe.
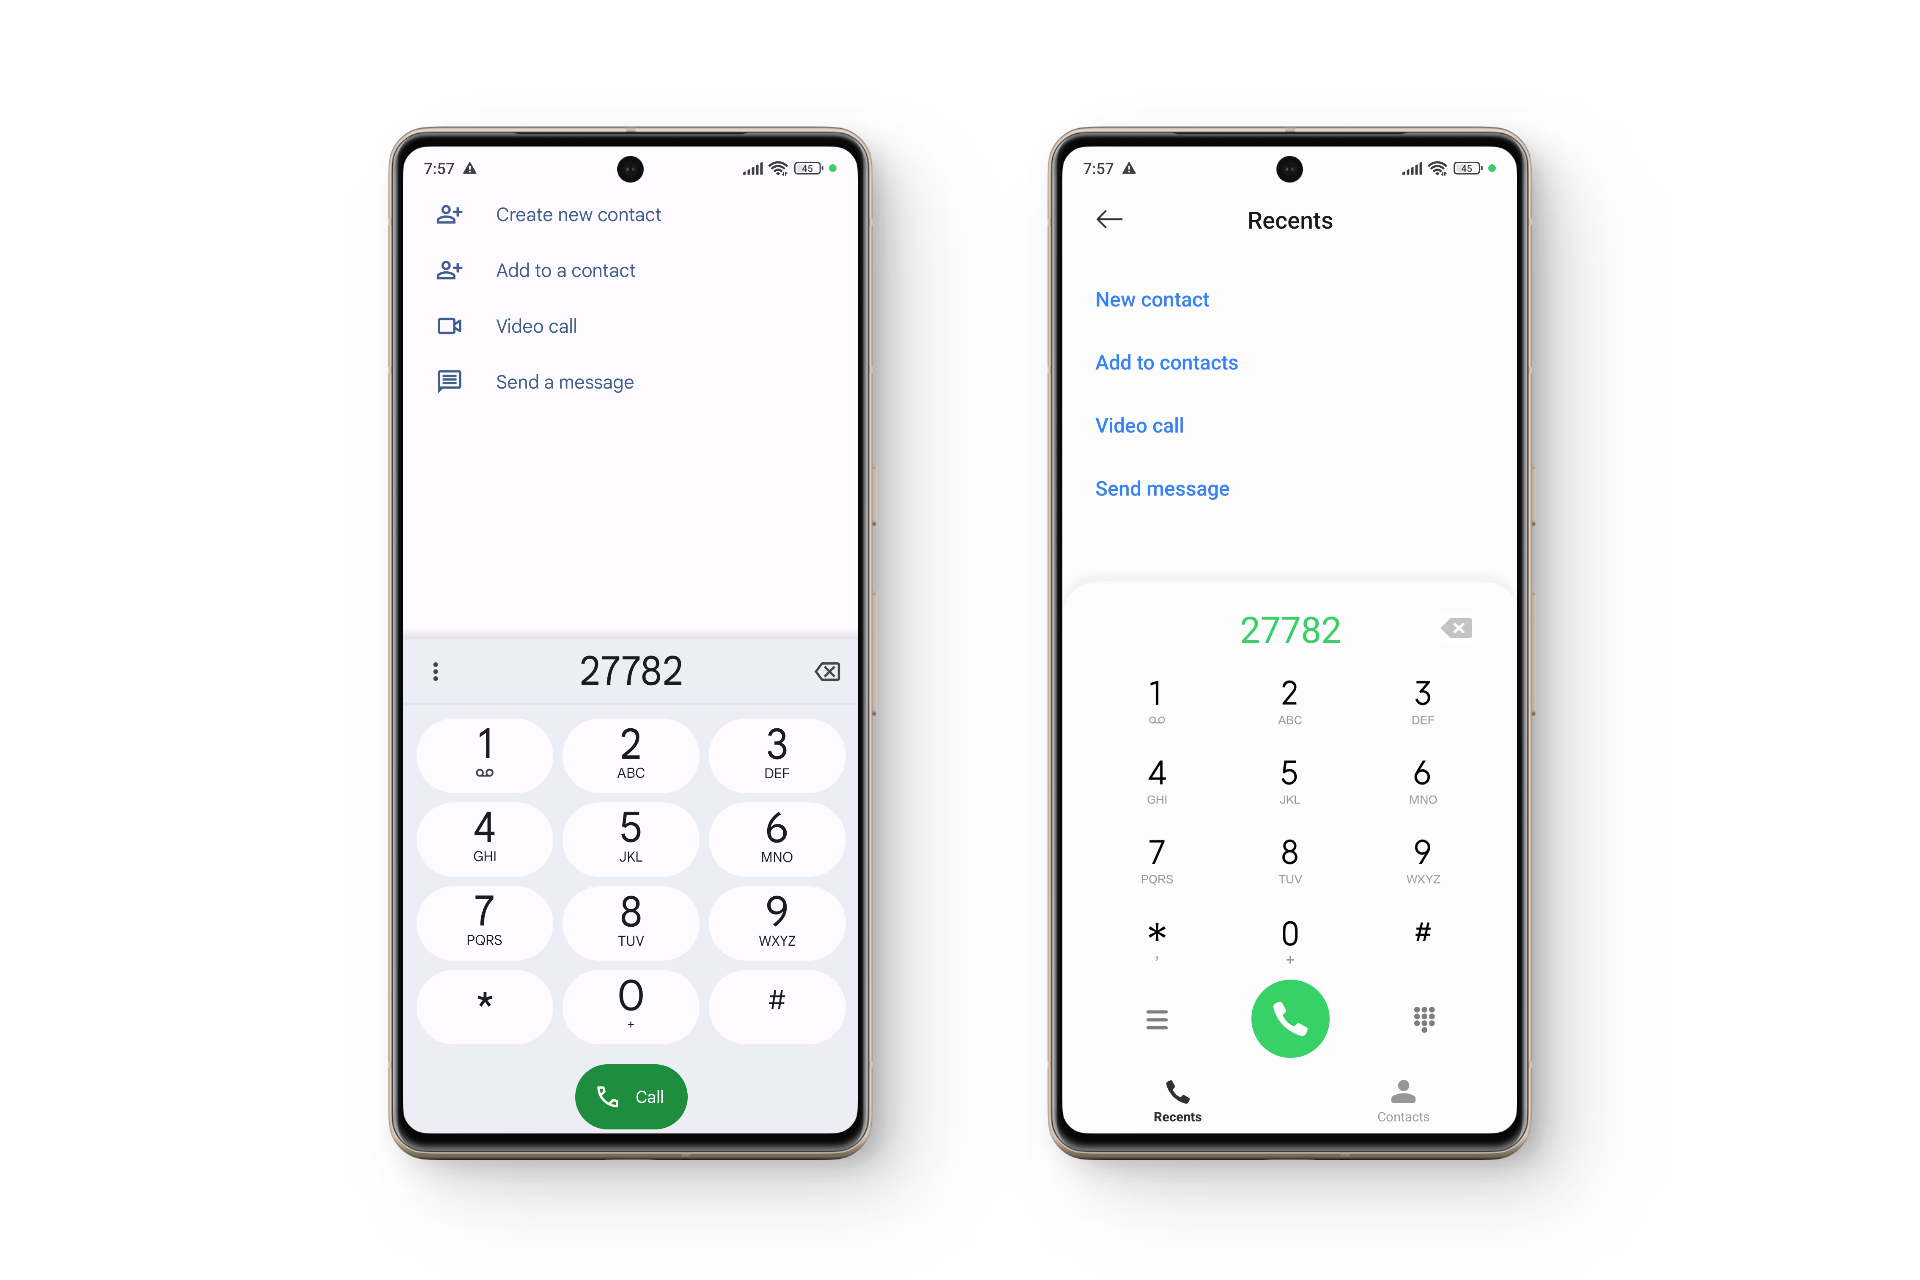
In 2019, due to regional privacy restrictions, Xiaomi replaced the Mi Dialer with Google’s Phone and Messaging apps in its Global and European ROMs. The Mi Dialer offered features like call recording, but without notifying the recipient, which raised privacy concerns.
This move wasn’t well-received by users, who sought alternatives to bring back the Mi Dialer. Some switched to devices with a different software region, while others opted to flash a different ROM. This period also saw the rise of MIUI-inspired custom ROMs (like Xiaomi.eu) that restored features Xiaomi had removed, including the Mi Dialer.
READ MORE: How to Install HyperOS Moon Super Wallpaper on Any Android? ➜
How to Get Mi Dialer in Your HyperOS Device?
Xiaomi didn’t port back the excluded featureset in the same regions in HyperOS, which meant that while regions like India, Indonesia and China had Mi Dialer built into their HyperOS devices, the other regions were stuck with the Google Phone app.
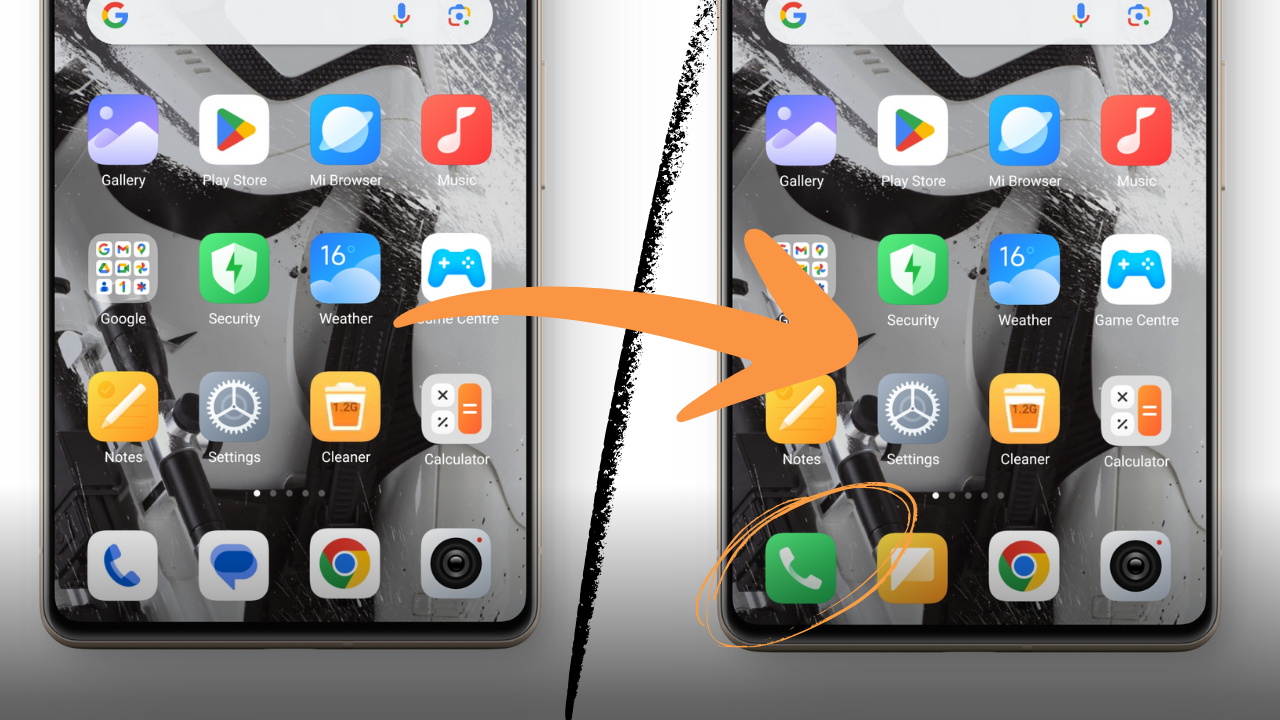
There are three main ways, in general that would being back the Mi Dialer to your phones, fully operational. These are:
- Switching to a Supported HyperOS ROM — Works with Locked Bootloader
- Flashing the Xiaomi.eu Custom ROM — Requires an Unlocked Bootloader
- Porting the Mi Dialer Module via Magisk — Requires Root Permissions (Not Recommended for Normal Users)
READ MORE: How to Backup Data Before Flashing a Custom ROM [2024] ➜
↪ Precautionary Measures
The procedures mentioned above may appear somewhat technical for some users, which is why it is always advisable to have a backup plan in place in case anything goes sideways. As a precautionary measure, the initial course of action should be to save all important data, either by storing it externally or using cloud storage, as there is a possibility that all data may need to be erased.
It is also important to know what to do if any of the procedures mentioned above lead to your phone becoming bricked, rendering it unusable. For this, we advise you to enable “USB debugging” in your phone’s Settings. This is because if the HyperOS update causes issues, or your phone crashes or the operating system becomes corrupt, there is always the option to flash the stock firmware via an external computer.
To enable USB Debugging, follow the steps below:
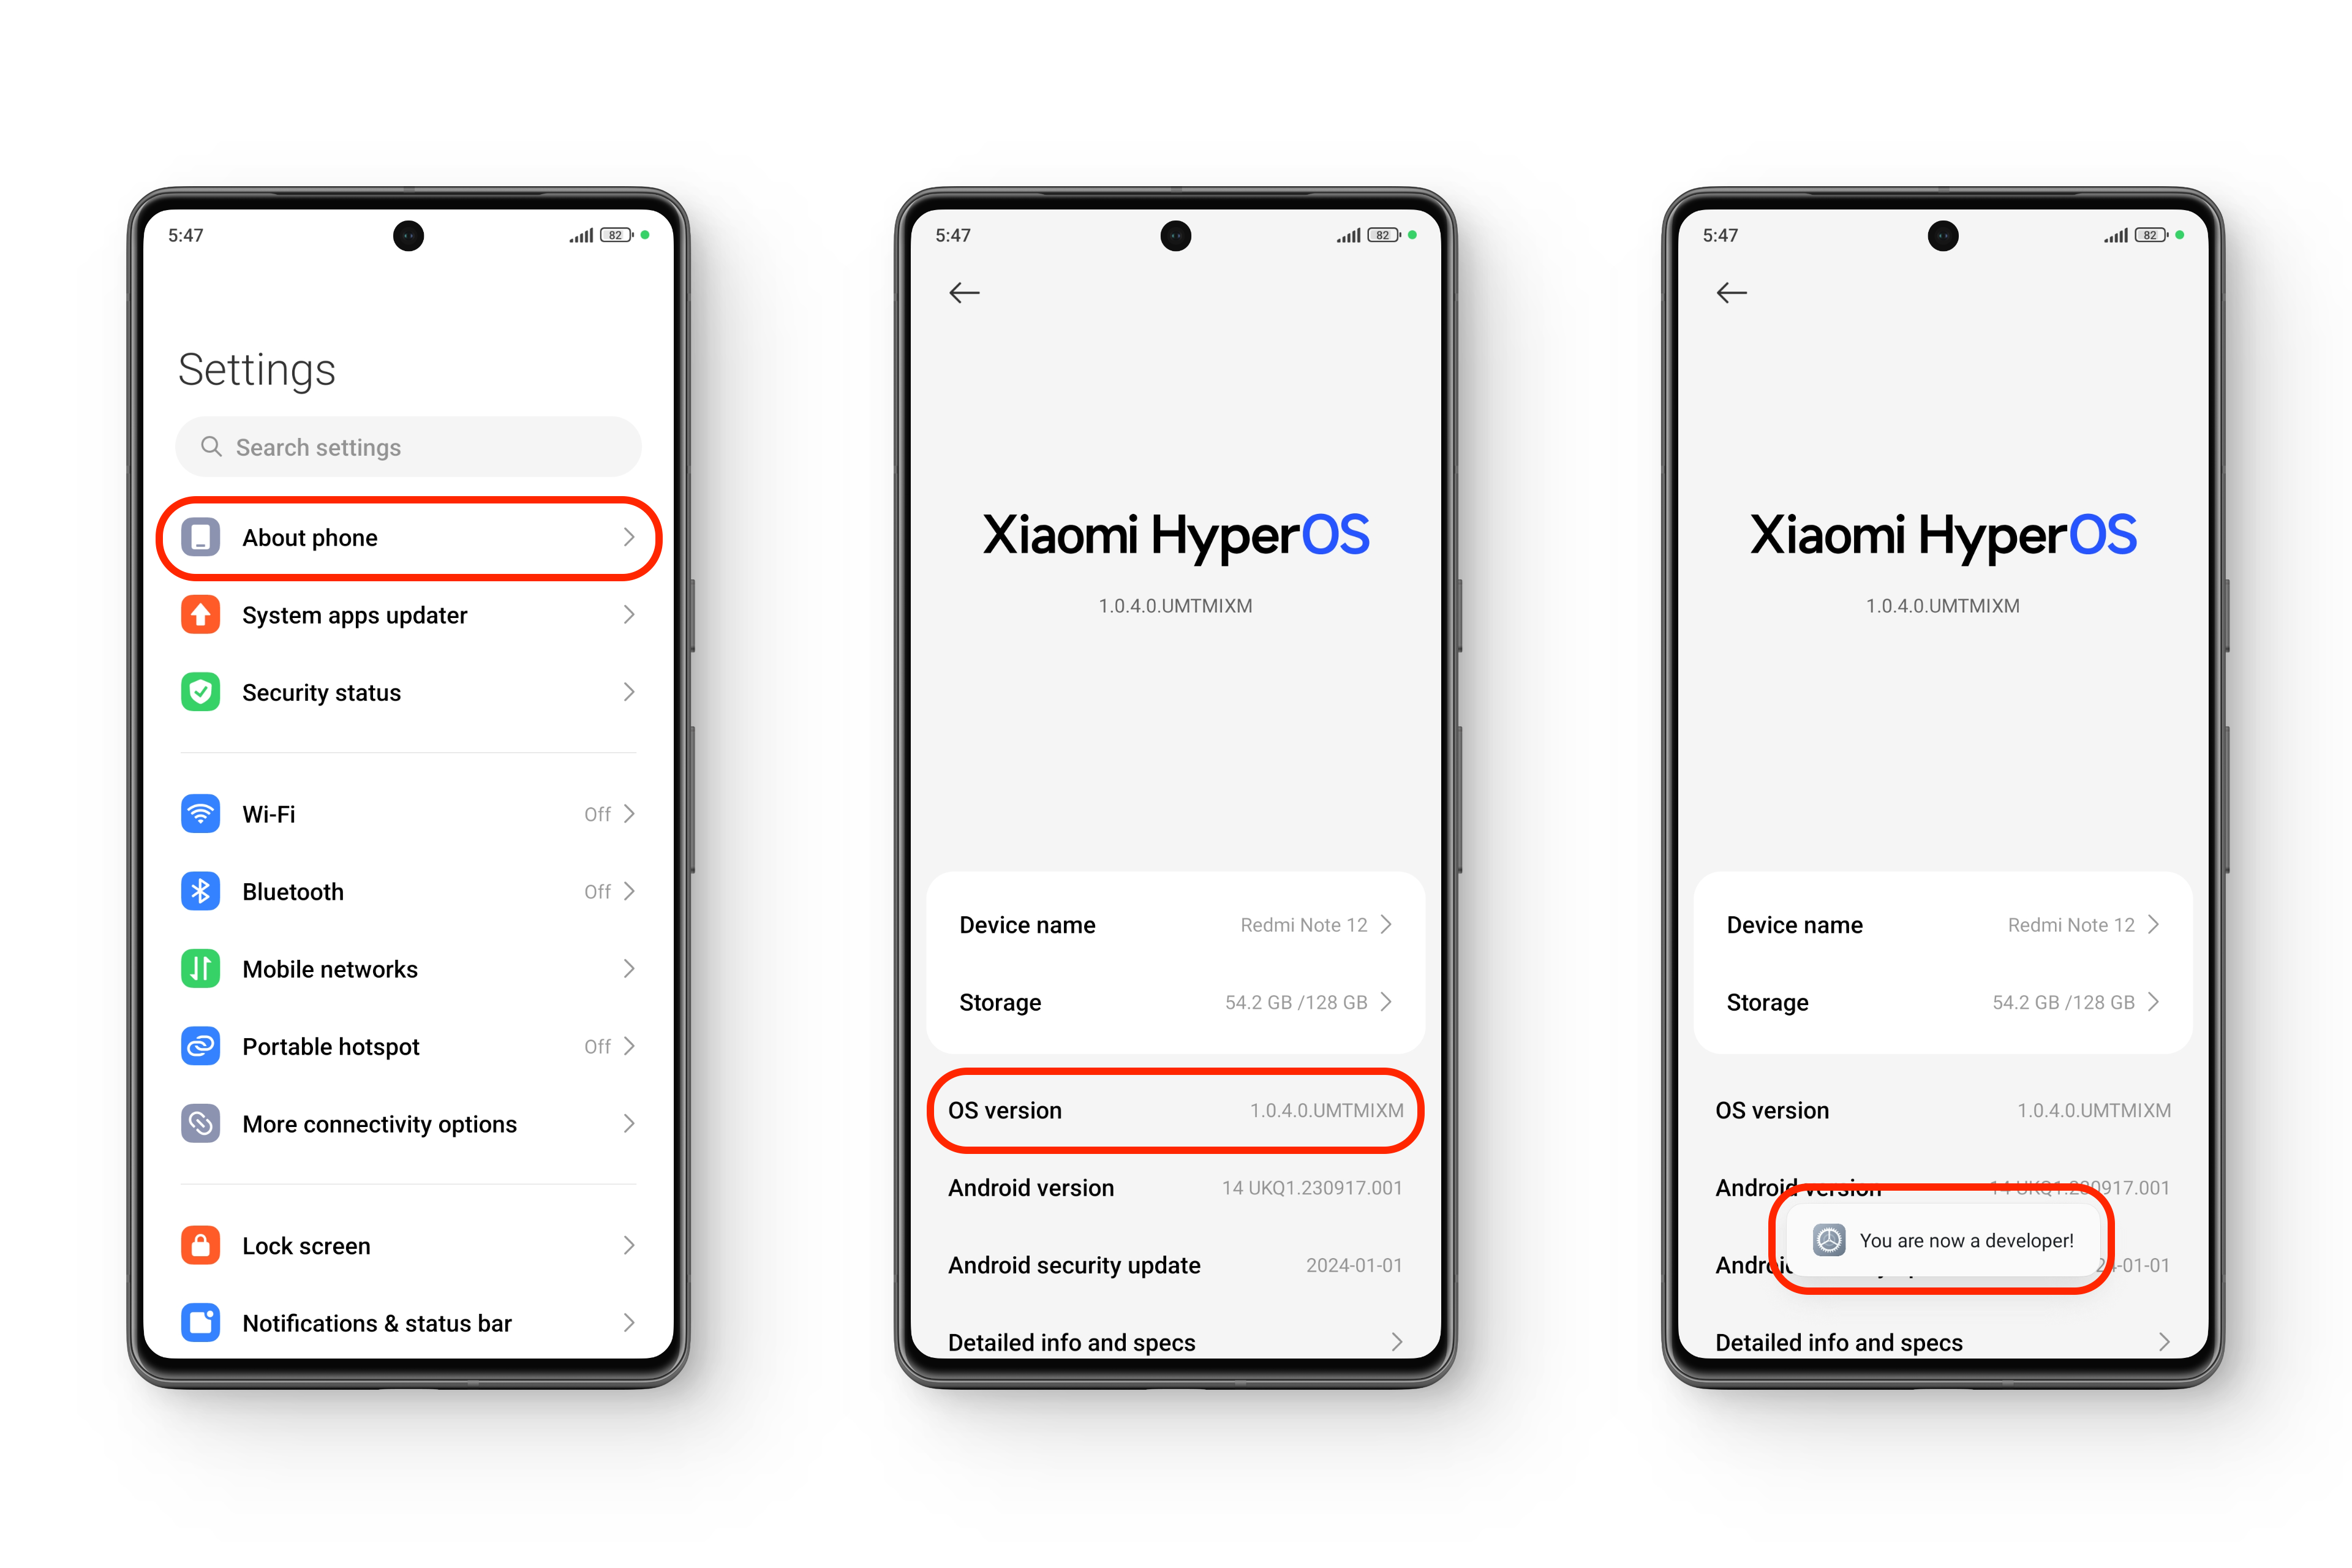
- Go to Settings and tap on “About Phone.”
- Look for the “OS version,” and tap on it several times till you see the message: “You are now a developer.”
Enabling “Developer options” in HyperOS - Head back to Settings and scroll down to find “Additional settings.” Tap on this.
- Scroll down to “Developer options,” and tap on it.
- Look for “USB debugging,” and turn the toggle on.
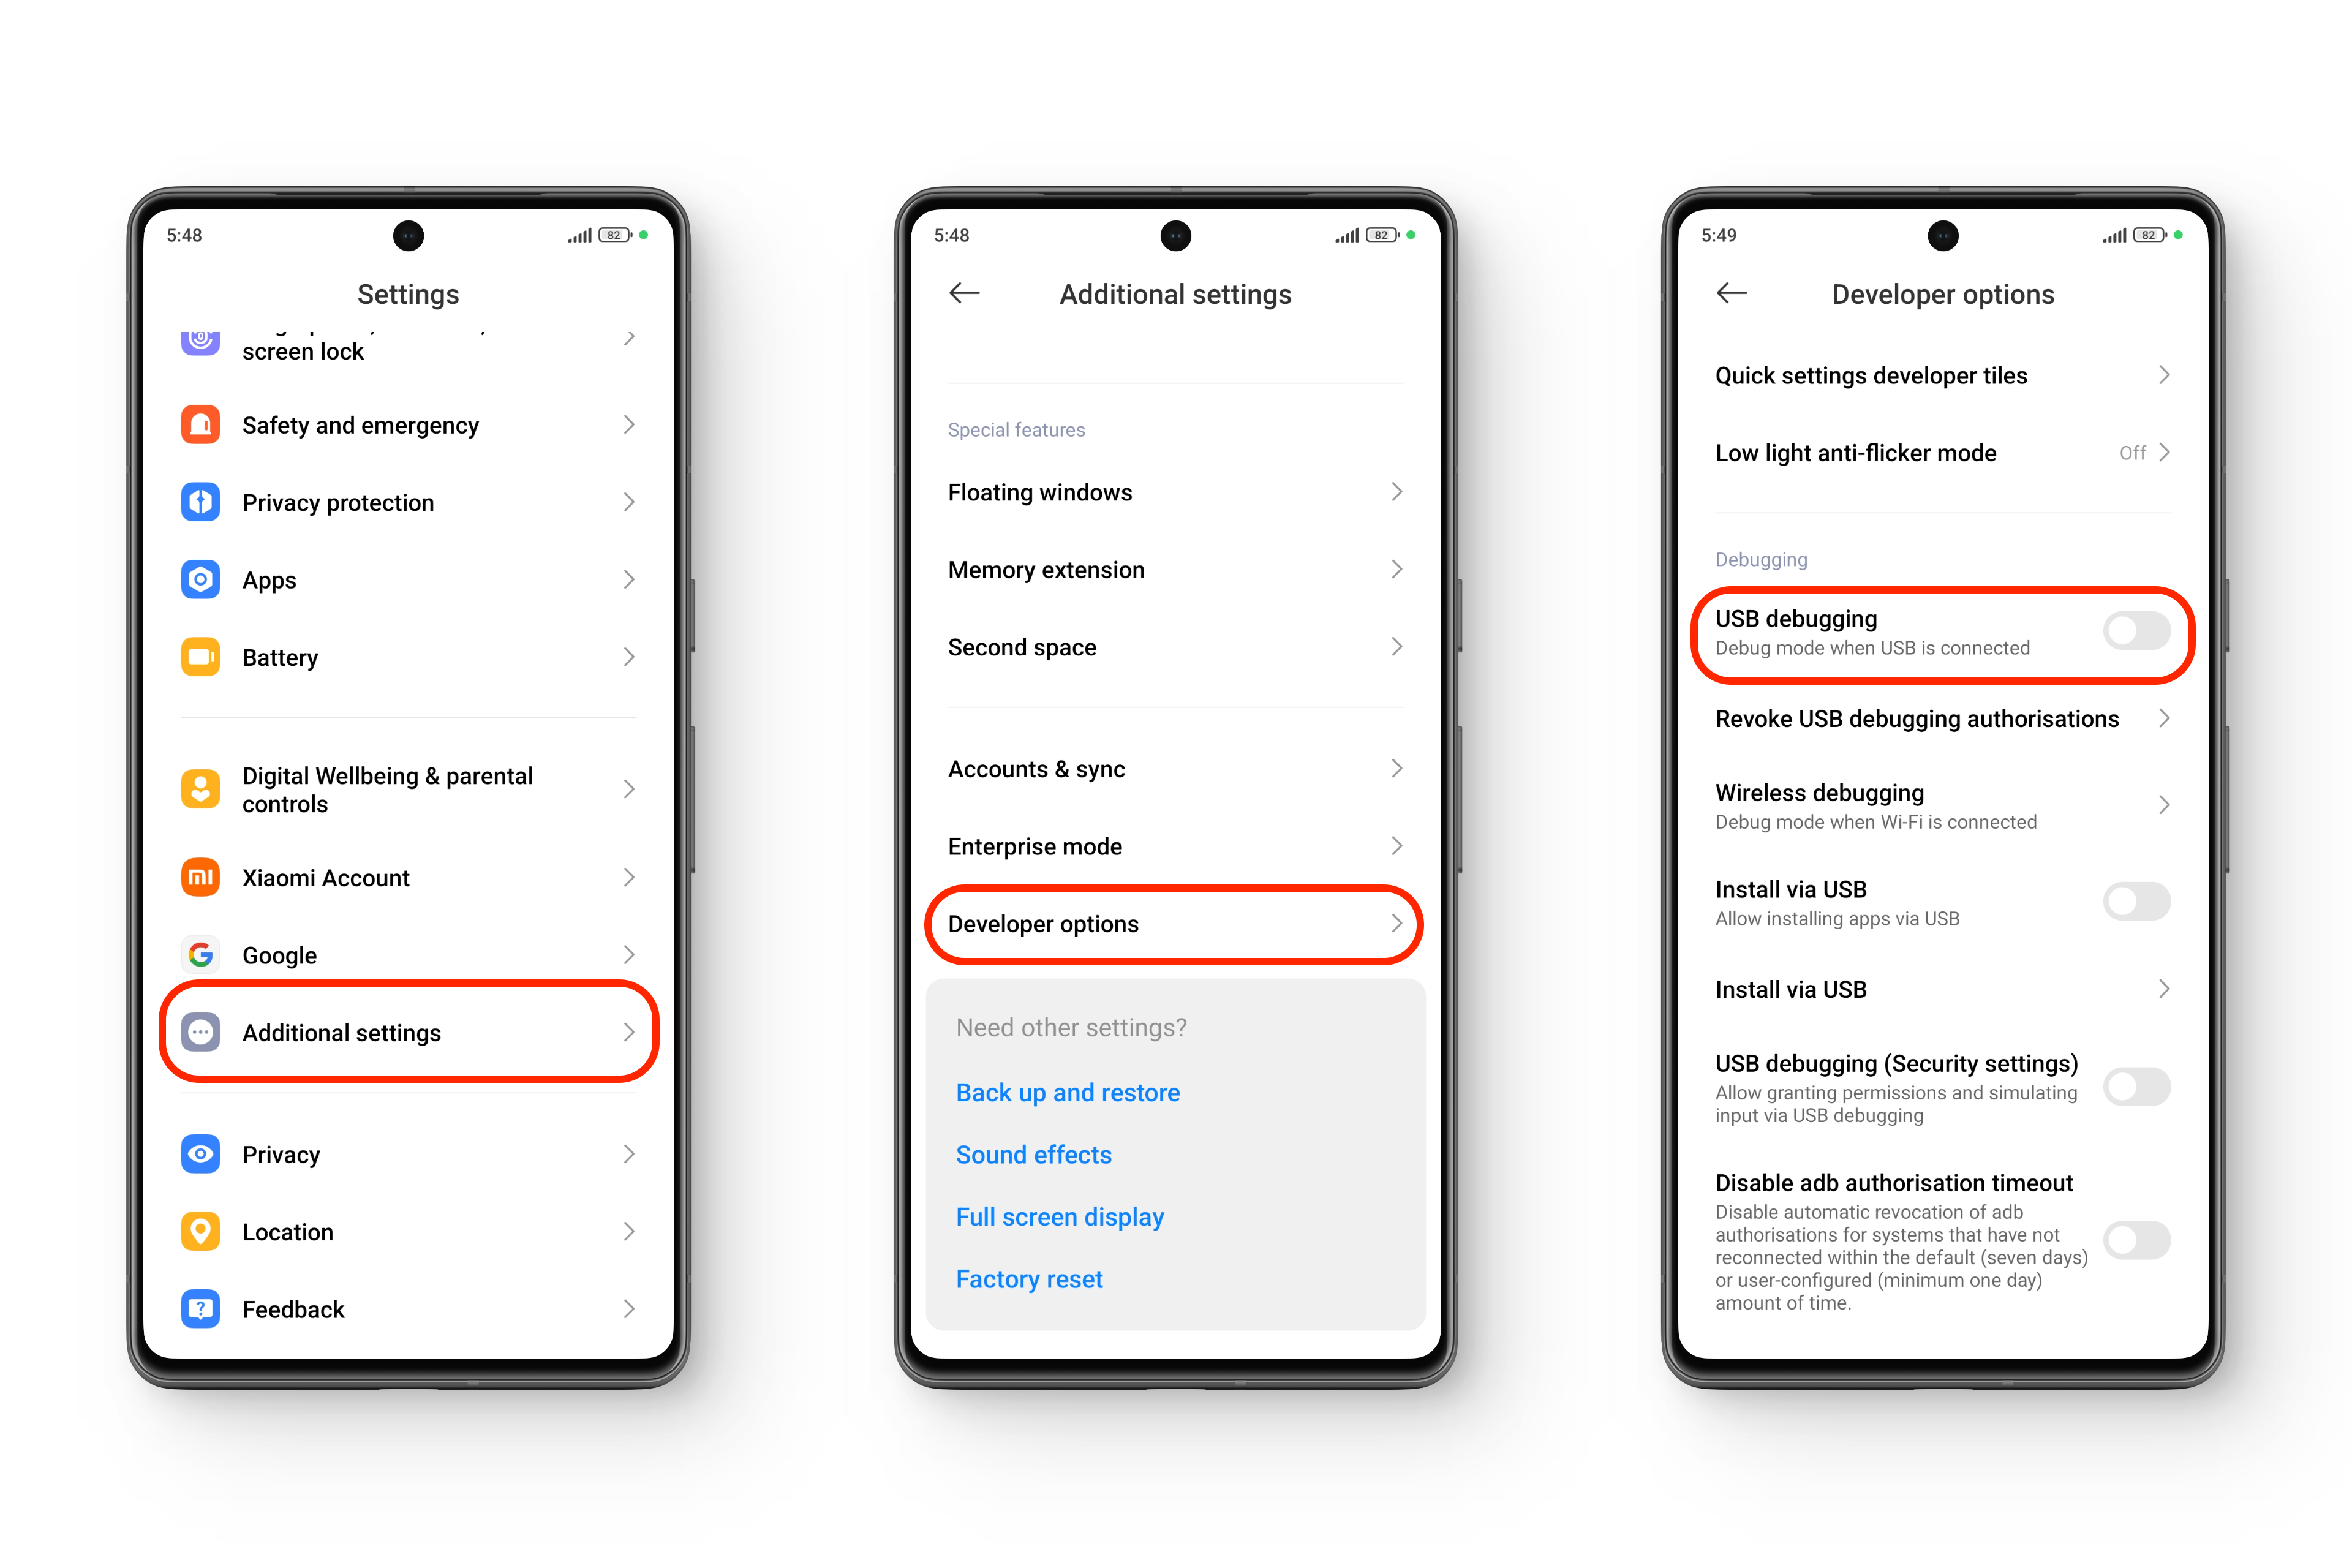
Enabling “USB debugging” in HyperOS - In the confirmation dialog that pops up, tap “OK.
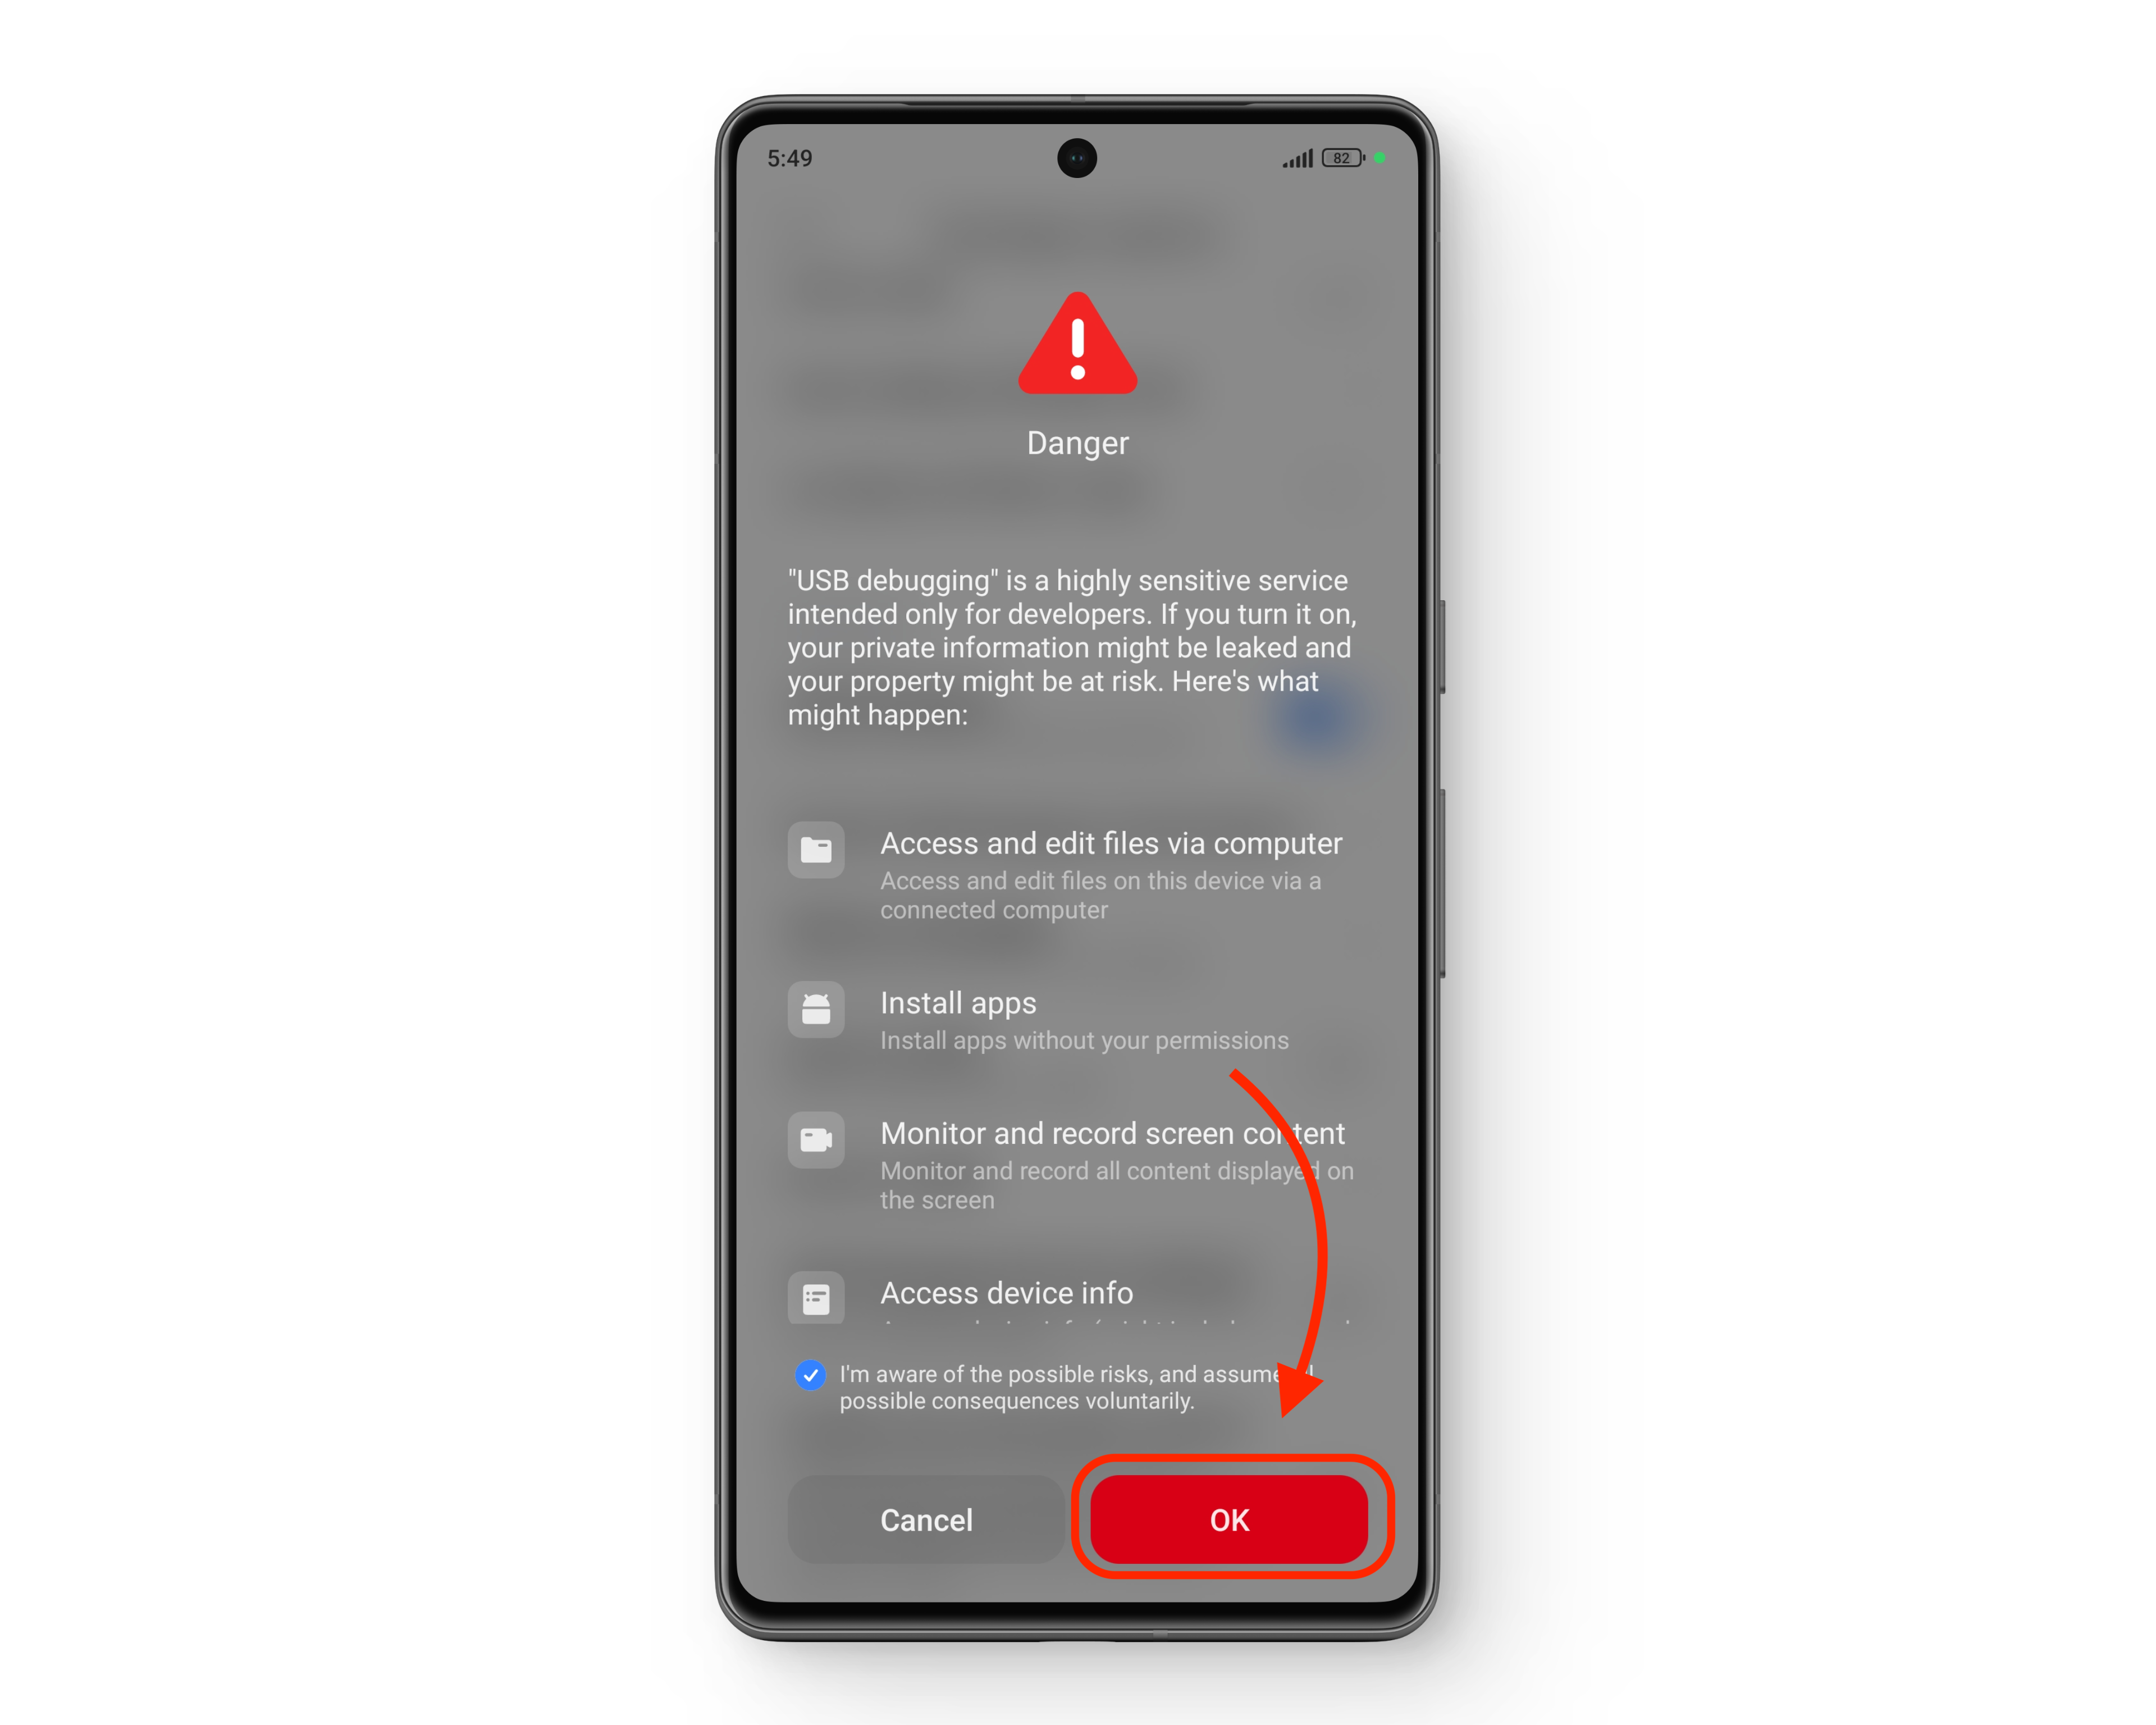
The (HyperOS) precautionary dialog box
READ MORE: How To Restore Background Play Option in HyperOS? ➜
1) Switching to a Supported HyperOS Region (Global to India)
There are two approaches to enabling the Mi Dialer app on your phone. The first option involves switching your phone’s ROM to a region where the app is supported. In this case, we’ll focus on changing from a Global HyperOS ROM to the Indian region.
Our approach will be to present the region change as a software update. We’ll first use Mi’s System Updater app to authenticate the update while still running on the Global HyperOS ROM. Then, during the installation process, the system will switch to the Indian HyperOS ROM.
Step 1: Downloading the Recovery ROM Files
Firstly, you will need to download the necessary ROM files for installation. There will be two different files required: one corresponding to the exact region your phone is operating in (for authentication), and the other being the ROM you intend to switch to. It’s crucial to note that you should download the Stable ZIP versions of the firmware files, not the Fastboot files.
To download the files, we’ll use MiFirm. The links to the specified files are provided as it’s important that both ROM files for each region are more recent than the one currently installed on your phone. These will most probably differ from the ones replicated in the steps down below.


Step 2: Moving the Recovery ROM Files to Main Partition
Once the files have been downloaded, you’ll find them in the Downloads folder within your internal storage. To proceed with flashing the update, these files need to be copied to the main partition of the internal storage.
- From your home screen, open the File Manager app.
- On the bottom bar, tap “Storage.”
- Scroll down and locate the “Download” folder. Open it.
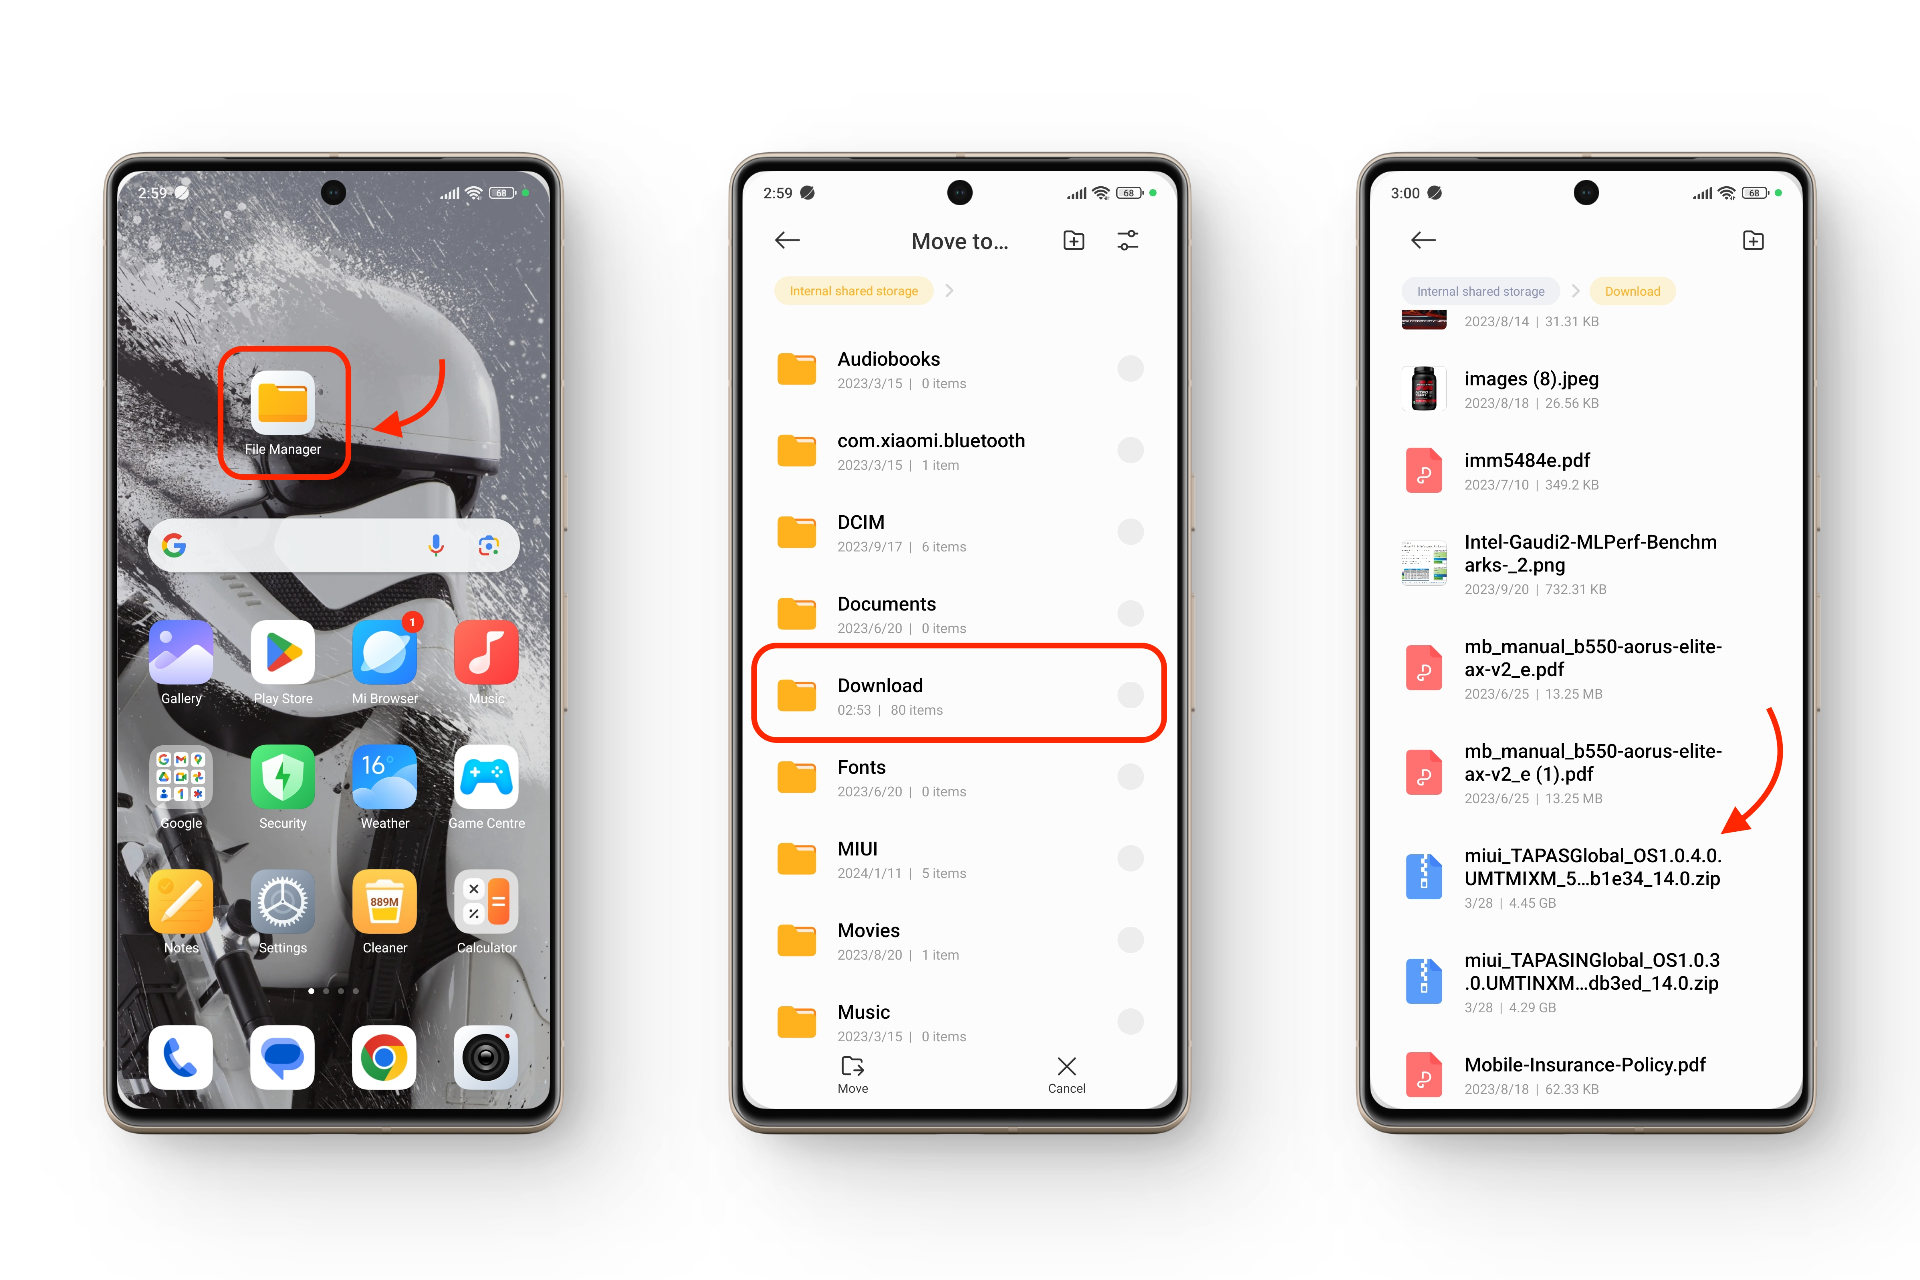
Accessing the recovery ROM files from the device’s internal storage. - Locate the ROM files. Long press on one of them to select both files.
- In the bottom menu, tap “Move.”
- Choose “Internal shared storage,” then tap “Move” again to confirm.
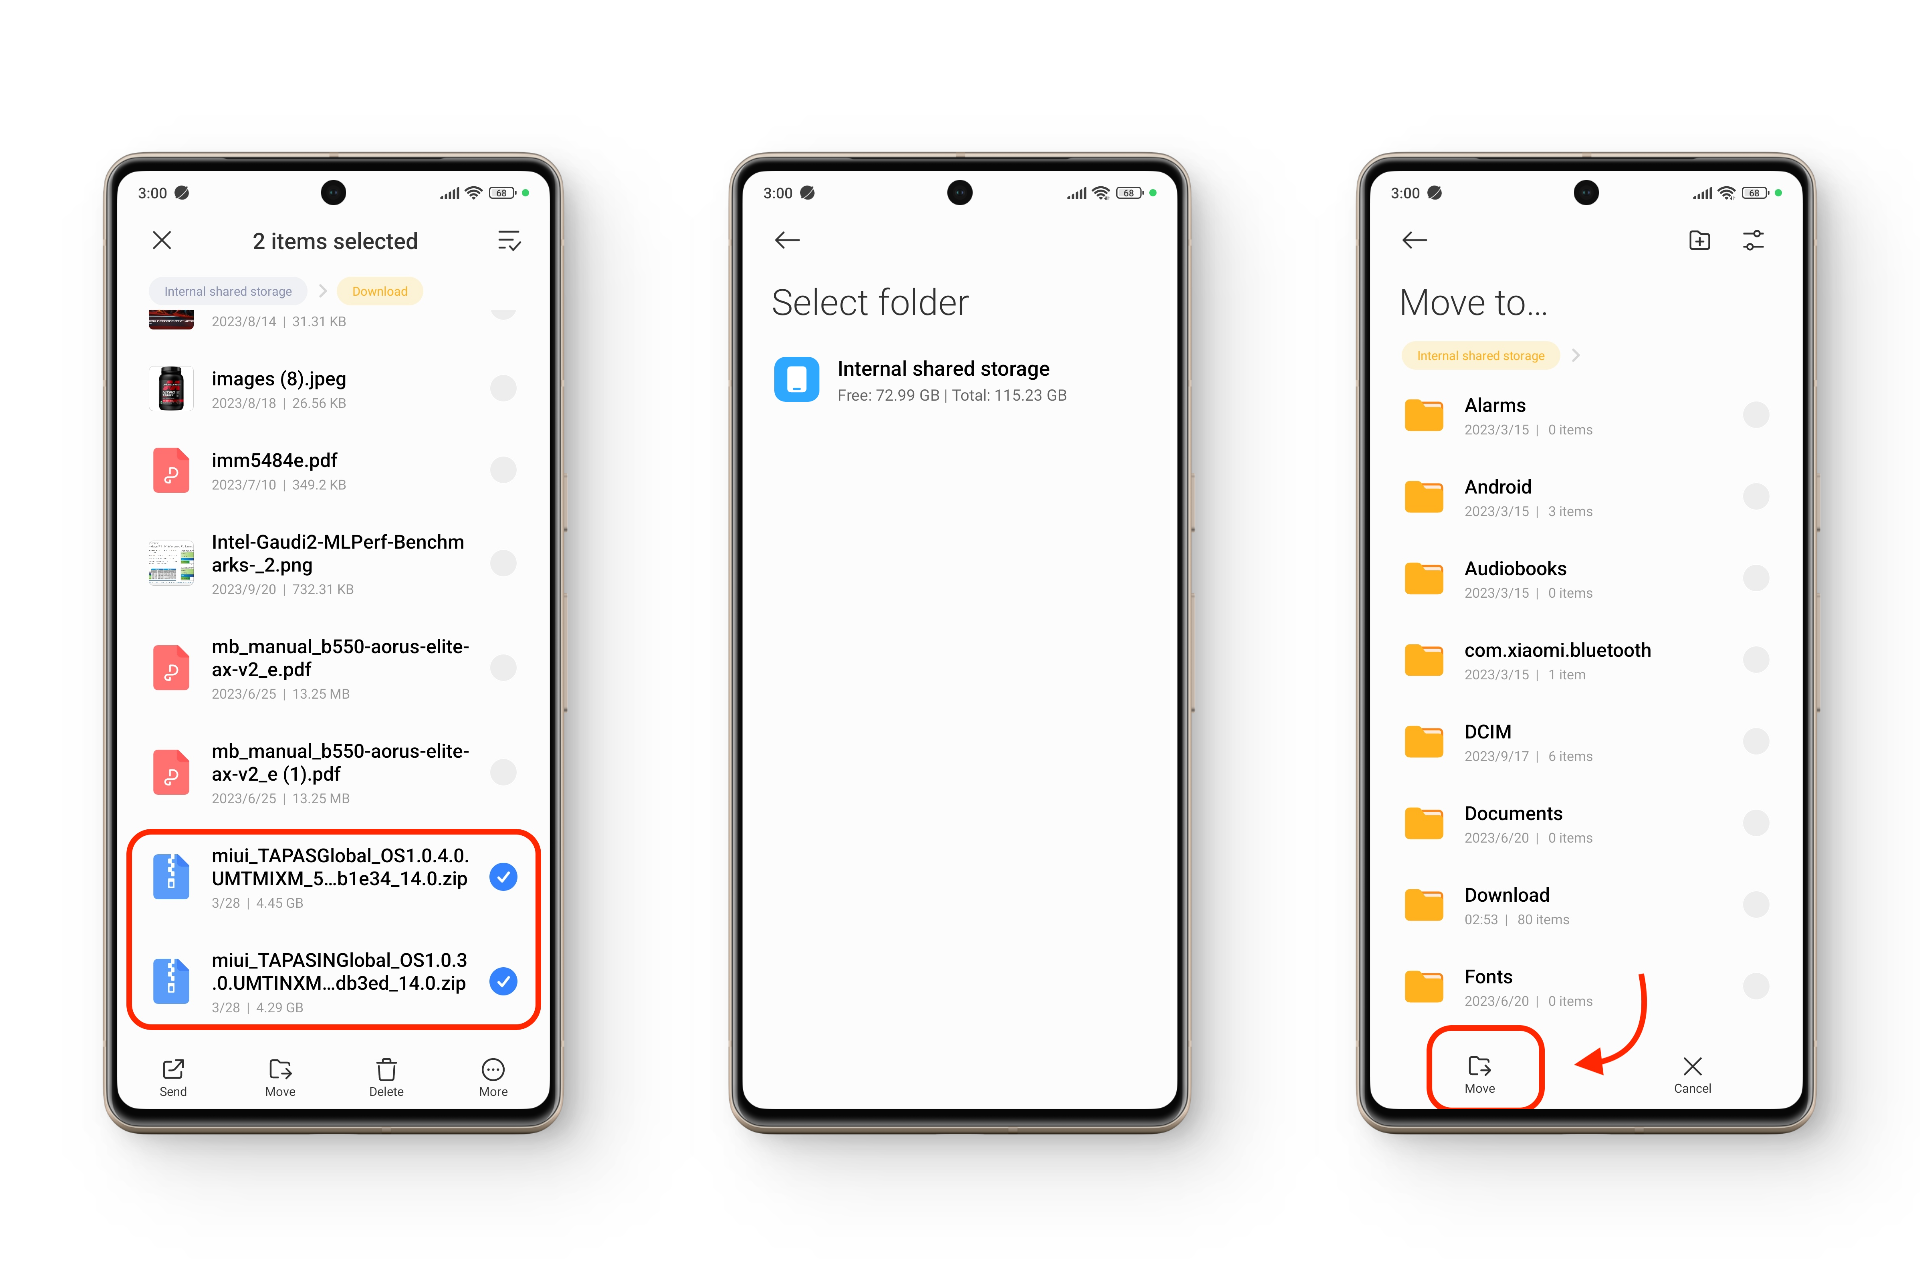
Moving the ROM files to the main partition.
Step 3: Setting up the Recovery ROM Files
In the internal storage, both files will now be used to manually push the update. However, HyperOS does not allow direct firmware updates from one region to another. To bypass this limitation, we’ll need to first authenticate the update using one file (the Global ROM), and then rename the India ROM to the same name to proceed with the update process.
Here’s how to rename the Global ROM:
- Long-tap on the Global ROM recovery ZIP file.
- In the bottom menu, tap on “More” > “Rename.”
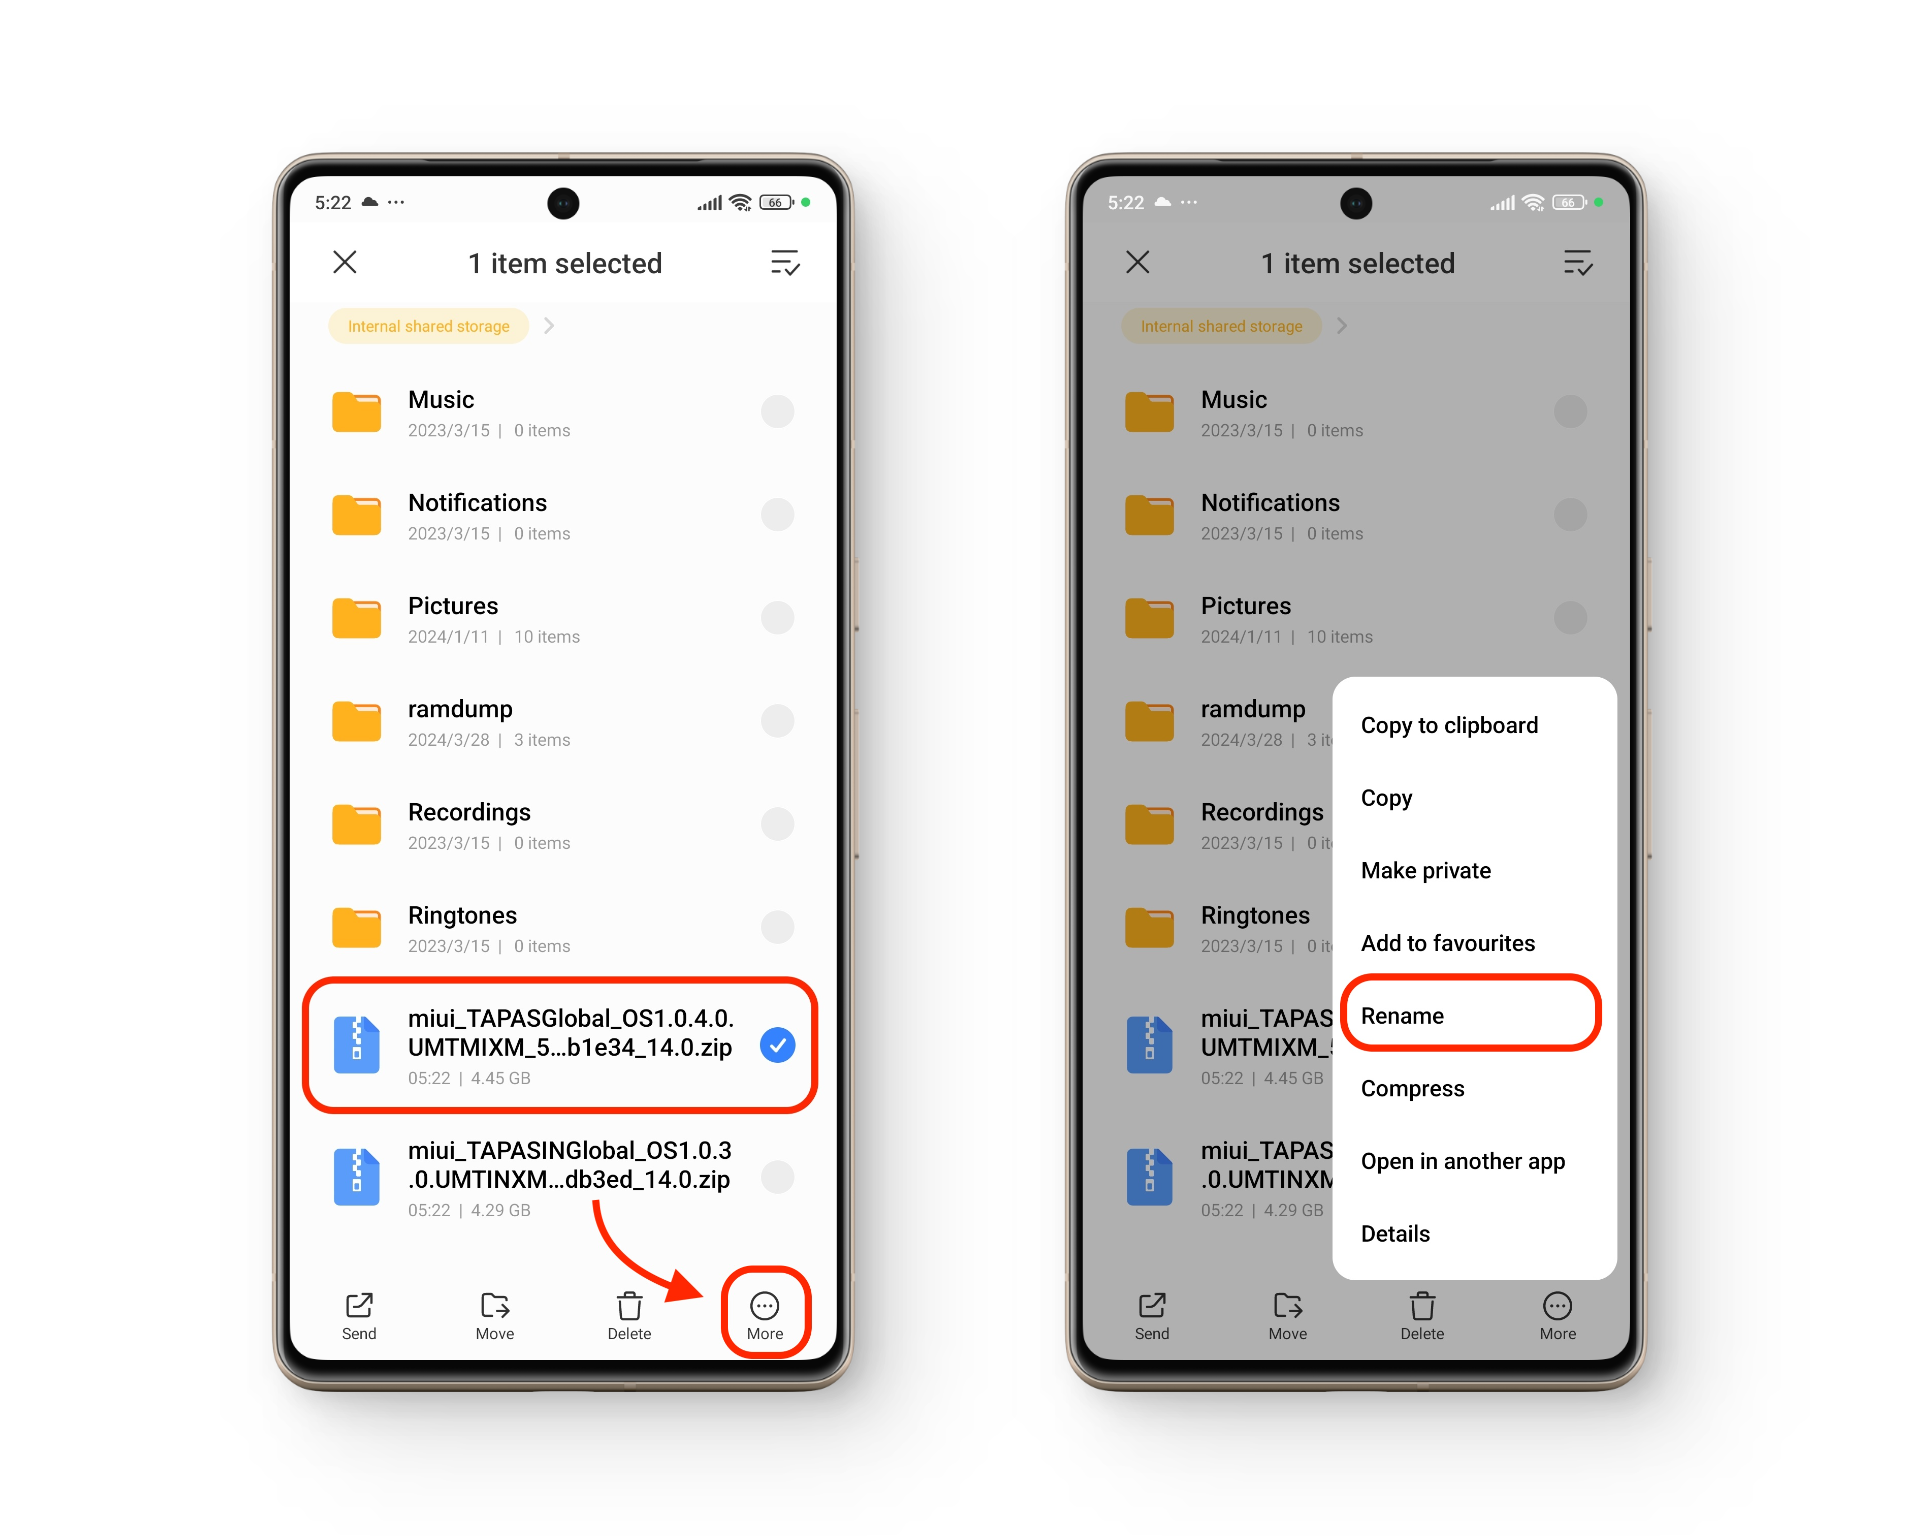
Renaming the Global ROM file. - Choose a short and memorable name for the file.
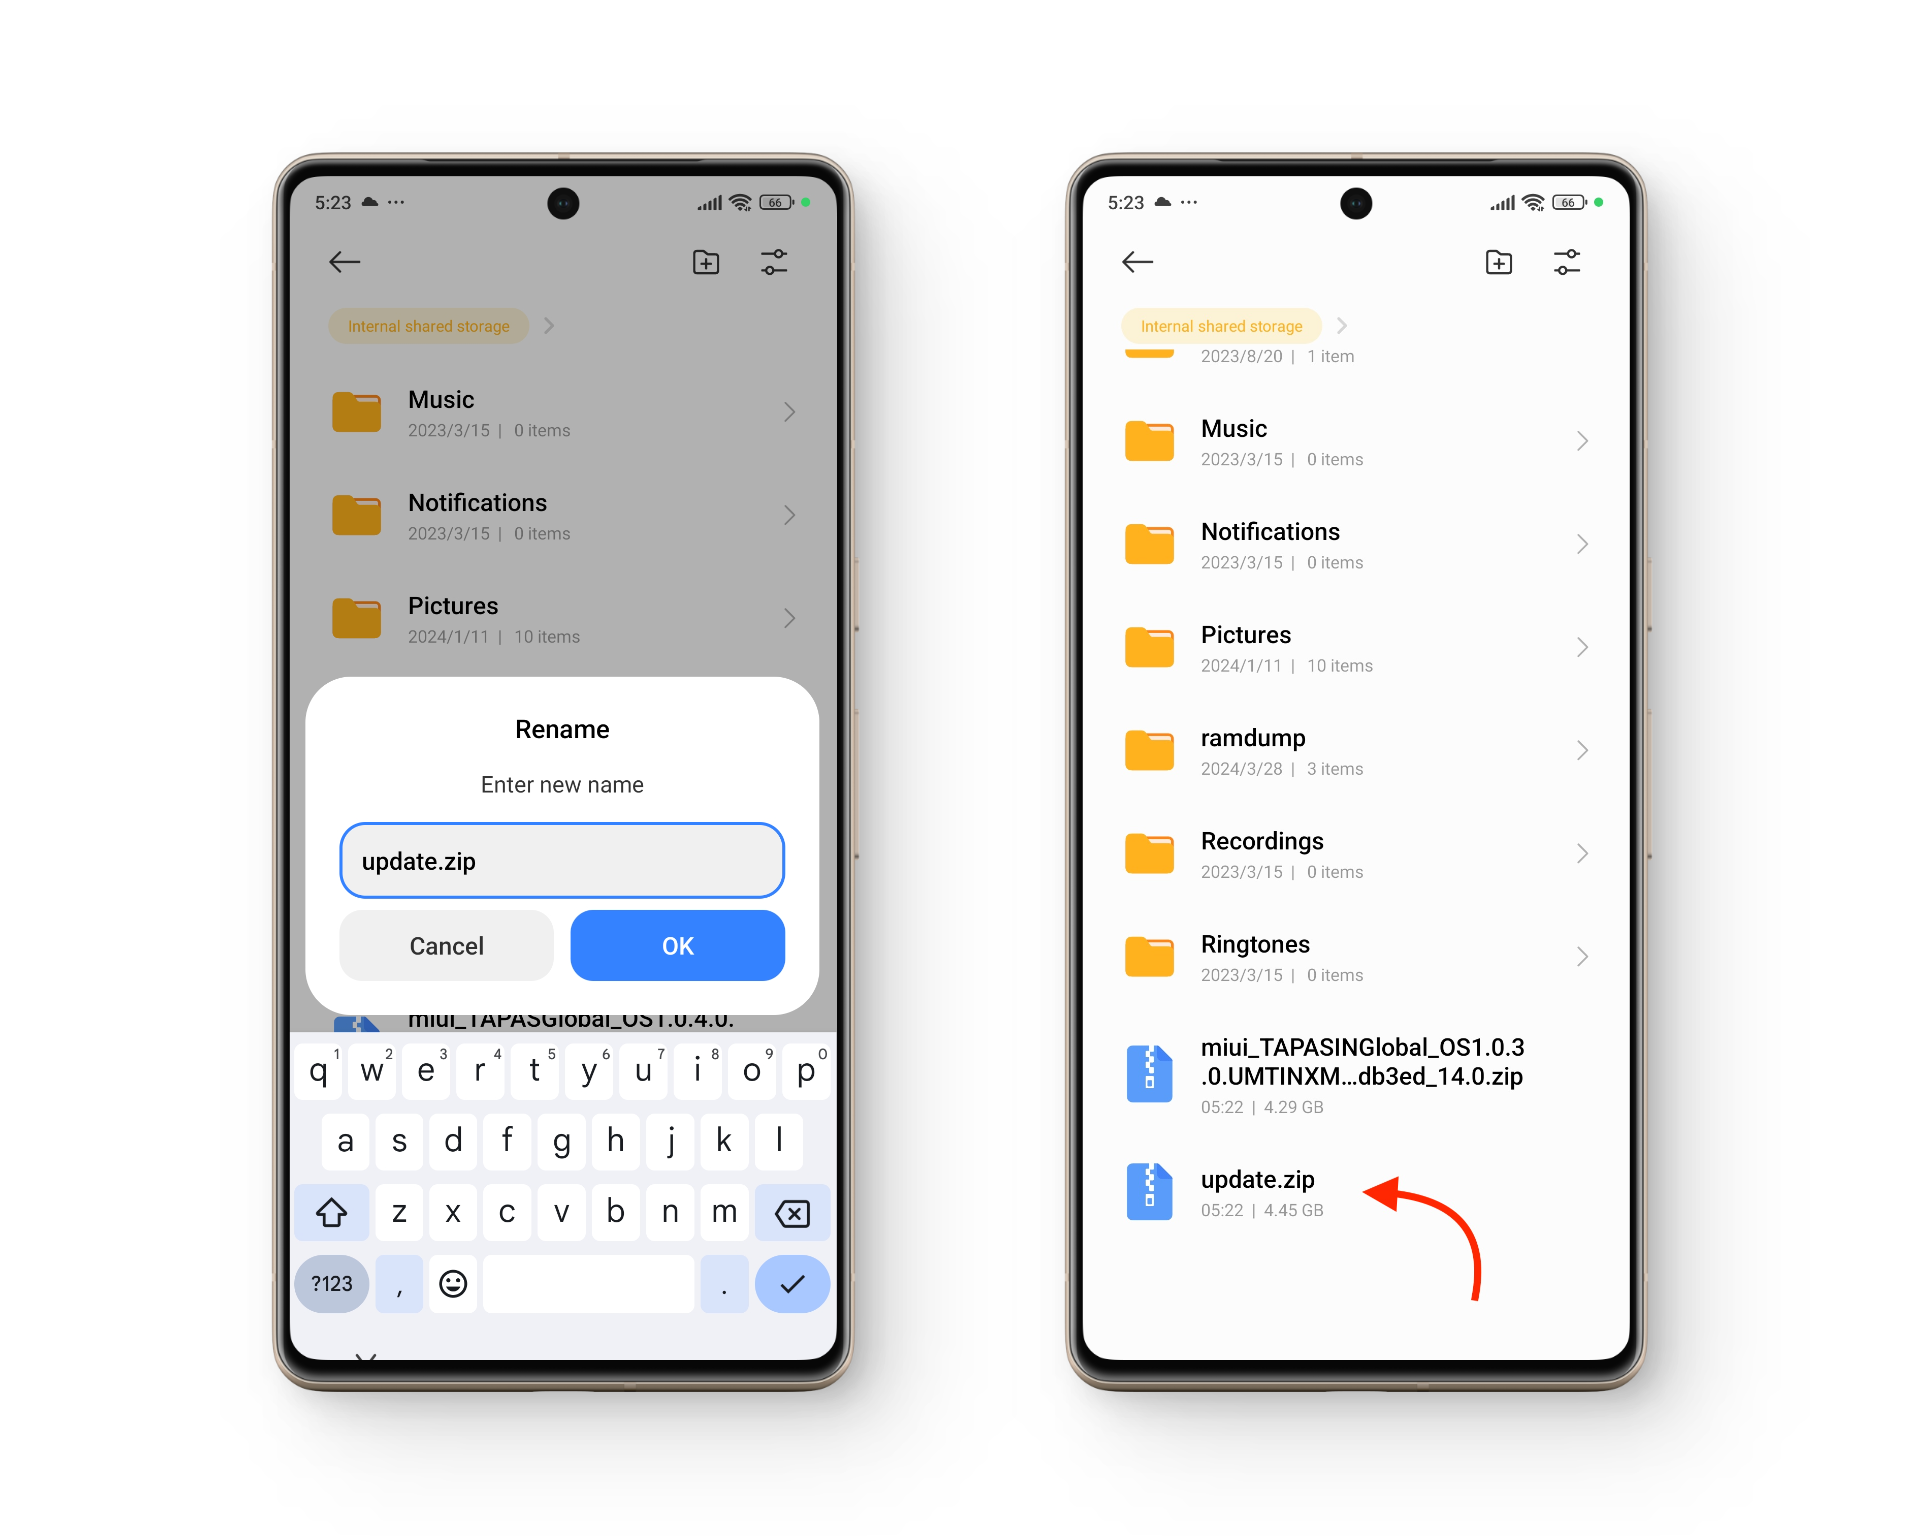
Choose a short, memorable name for the file.
Step 4: Adjusting the Phone’s Settings for Manual Update
Before we begin manually pushing the update, there are a few things to check. The first is to clear the app data for the Updater app, and the second is to change the phone’s region to “United States.” This step bypasses a basic security check that HyperOS performs on the client-end after a specific update file is selected for installation.
Here’s how to clear the app data for Updater:
- Go to Settings and select “Apps.”
- Choose “Manage apps.”
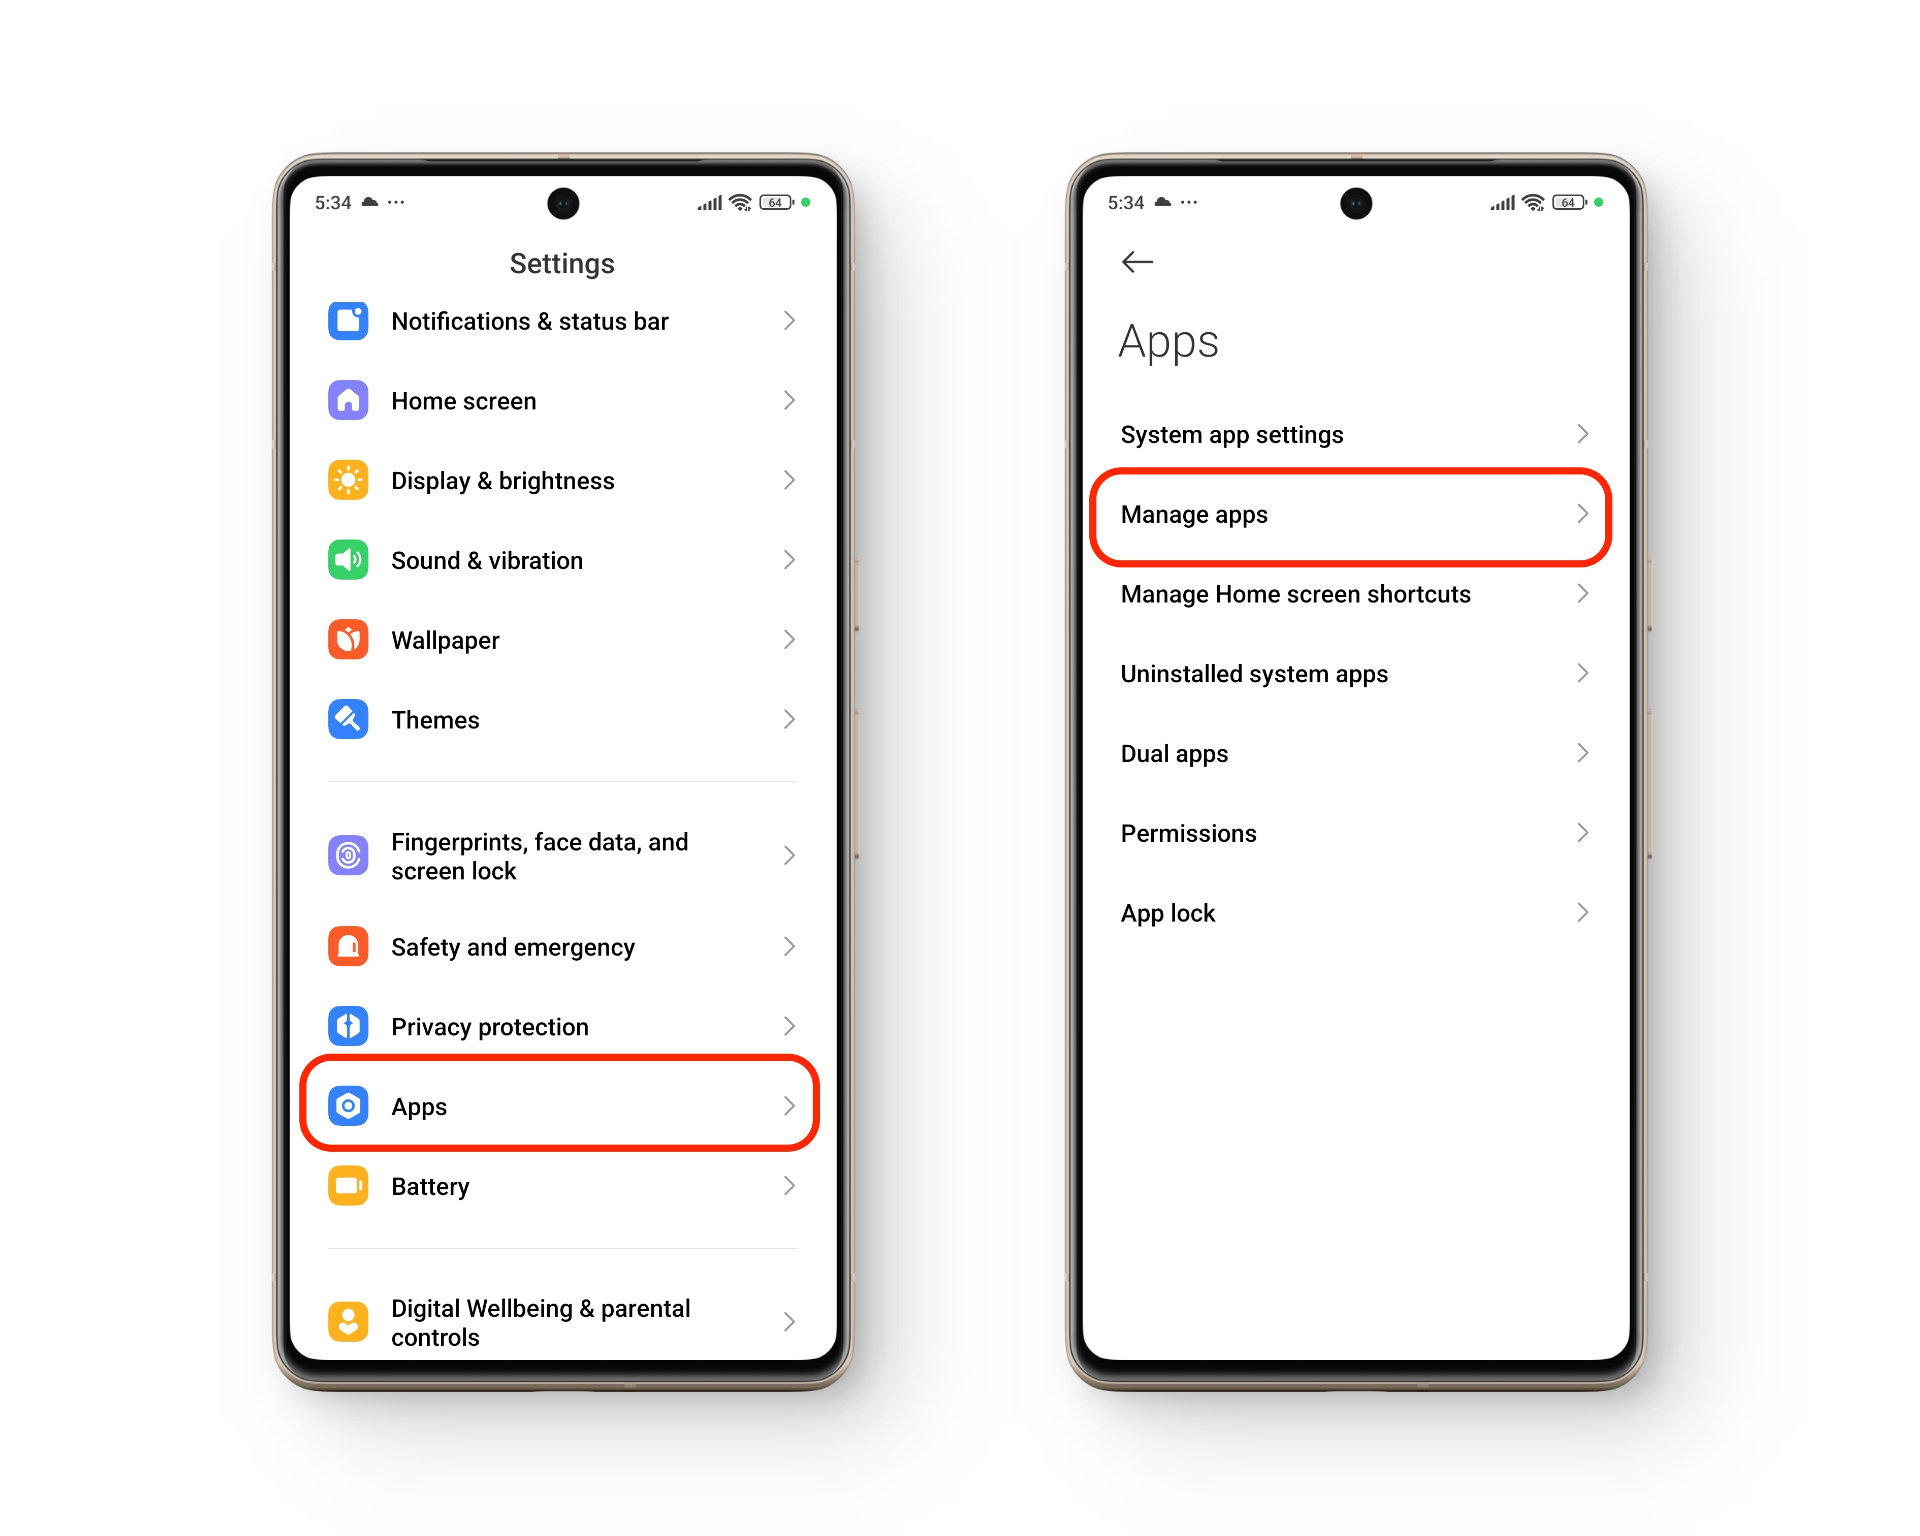
Accessing App Settings in HyperOS - Locate the three vertical dots in the top right-hand corner. Tap on them and choose “Show all apps.”
- In the search bar, type “Updater,” and once the app appears, tap on it.
- At the bottom of the screen, tap on “Clear all data.”
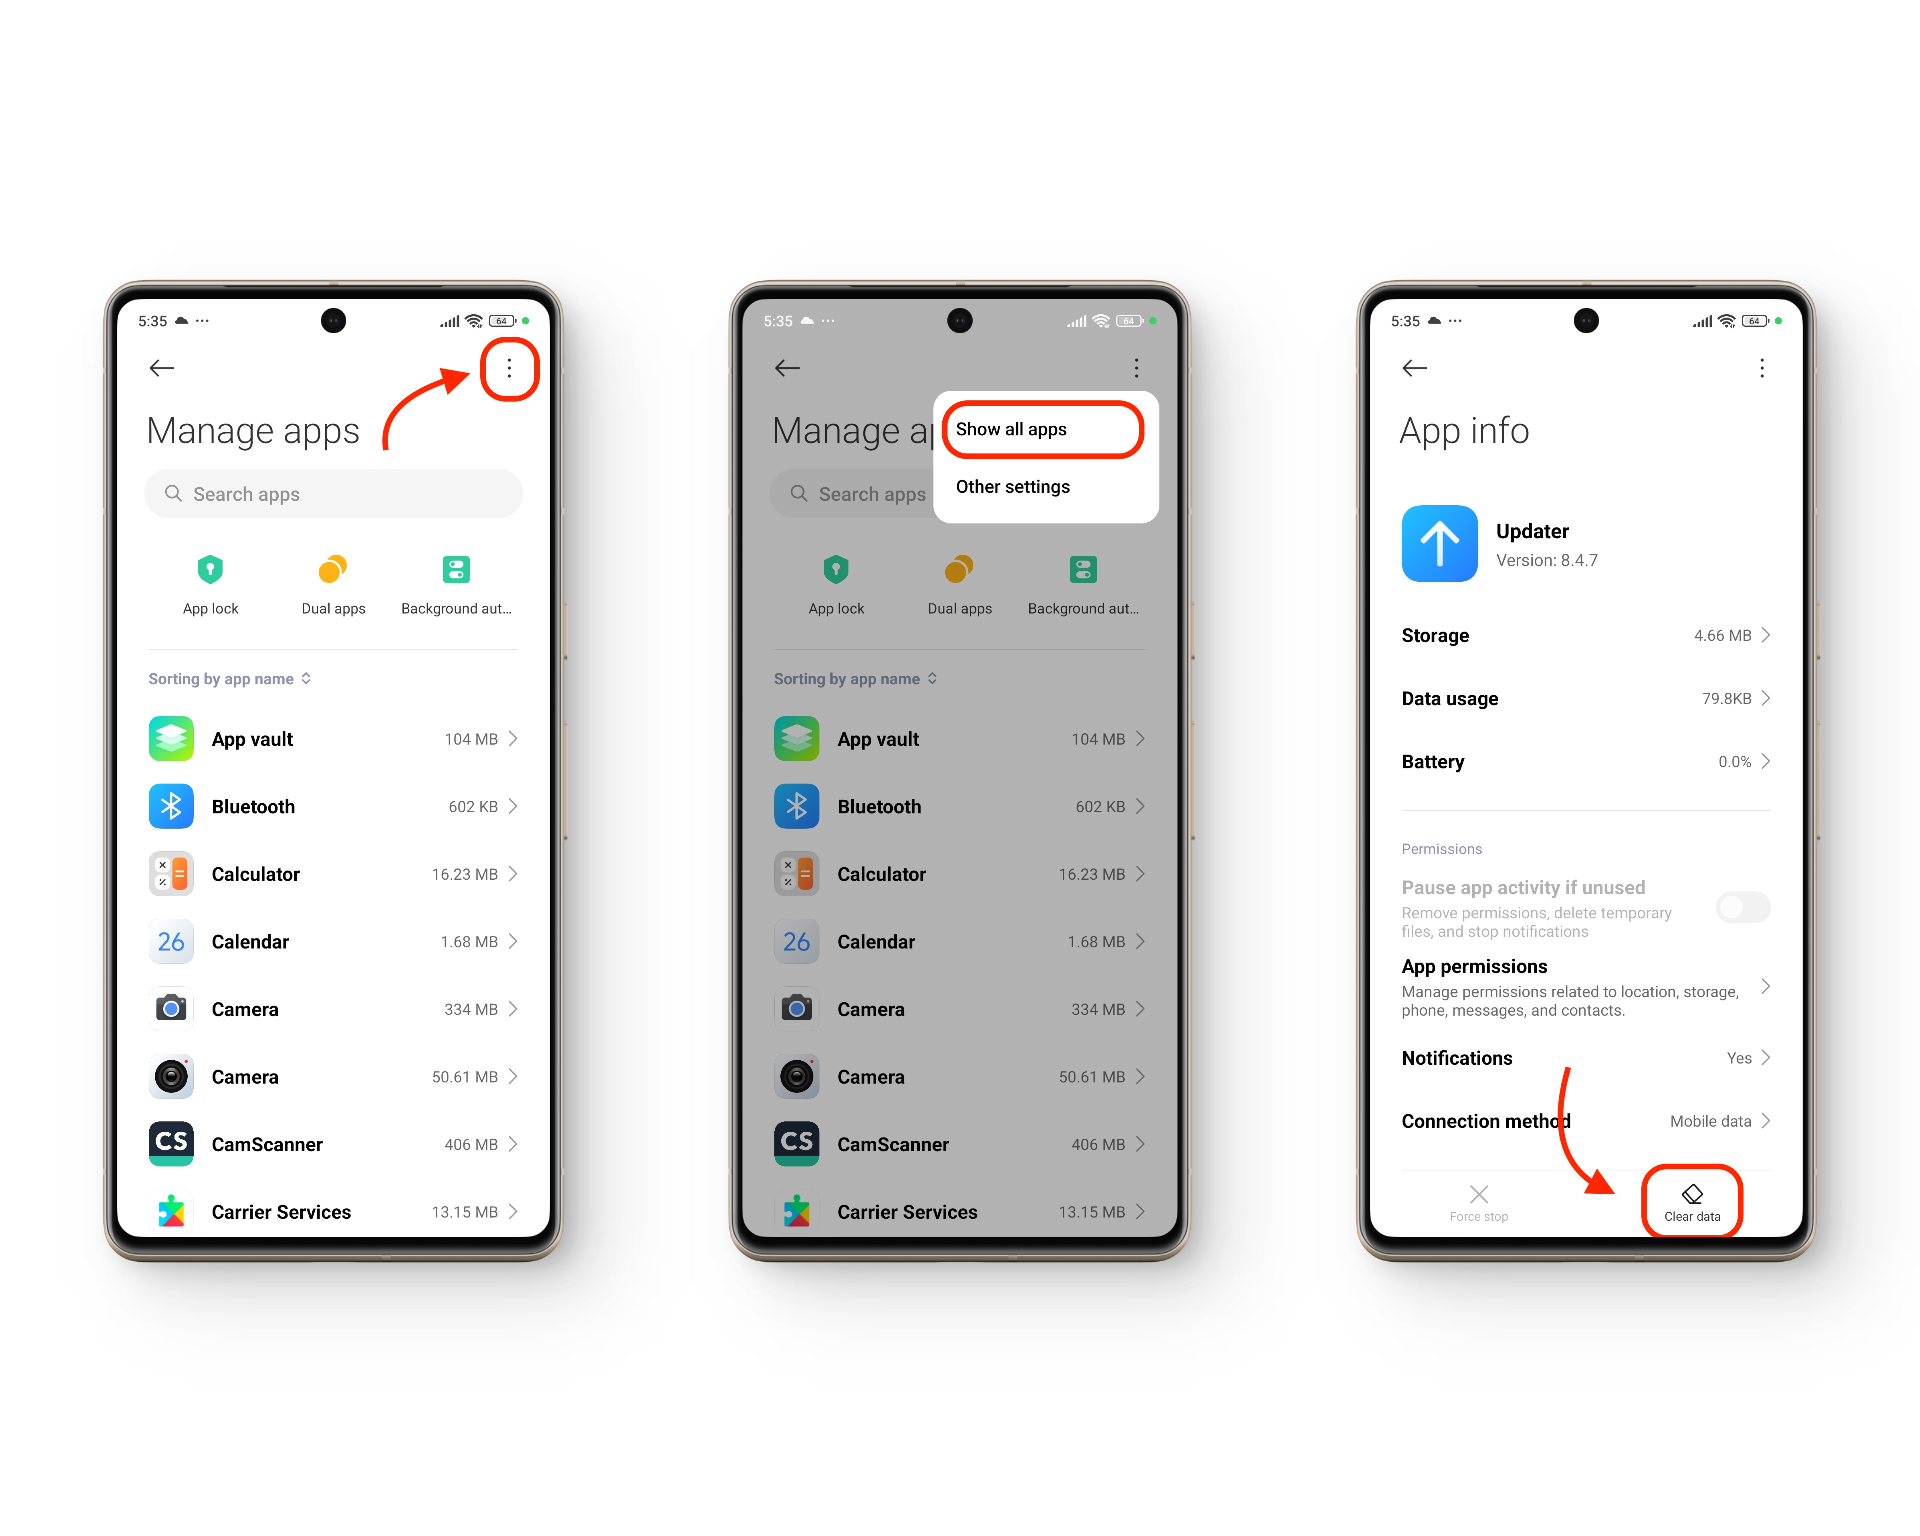
Clearing app data for the Updater app. - Confirm by selecting “Clear all data,” and when prompted, tap “OK.”
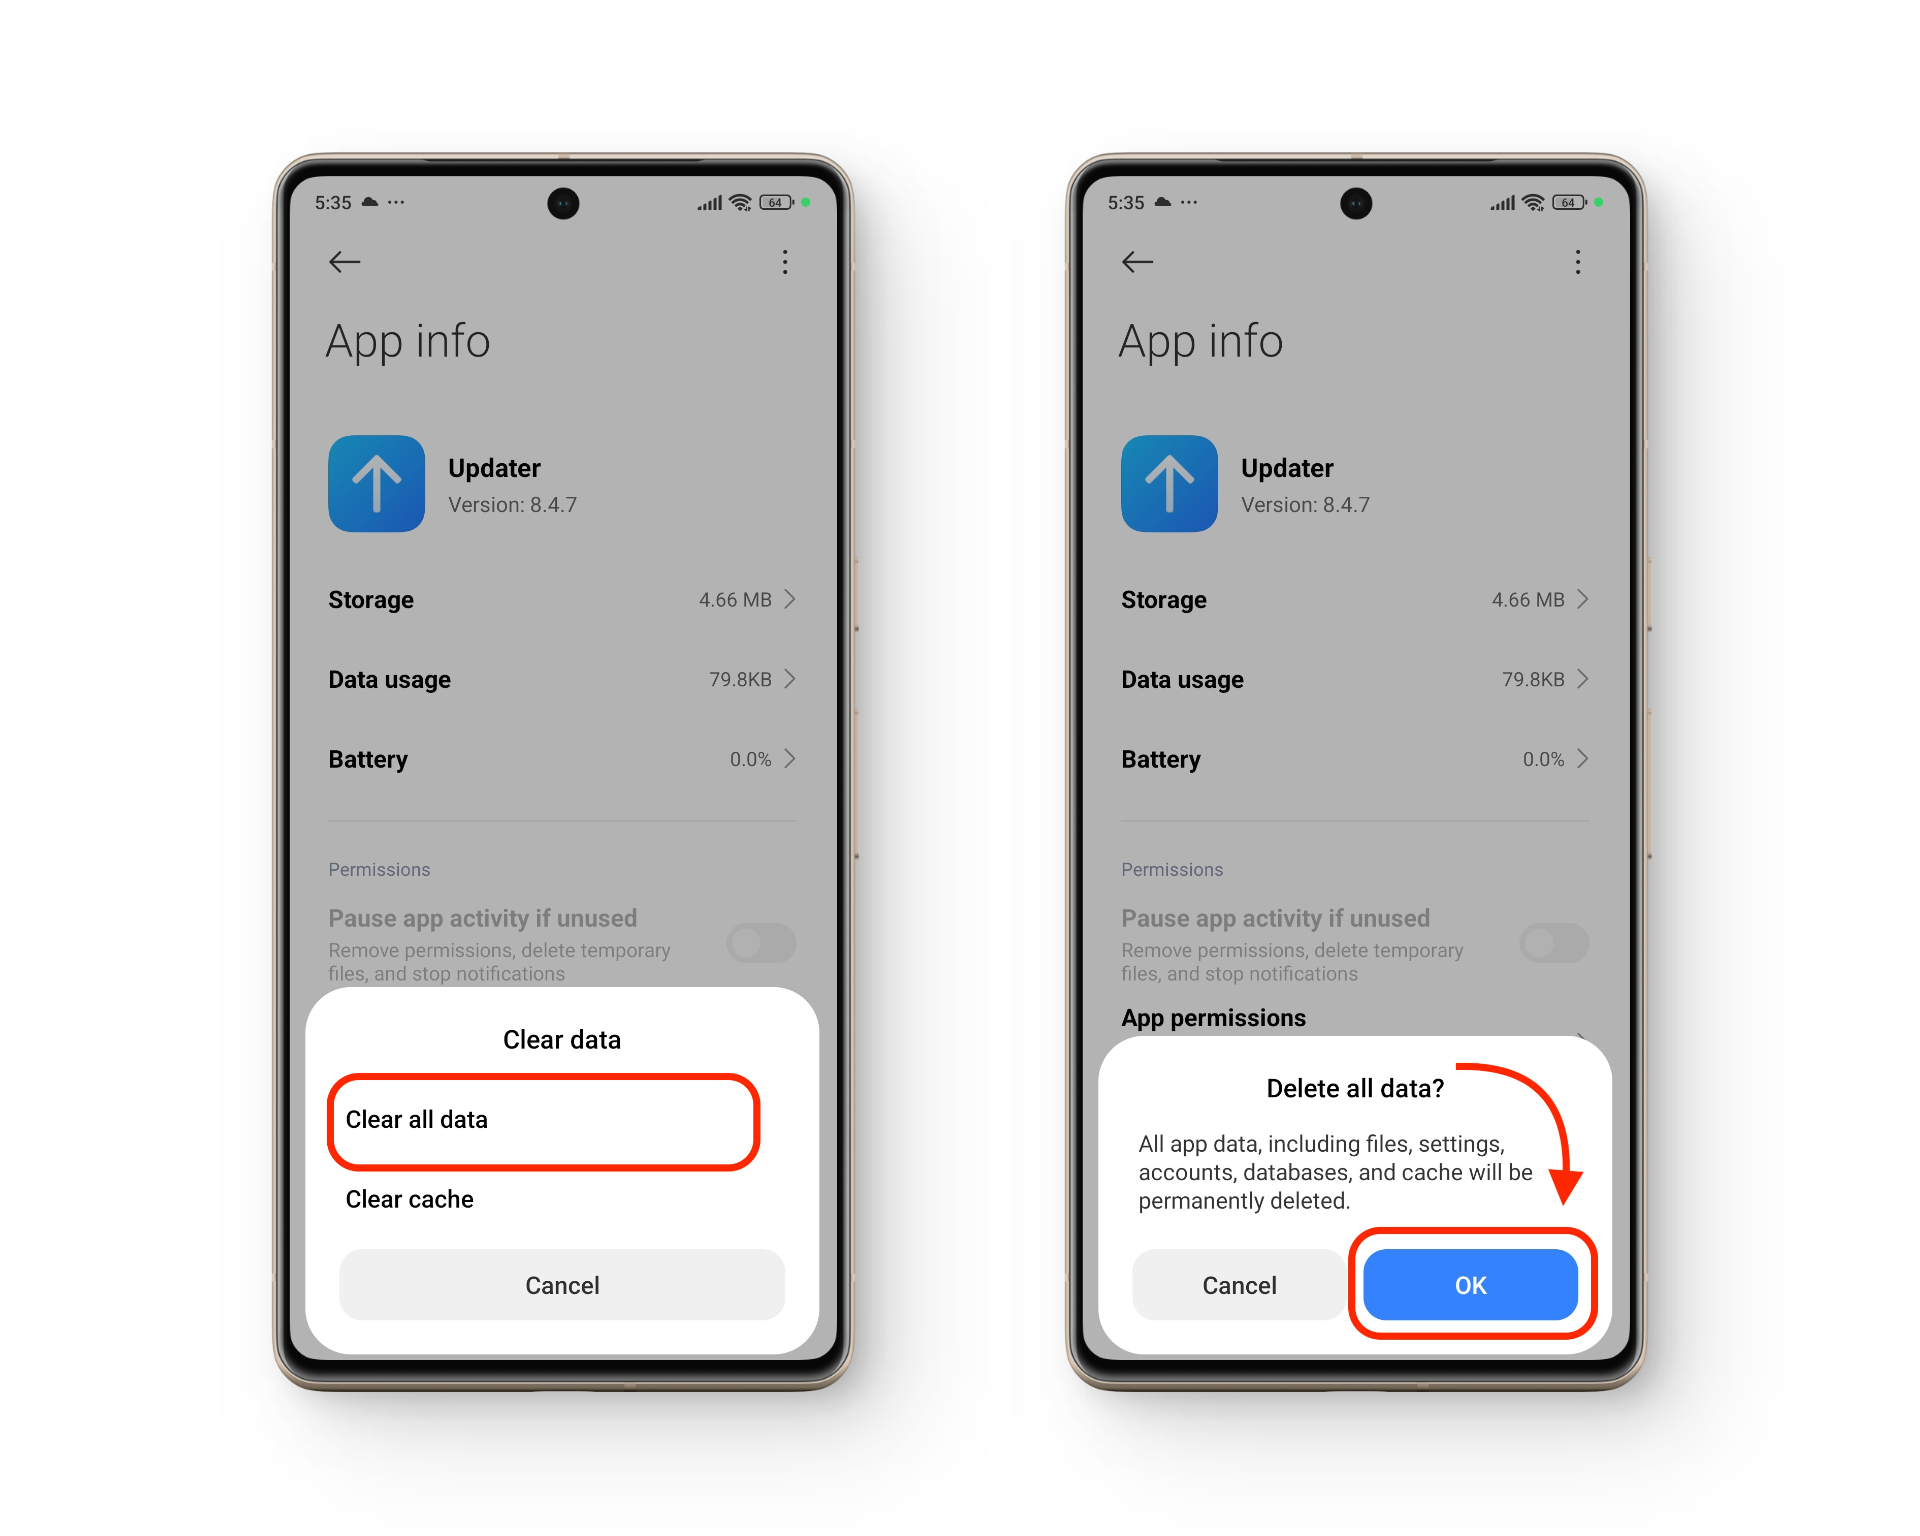
Choose “Clear all data,” and when prompted tap “OK.”
Once this is done, change your phone’s region to United States. Here’s how you do that.
- Go to Settings and select “Additional settings.”
- Tap on “Region.”
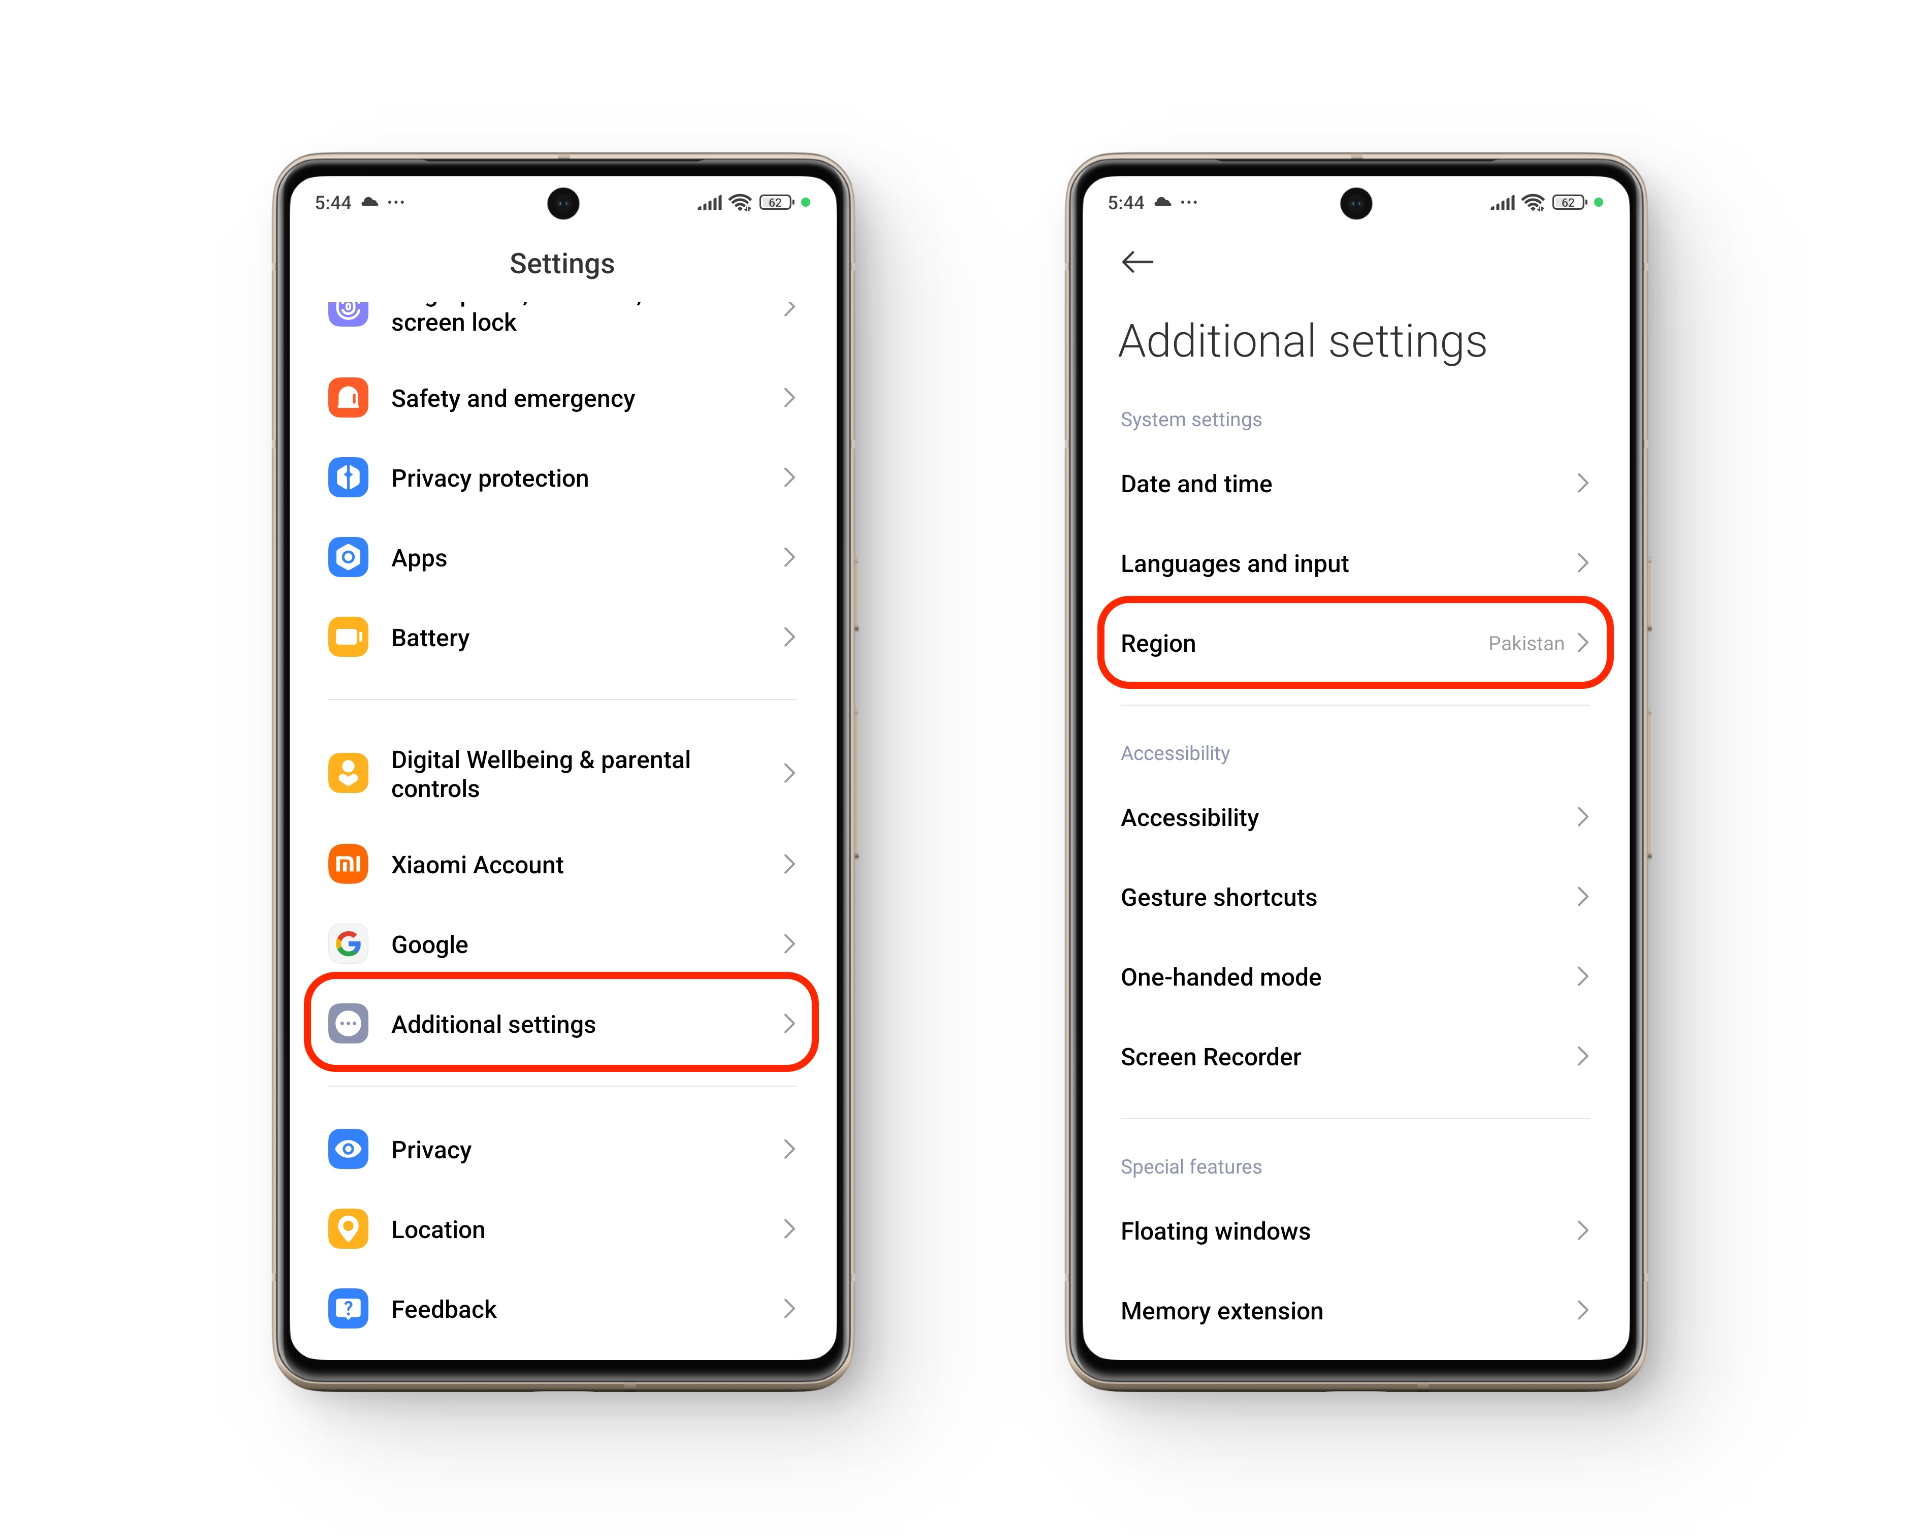
Accessing Region Settings in HyperOS - Search for the United States, and once it appears, tap on it.
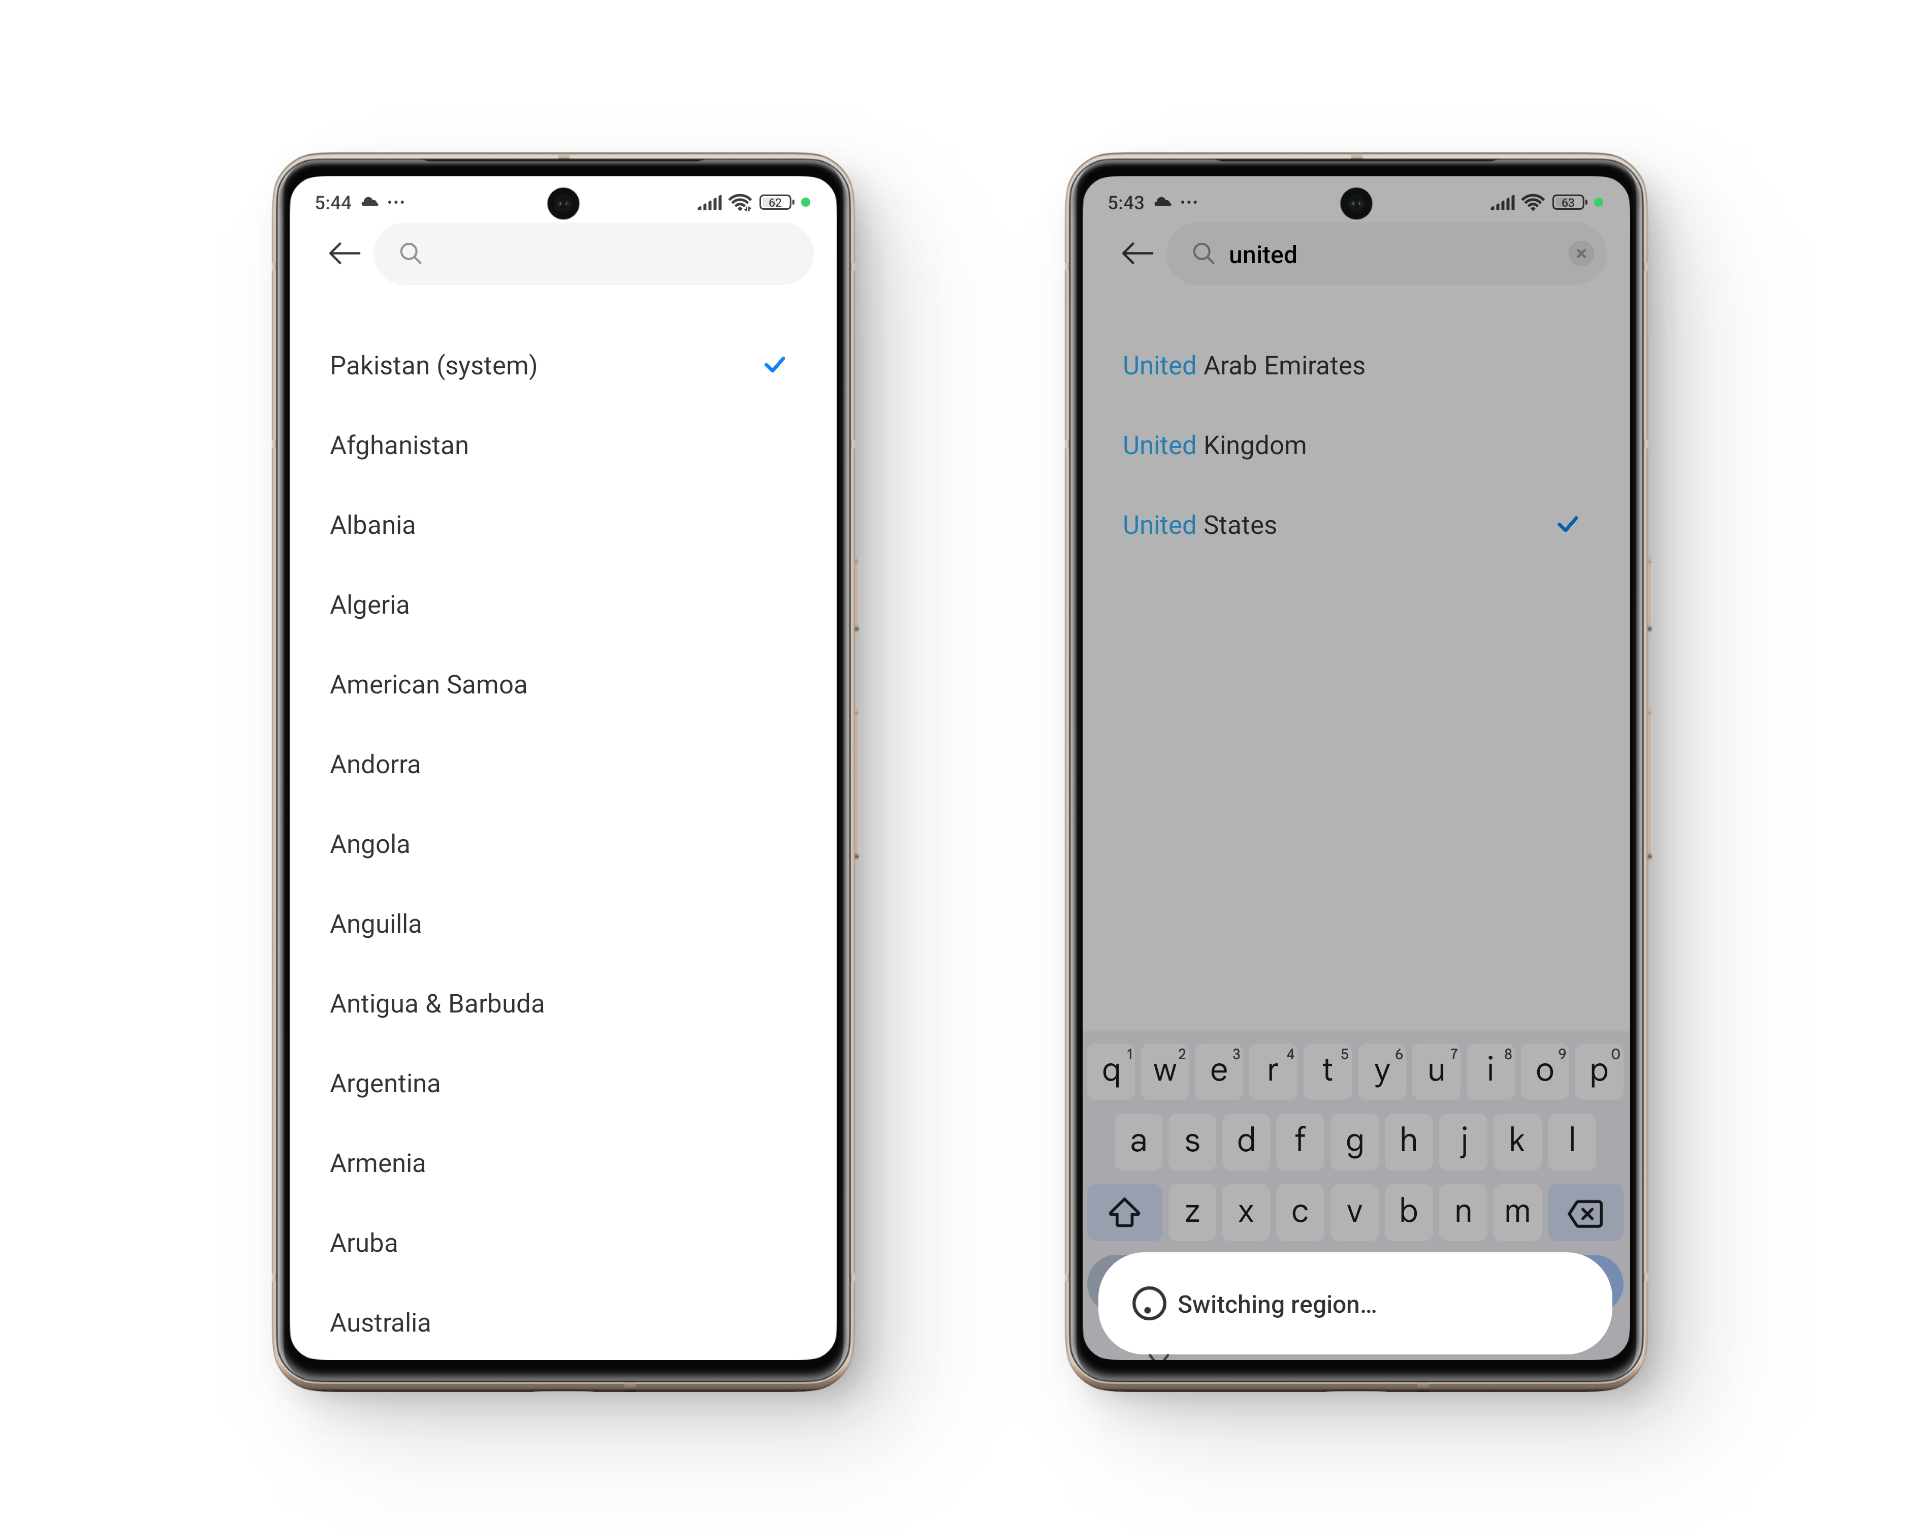
Changing the Region to the United States.
Step 5: Manually Pushing the Update
Once the setup has been completed, we will proceed to the actual part where we manually update the OS to a different region. To do this, we will first need to unlock the option to manually update HyperOS using a ZIP file.
After that is done, we will select the Global ROM. Then, immediately after it starts verifying the files, we will switch to the File Manager and rename the Global ROM to something else. At the same time, we will rename the India ROM to what the Global ROM was named previously.
Here’s how you can unlock the option to push an update manually:
- Open Settings and select “About phone.“
- Tap on the HyperOS logo in the middle of the screen. This opens up the Updater.
- Now, tap the HyperOS logo continuously 7 times till you see the message “Additional update features are on.”
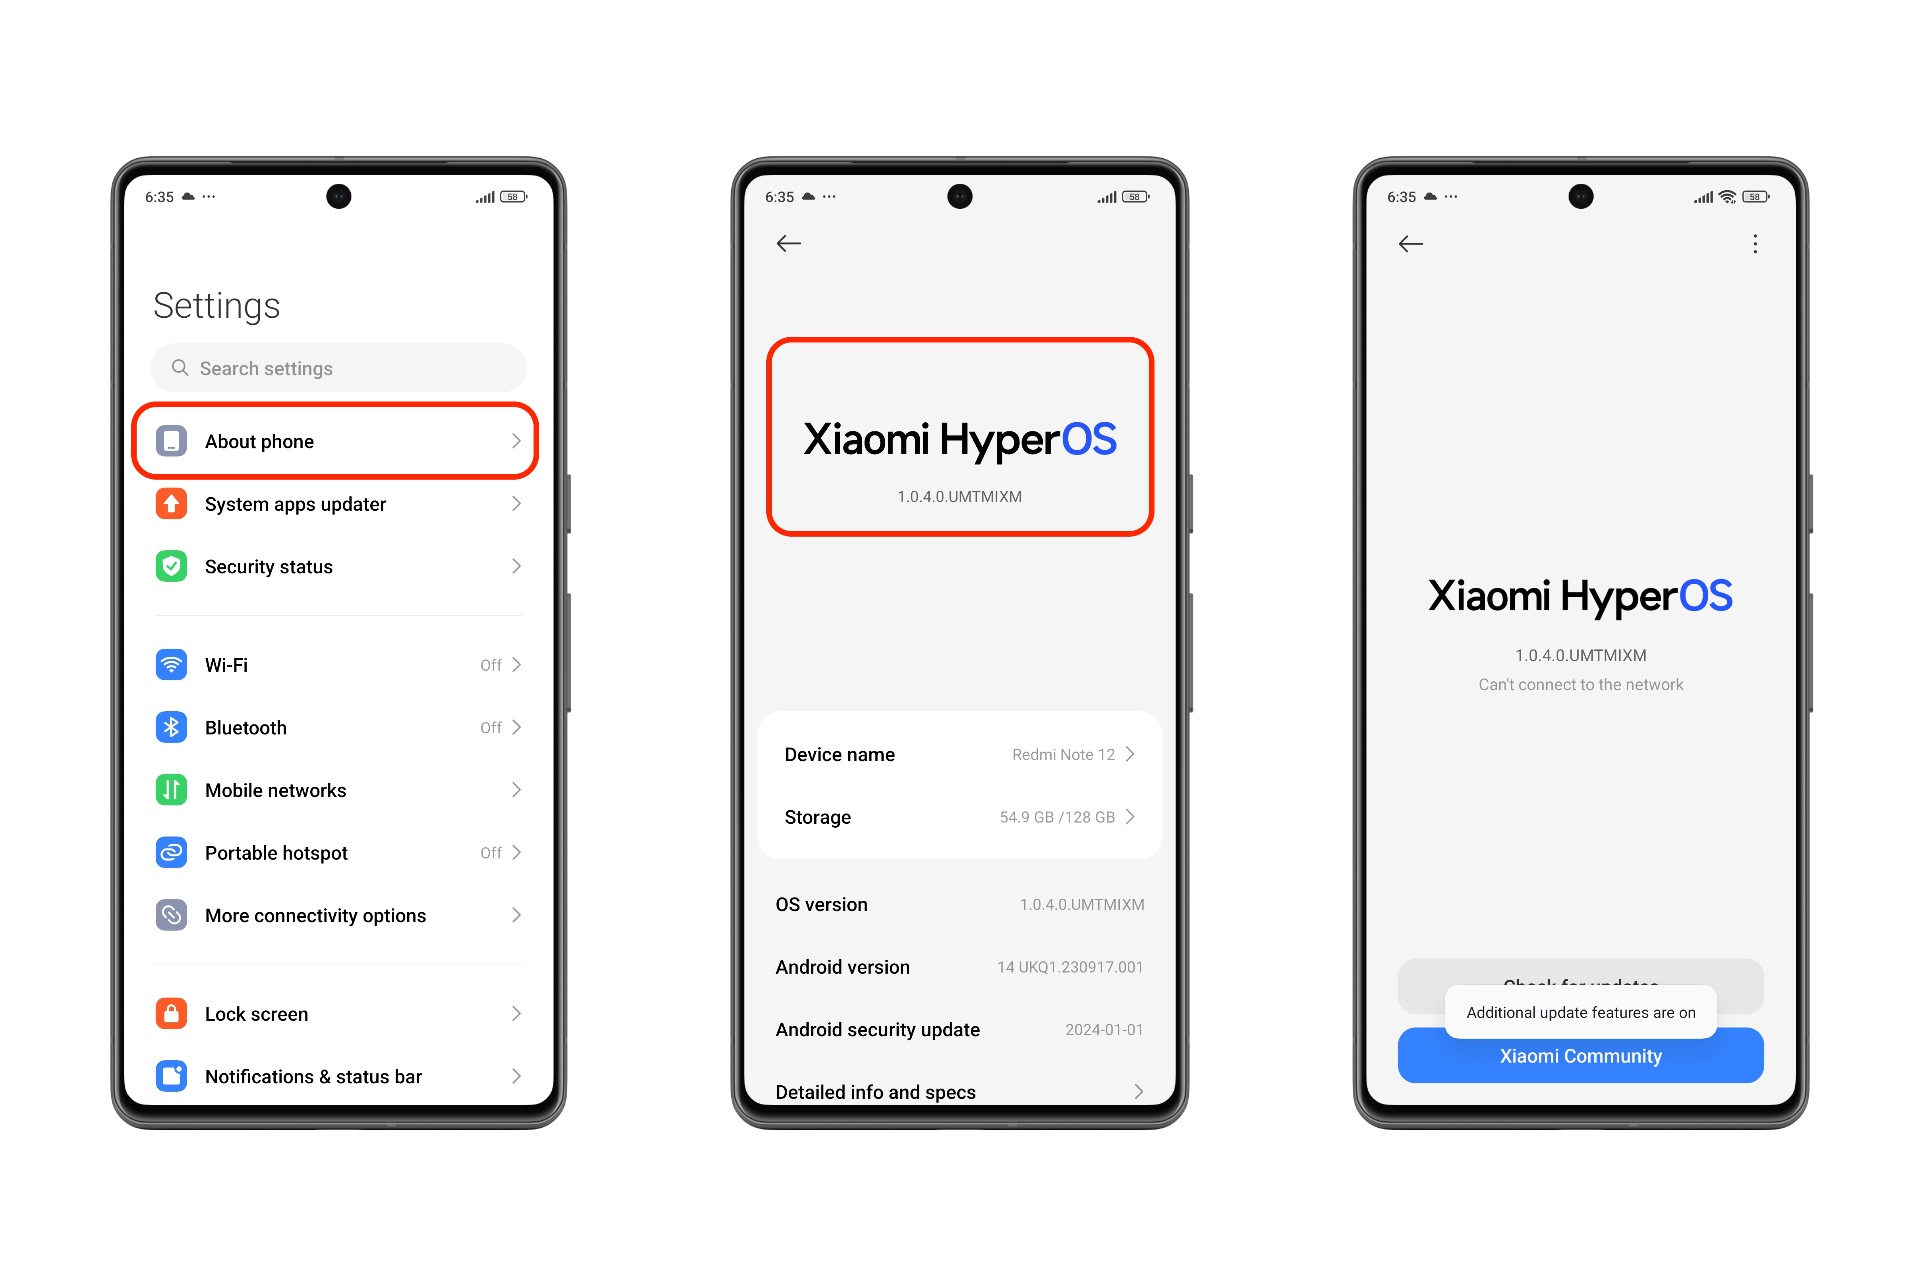
Turning on “Manual update” on HyperOS
Once this is done, we’ll move to the actual update process.
- Open Settings and go to About phone > Updater (tap on the HyperOS logo).
- Tap the three vertical dots in the top right corner and select “Choose update package.“
- Locate and choose the Global ROM from the list of files. This will immediately begin the authentication process.
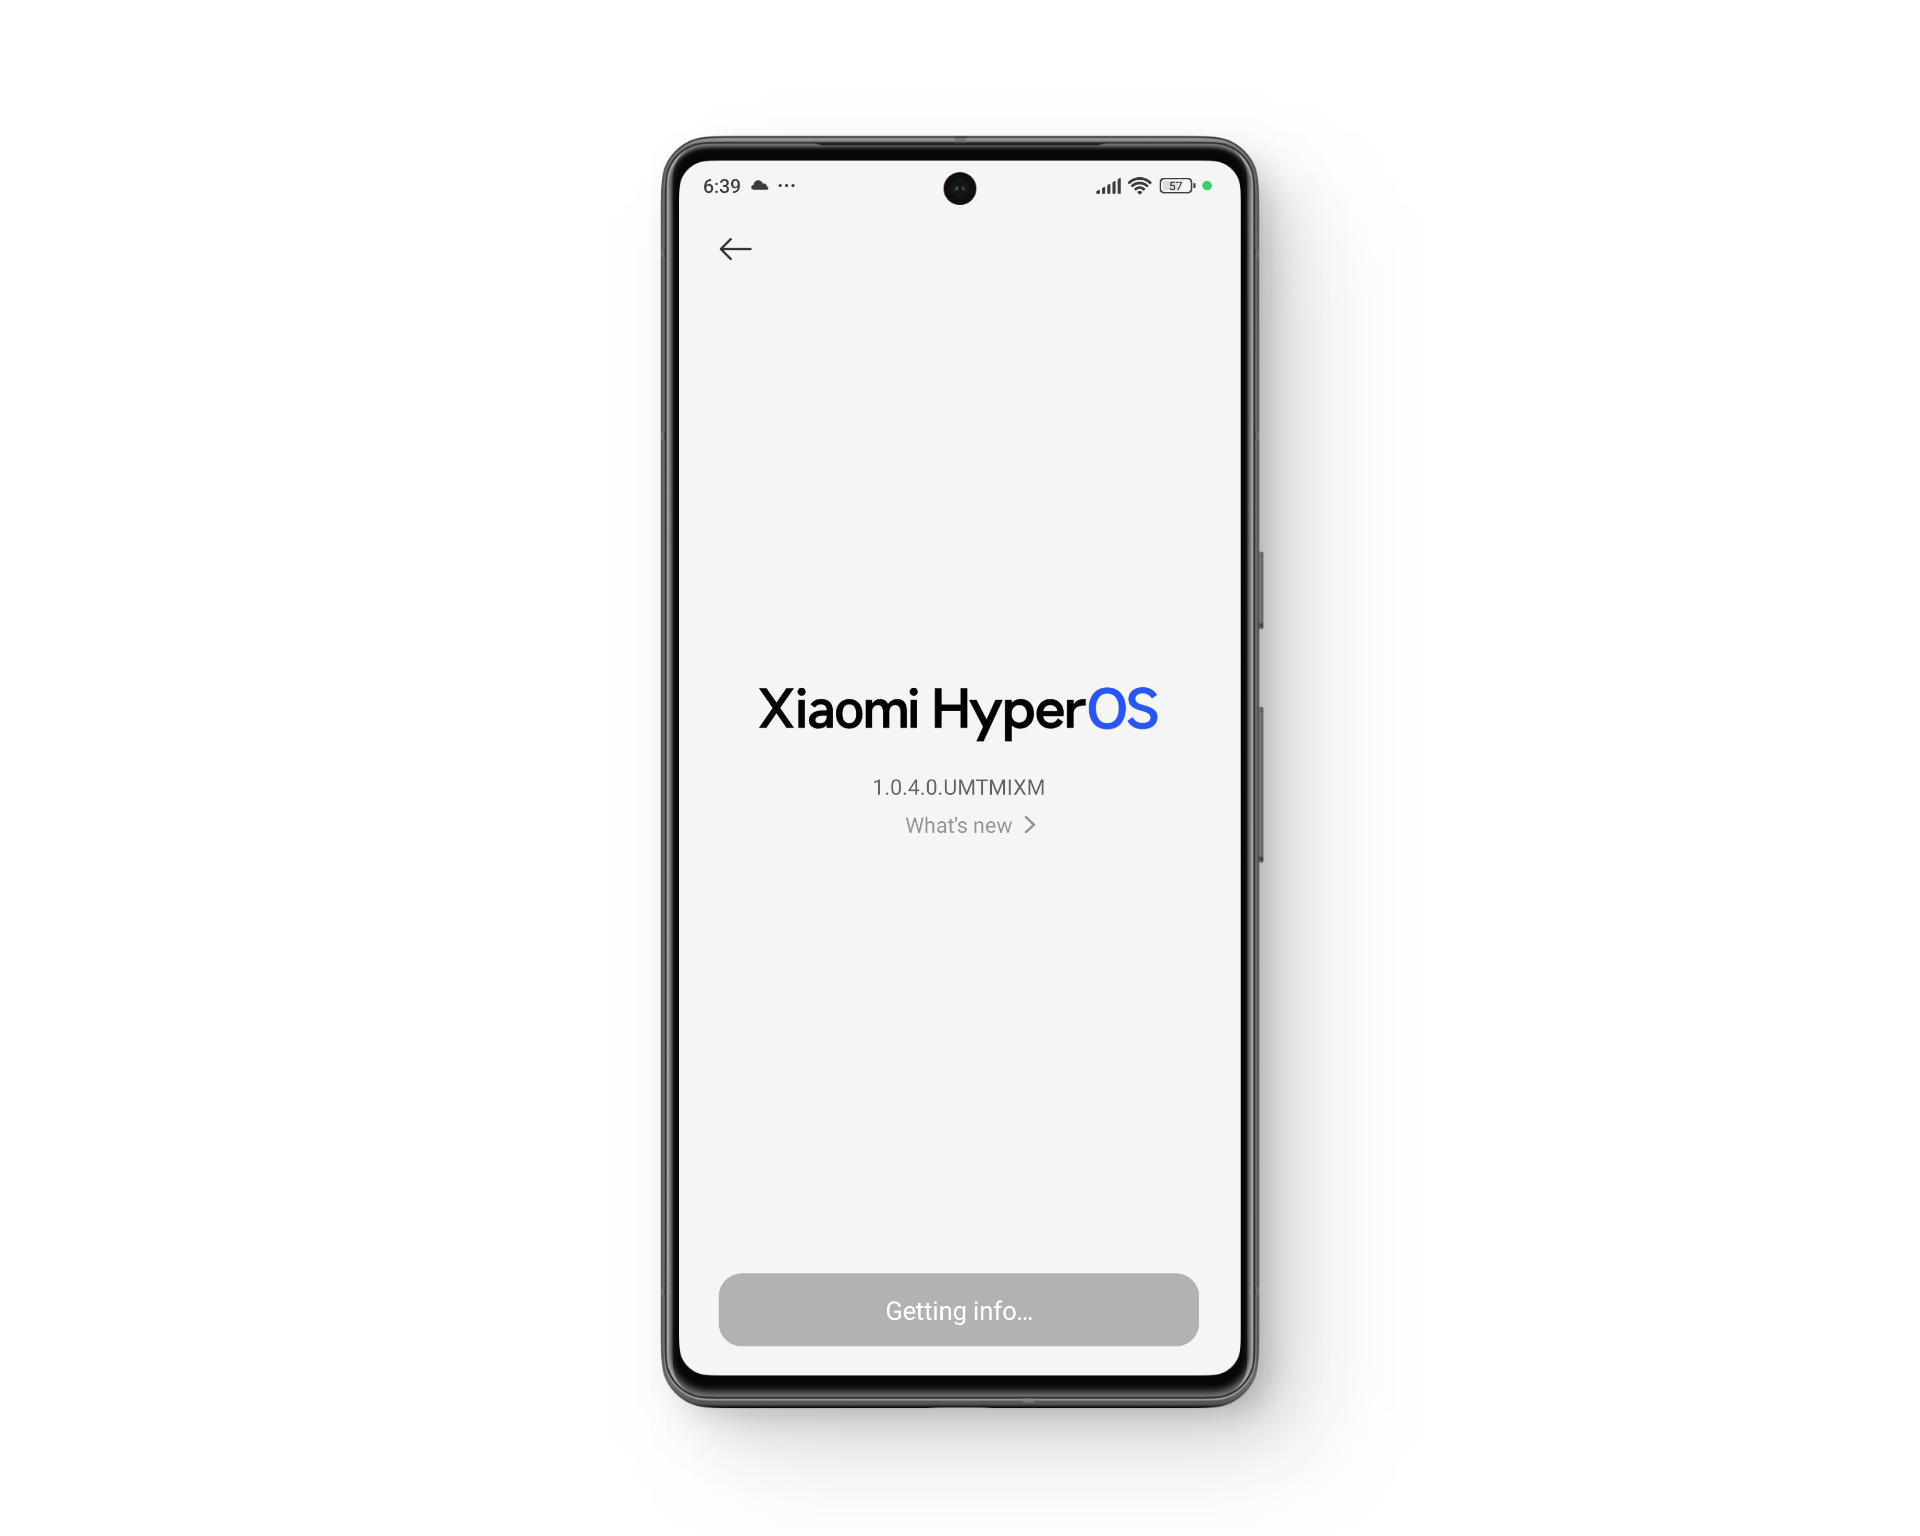
Updater authenticating the old (HyperOS.Global) file. - Quickly switch to the File Manager app. Copy the filename of the Global ROM. While the filename is copied, rename the Global ROM itself to something different.
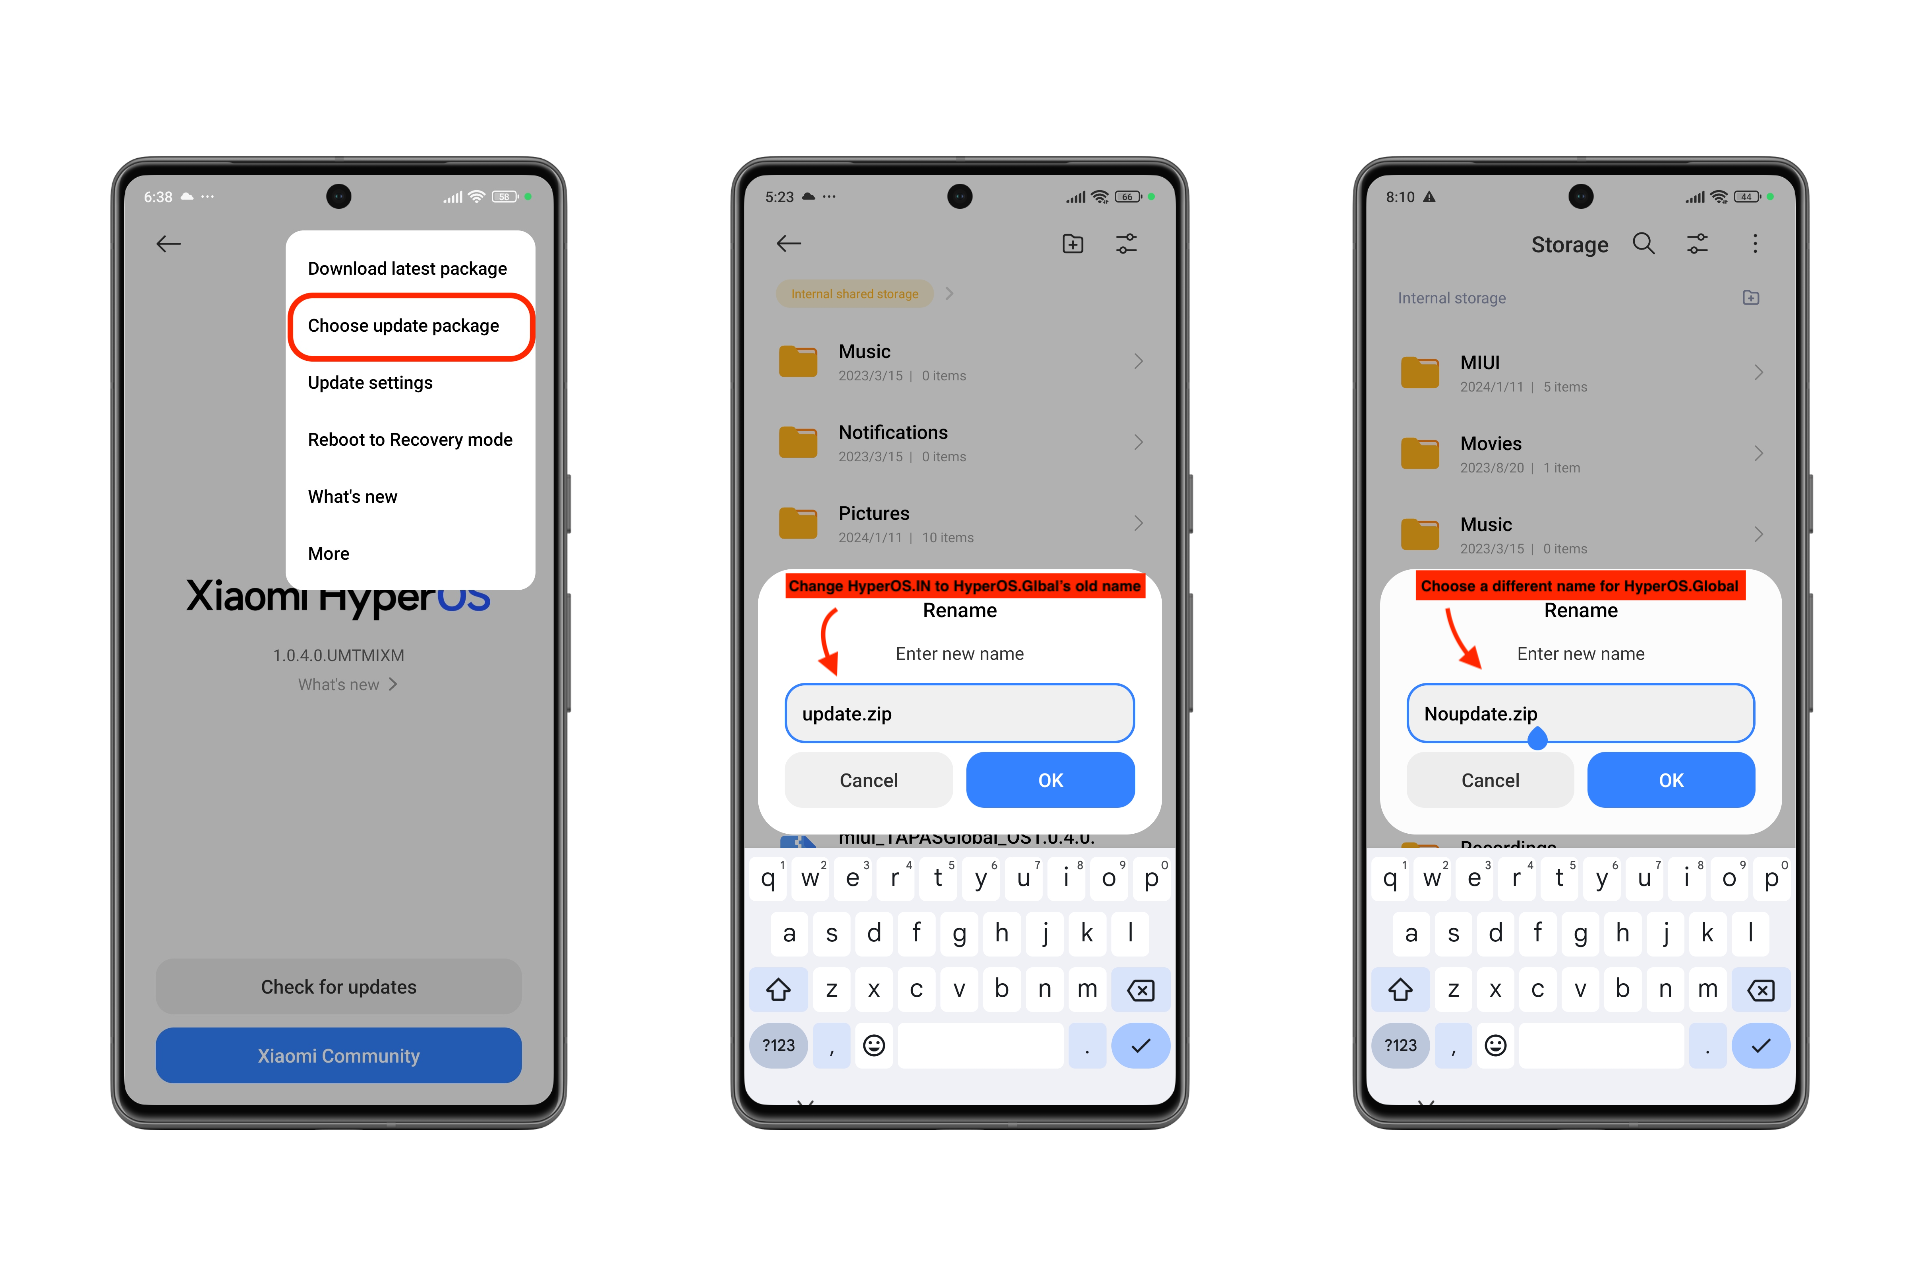
Switching the ROM files for authentication. - Paste the copied filename into the India ROM to rename it.
- Return to the Updater app. The system will now continue the update process using the renamed India ROM.
- The update process may take anywhere from around 10-25 min. After this, the app will prompt you to restart the device to complete the installation process.
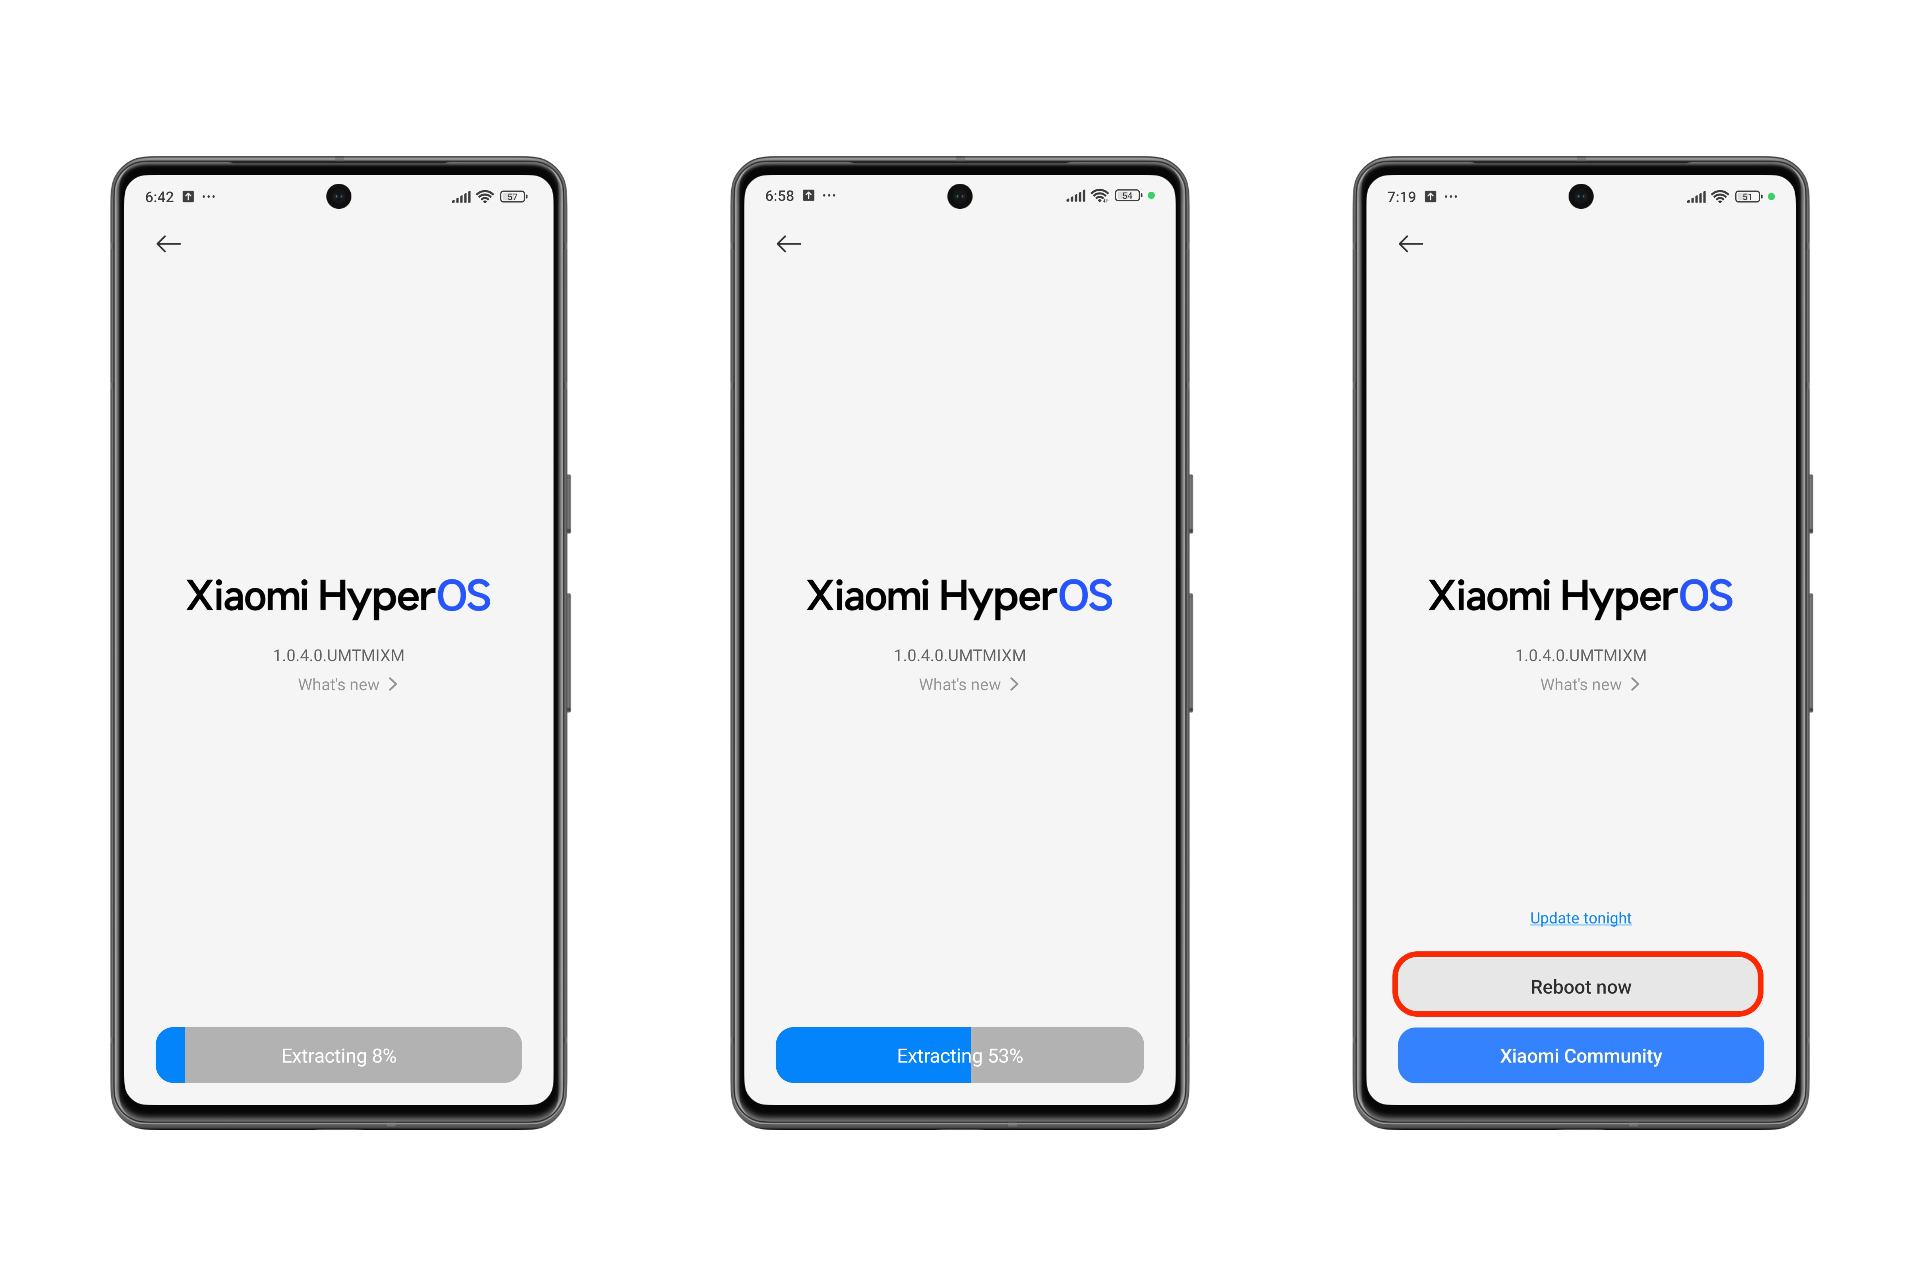
The flashing/region change process can take longer than a usual update.
Step 6: Rebooting the Device to Finish Installing the Update
After the phone finishes rebooting, you will notice that it takes quite a while to start up. This is normal. Once the phone loads the operating system, you’ll notice that the Google Phone app is gone, and instead, a few new apps including Mi Dialer and Messaging have appeared on the home screen. The process has been completed.
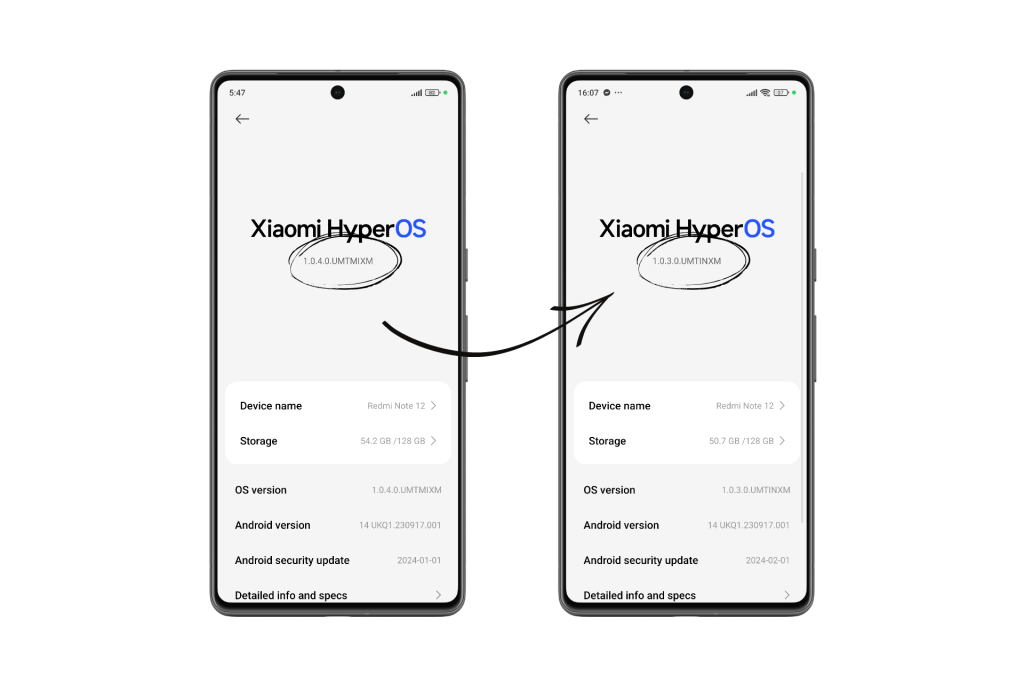
2) Flashing the Xiaomi.eu Custom ROM
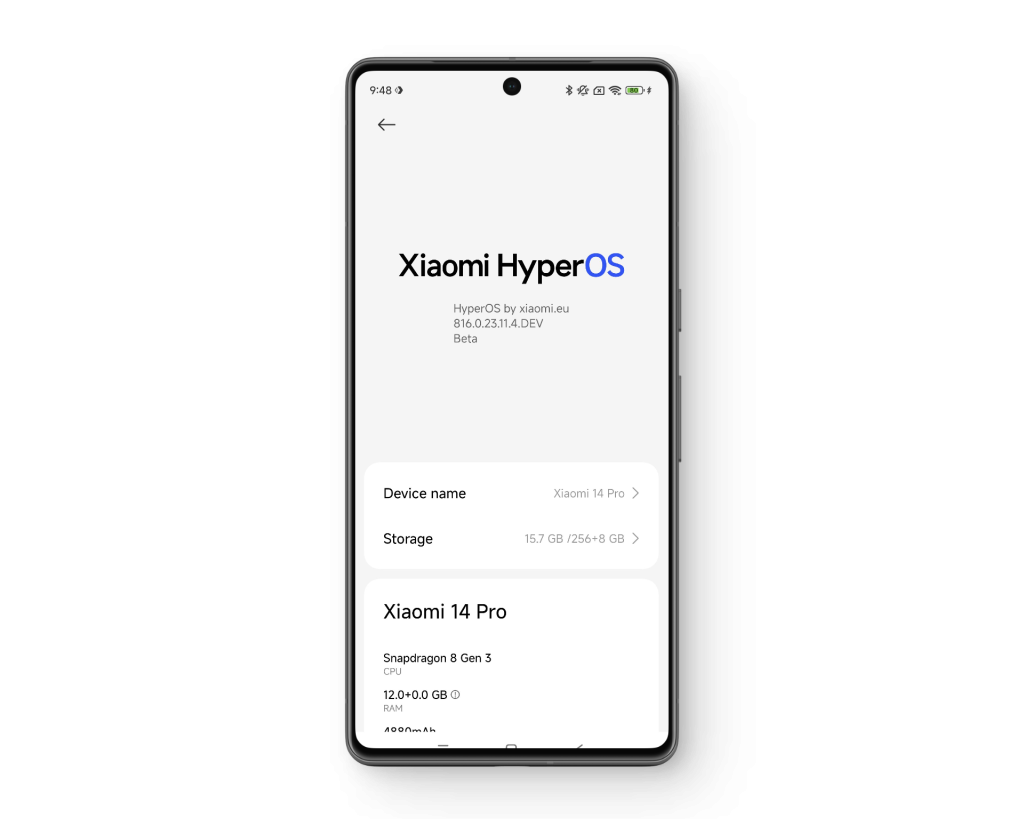
Xiaomi.eu is a community of developers/modders who unofficially provide custom ROMs based on official HyperOS releases. These ROMs are not officially supported by Xiaomi, so new features may take time to be ported. However, they do offer several improvements over the stock ROM.
Firstly, they come with minimal bloatware, making them faster, smoother, and more responsive. They also include all region-locked features like the Mi Dialer and the Messaging app, and often offer better customization options.
On the flip side, however, unlocking your bootloader is necessary, and you will need to wait for 168 hours before starting the flashing process. Furthermore, your warranty will be void, and there is a slight possibility that your phone may become corrupted or bricked if proper instructions are not followed during the flashing process.
Here are some of the differences between the stock HyperOS ROM and Xiaomi.eu’s versions.
| Stock HyperOS | Xiaomi.eu ROMs | |
| Developer | Xiaomi | Xiaomi.eu Community |
| Source | Official Release | Based on Official Releases |
| Bloatware | Yes | No |
| Installation | Pre-installed | Manual flashing required |
| Warranty | No change | Potentially voided |
↪ Flashing the ROM
To get Mi Dialer, you may need to flash the entire ROM from scratch. However, this process is beyond the scope of this article. If you need additional information on flashing the ROM, you can consult official Xiaomi.eu forums and XDA guides. These sources provide in-depth information on the minor intricacies for each different version and devices.
READ MORE: The Best Custom Android ROMs in 2024 Ranked ➜
Conclusion
If you’re using a Xiaomi device running HyperOS and want to port the Mi Dialer, the most safe option is to flash the same ROM designed for a different region. Alternatively, if you’re inclined to experiment, unlocking your device’s bootloader and flashing a different ROM could also be a viable approach.
FAQs
In most cases, you won’t but in all cases, it is usually best to take a full backup of your data since if anything goes wrong, you would have something to rest back to. This is also why it is a good idea to turn on Developer options before proceeding, since if you hard-brick your phone, you always have a chance to recover.
At the moment, it isn’t advisable to go with the China ROM. The safest route is to essentially stick to the India region.
Since you are not tinkering around with the system software in any way and are using a ‘loophole’ to essentially push an update via the official Updater app, there shouldn’t be any problems. However, it depends on how the service officials respond to your problem at hand.
Yes, you will need to unlock your bootloader and wait for 168 hours before starting the flashing procedure. This is because Xiaomi.eu ROMS, though they may look oddly similar in use, are actually unofficial releases based on the official HyperOS ROM.
 Reviewed by


