SOLVED: The User Profile Service failed the logon
The error occurs when the User Profile Service fails to run at startup. When this error appears, the user cannot log in to the account, as it might be corrupted or damaged. However, there are some ways to restore the account. If none of them work, the data can still be recovered.
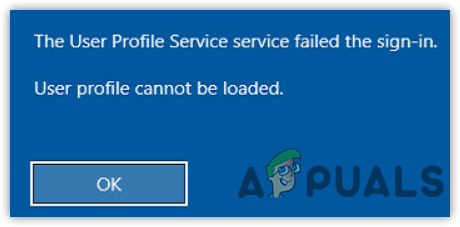
You might encounter errors that say, ‘The User Profile Service failed the sign-in. User cannot be loaded,’ or ‘The User Profile Service failed to log on. User profile cannot be loaded.’ Both messages indicate that the User Profile Service might have failed to start due to a duplicate profile entry in the registry editor. Mainly, this is the leading cause of a corrupted user profile.
Before diving into the solutions, we recommend restarting your computer. If that does not work, proceed to the methods below:
1. Boot Windows in Safe Mode
To make changes in Windows, you must enable safe mode because you cannot log in due to the error message. The error often occurs because of duplicate entries, so we need to manually rename the entries to fix this error message. To do this, you need to boot into safe mode.
Safe Mode is a mode in which the user diagnoses the cause of a problem, as it does not allow irrelevant services, third-party applications, and GPU drivers to load at startup, since these could cause issues. Therefore, follow the steps below to boot into Safe Mode:
- On the sign-in screen, click the power button in the bottom right corner.
- Hold the Shift key, and then click Restart.
- The Options Screen window will appear; click Troubleshoot > Advanced Options > Startup Settings
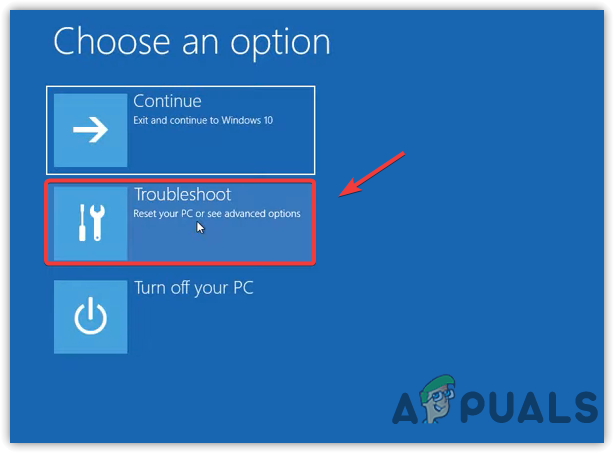
Navigating to Troubleshoot - And then, click ‘Restart‘ from the bottom right.
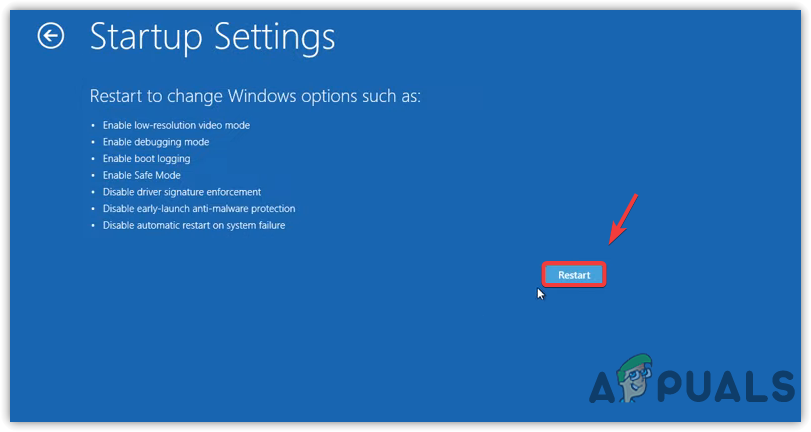
Restarting the Computer to Boot into Safe Mode - Once the computer restarts, press 5 or F5 on the keyboard to enable Safe Mode.
- Once finished, proceed to the following methods to fix this error.
1.1 Edit Registry Profile Entry
The Registry Editor contains a key called “ProfileList,” which holds the subkeys for the user profiles. Typically, the error occurs when the user profile keys are duplicated. To fix this issue, you need to change the names of the duplicated profiles.
We recommend creating a registry backup before making modifications to the registry editor. Below are the steps you can follow:
- Click the Start Menu and type “Registry Editor.
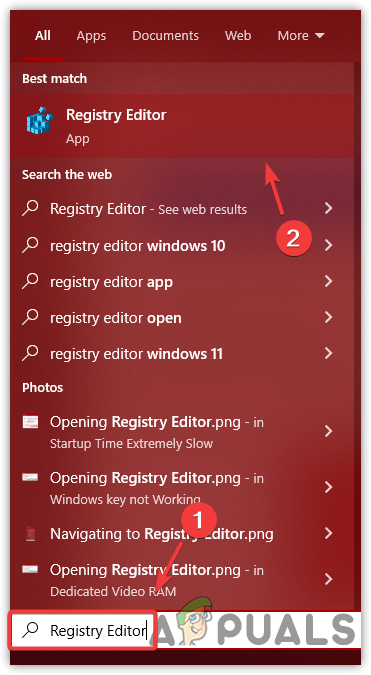
Opening Registry Editor - Open the Registry Editor and navigate to the following path:
Computer\HKEY_LOCAL_MACHINE\SOFTWARE\Microsoft\Windows NT\CurrentVersion\ProfileList
- Expand the ProfileList, and if there is a sub-key with the .bak extension, that means you have a duplicate entry. If you do not have a sub-key with the .bak extension, skip to Step 6
- Right-click the sub-key with the .bak extension and click Rename
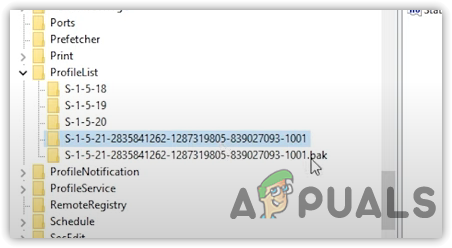
Checking For Duplicate Entries - Remove the .bak, and then right-click the subkey without the extension, and click ‘Rename‘.
- Type “.bak” or “.ba” at the end of the sub-key name and hit Enter to save..
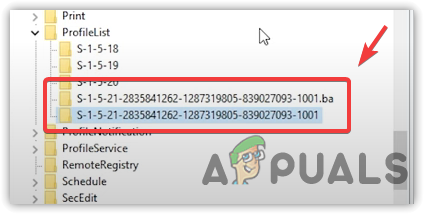
Renaming Entries - In the right pane, right-click the “State” key and click “Modify.
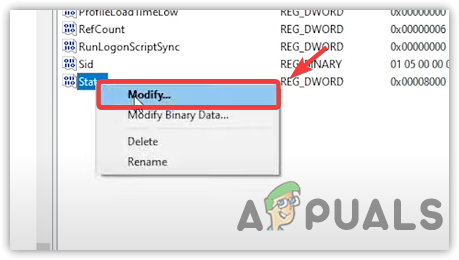
Clicking Modify - Change its value data to 0.
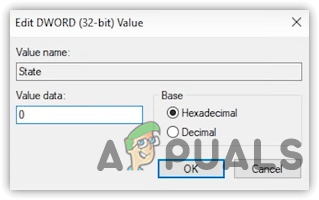
Editing a Registry Value - Repeat the same process with the RefCount key
- Once completed, close the registry editor and restart your computer to verify if the error persists.
2. Replace NTUSER
NTUSER.DAT is a file that contains all user information. If it becomes corrupted, you may encounter this error message. To fix this error, try replacing the NTUSER file by following the steps below:
- Enable Safe Mode by following the instructions in “Method One”.
- After that, open File Explorer and navigate to the disk where you have installed your operating system.
- Then, go to “Users.
- Click on “View” from the top and check the option called “Hidden Items.”

Seeing Hidden Items - Now navigate to the Default folder

Opening Default Folder - Right-click the NTUSER.DAT file, and then click “Rename“
- Add “.old” at the end of the file name. The name of a file should be “NTUSER.DAT.old”

Renaming User Profile File - Now, return to the Users folder and go to the Guest folder or any other user folder.
- Right-click on NTUSER.DAT and select “Copy.

Copying User File - Now, go to the Default folder and paste the copied file here.
- Once done, restart your computer to see if the error has been fixed.
3. Use System Restore
If the error persists even after renaming and editing registry entries, we recommend using a system restore utility. However, system restore requires a restore point, which should have been created before the error occurred. If you do not have a restore point, you cannot use this utility
System Restore is a process that takes a snapshot of files, including the Registry Editor, for future use. When something goes wrong, such as driver corruption, BSOD errors, or errors like this one, System Restore can revert Windows to a previous state using the restore point. Here are the steps to follow:
- Click the power button, then hold Shift, and click Restart.
- Navigate to Troubleshoot > Advanced Options.
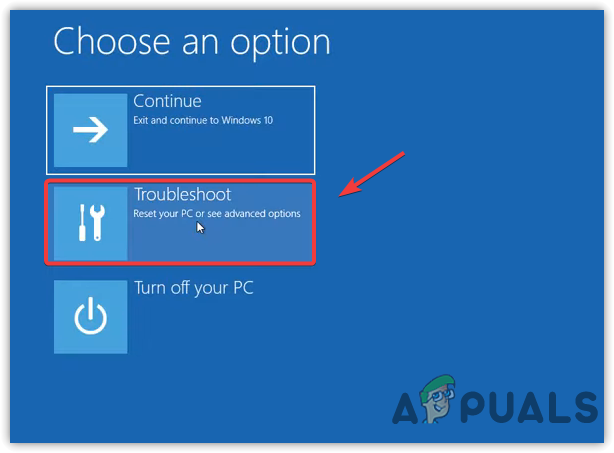
Go to Troubleshoot - Click on “System Restore” and then click on “Next.
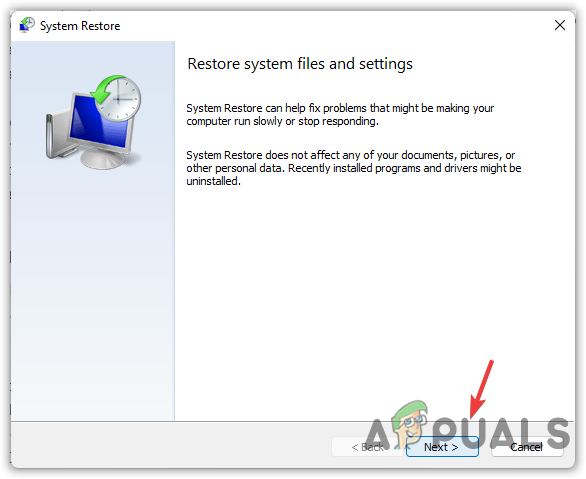
Clicking Next - Select a restore point and click “Next.
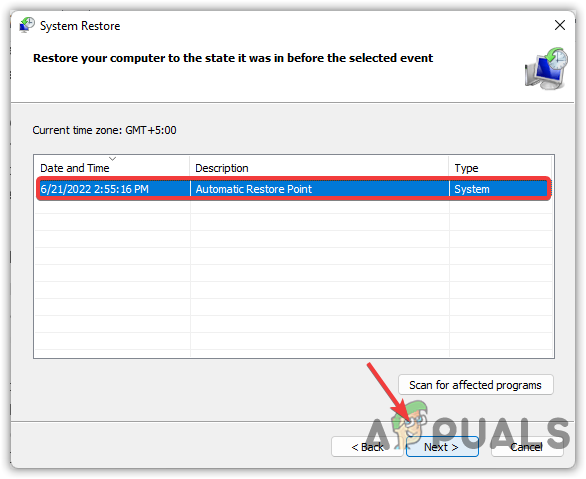
Selecting a Restore Point - Click “Finish” to start the restore process.
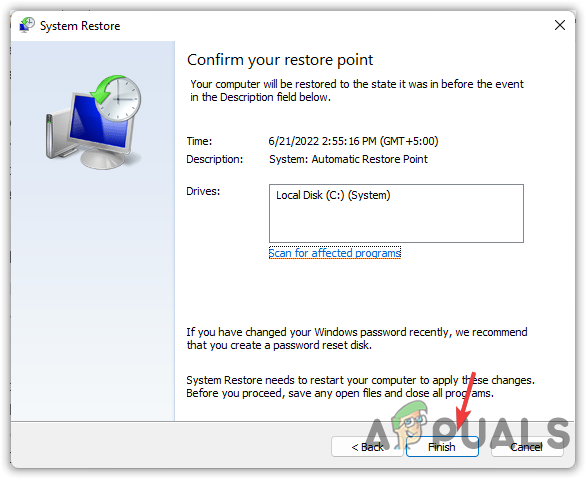
Clicking Finish - Once completed, the error should be resolved.
4. Restart the User Profile Service
The disabled User Profile Service can be the primary cause of this error. The User Profile Service is responsible for signing in the user to their local or Microsoft account. If this service is not running for some reason, you may encounter this error message on your screen. Therefore, it is recommended to ensure that the service is functioning properly. Below are the steps to follow:
- “Boot Windows in safe mode by following the instructions in Method 1.
- After that, press Win + R to open the Run dialog box.
- Type “Services.msc” and press Enter.
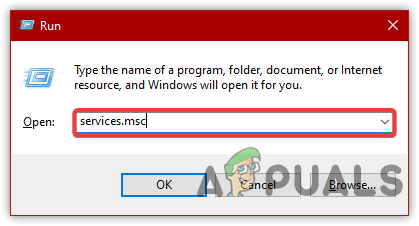
Navigating to Services Window - Find and right-click the User Profile Service.
- Go to Properties.
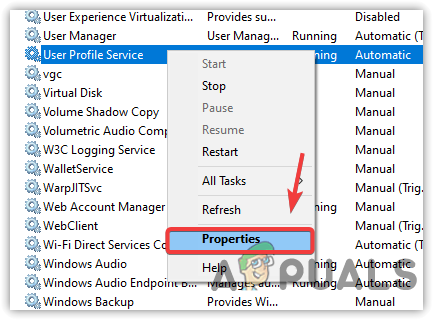
Opening Service Properties - If the startup type is not set to Automatic, change it to Automatic and click Apply.
- If the service is stopped, click the Start button, and then click OK to save the changes.
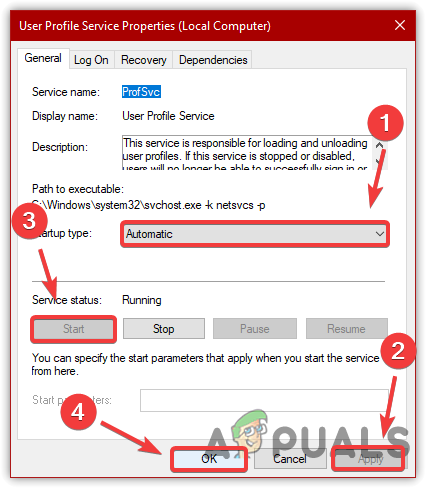
Restarting User Profile Service - Once done, close the window and try restarting the service
5. Create a New User Account
If the error persists, you can create a new user account, as the old account may be corrupted. After creating the new account, if the error does not occur, you simply need to transfer all your data to the newly created account. Below are the instructions for creating a local account:
- To follow the instructions, boot Windows in Safe Mode by using Method 1.
- Once you have enabled Safe Mode, click the Start Menu and type “Command Prompt” in the search box
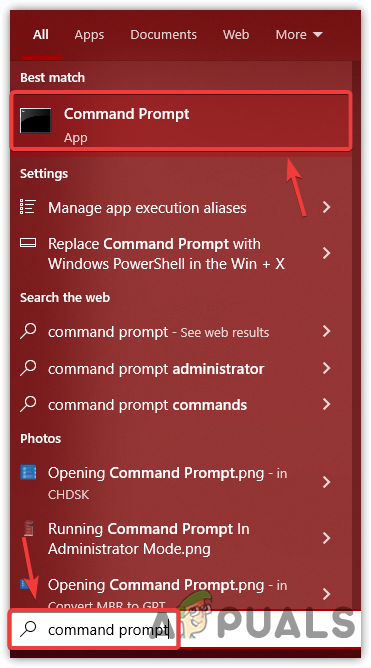
Opening Command Prompt - Now, type the following command to add a new user:
net user /add username password
Note: Replace the username with the name you want for your account. Same with a password, but the password is optional; you can skip it by not typing anything.
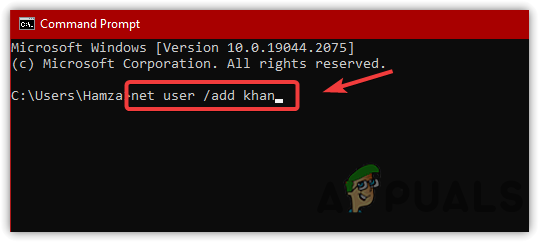
Adding A New User Account - Again, type the following command to add a new user account to the administrators.
localgroup administrators username /add

Adding A New User Account to Administrators - Once done, log in with your newly created account and transfer all of your data into it.
6. Switch to the Normal Startup
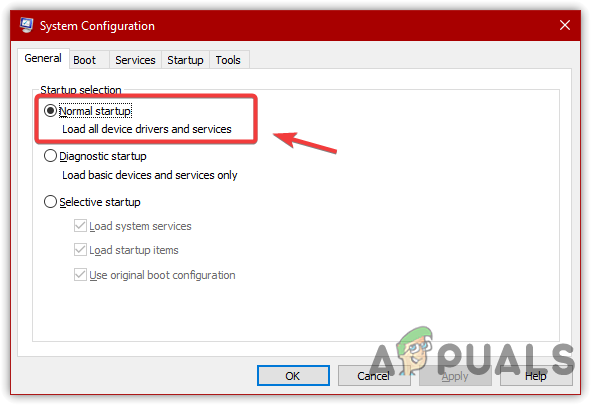
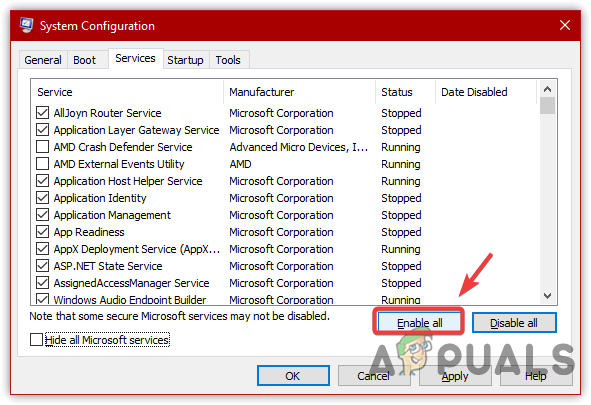
Sometimes, when performing a clean boot, we disable Microsoft services, and this can lead to various errors, including the one you are experiencing. Therefore, make sure that you have not disabled any Microsoft services. Additionally, if you are currently using a selective startup instead of the normal startup, switching back to the normal startup may resolve the issue. The normal startup enables all device drivers and services, even if they do not seem relevant.
- Below are the instructions to change the startup type
- Once again, for this procedure, you will need to boot into Safe Mode and then execute the following steps:
- Press Win + R to launch the Run window.
- Type “msconfig” and click OK to open the System Configuration window.
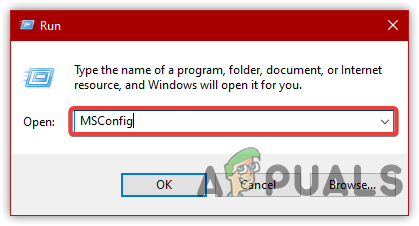
Opening MS Configuration - Now, under startup selection, if it is set to selective startup, change it to Normal Startup.
Selecting Normal Startup - After that, go to ‘Services‘ from the top, and if the ‘Enable All‘ option is available, click on it.
Enabling Microsoft Services - Once done, restart your computer and check if the error persists.
7. Reset or Reinstall Windows
If you still cannot get rid of this error, the final solution is to reset or reinstall Windows. If you want to opt for a complete reinstallation of your operating system, you can visit the article on how to install Windows. Users who want to reset their computer can follow the instructions below:
Note: You will not lose your data, such as photos, videos, and documents. However, this will remove drivers, apps, and the settings you have applied to your computer.
Follow the first method to enable Safe Mode:
- Once you are in Safe Mode, click the Start Menu and type “Reset This PC.
- Open the settings and click “Get Started” to begin the process.

Clicking Get Started - Choose the “Keep My Files” option and then click on “Local Reinstall.
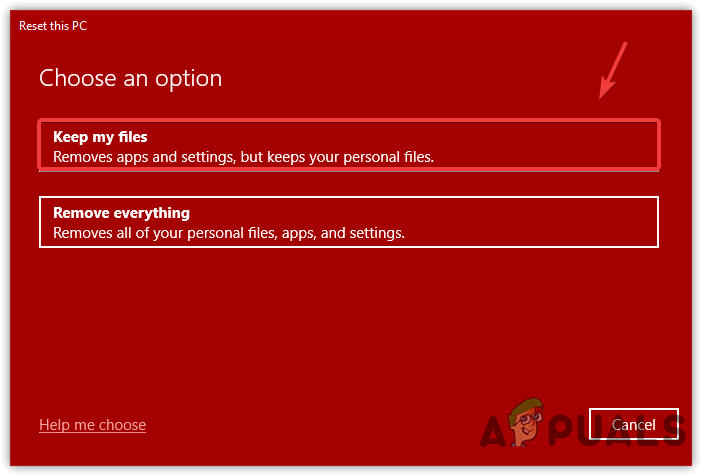
Selecting Keep My Files - Click ‘Next‘ and then click ‘Reset‘ to reset your computer.
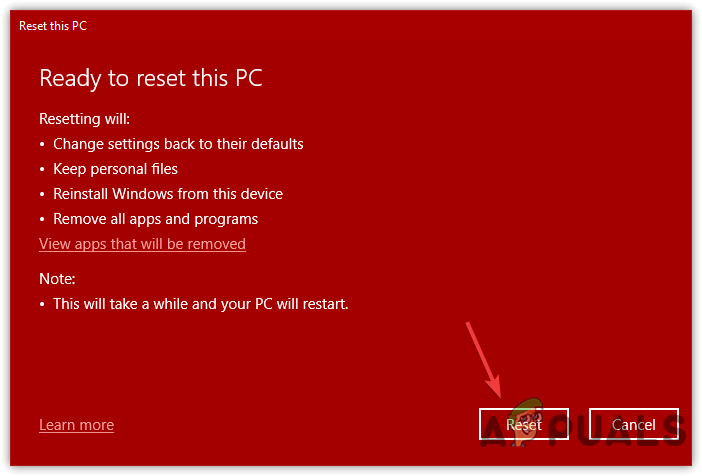
Resetting Windows